Master Guide to Cryptocurrencies
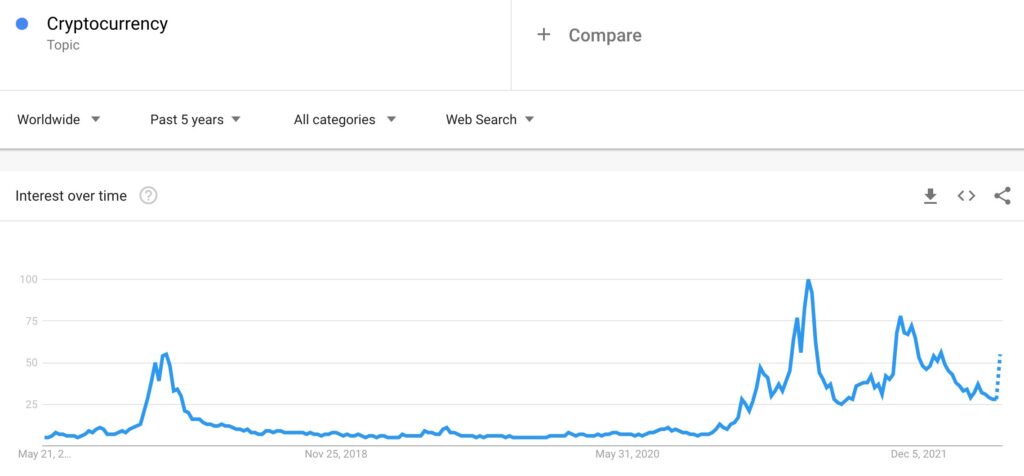
Cryptocurrencies is the new buzzing word in today’s world and millions of investors are looking at cryptocurrencies as their next investment opportunity. Below is a search trend of the word cryptocurrency for the last 5 years, and we can see from the below graph how the trend has improved from end of 2020, and it’s rising year on year. I am writing this blogs as many on my students asked me about cryptocurrencies, so here is a guide which will help you get a deeper perspective on cryptocurrencies. What is Cryptocurrency? Cryptocurrency is a decentralised digital currency which is build on blockchain technology. Cryptocurrencies don’t rely on banks to verify transactions, it’s a peer to peer system which allows anyone to send and receive payments through digital wallets. As of 2021, there are about 106 million investors who are using cryptocurrencies. Also, it’s estimated that by 2025, the blockchain market will grow by $39.17 billion How Does CryptoCurrency Work? The cryptocurrencies are created through a process called as mining which involves usage of specialised computer processors to solve mathematical puzzle. Cryptocurrencies are built on blockchain technology, which allows you to maintains the ledger when a crypto is moved from one wallet to another. What is Blockchain? A blockchain is a distributed ledger which records each and every transaction happening in the crypto space. Each transaction in the crypto space is checked using one of the following validation techniques: Proof of Work Proof of Stake Proof of Work Proof of Work is a process of verifying transactions on a blockchain in which an algorithm provides a mathematical problem that computers try to solve. Proof of Stake Proof of Stake is a process in which each user is limited in verifying transactions by the amount of cryptocurrency they’re willing to stake. Proof of Stake excludes mathematical problem solving process, so it’s more efficient that Proof of Work, allowing faster and smoother verification and confirmation times for transactions. What are the Important Terms used in Cryptocurrency Space? Decentralized: Decentralized means the currency is not backed by any central bank of any financial institution Wallet: It’s a place where you store your cryptocurrencies Exchange: Exchange is a place where you can buy and sell any cryptocurrency Distributed Ledger Technology (DLT): It’s a decentralised digital record, the records can be stored across multiple locations simultaneously. Blockchain also functions as DLT but it serves multiple purposes. What are Different Types of Cryptocurrencies? Bitcoin (BTC) The first one and the most popular one, Bitcoin was founded in 2009 by Satoshi Nakamoto. It is currently trading at $30,114 (as on 15th May 2022) Ethereum (ETH) Ethereum is the second popular cryptocurrency after Bitcon. Ethereum was developed in 2015, it’s commonly know as ETH and is currently trading at $2,078 (as on 15th May 2022) Tether (USDT) Tether is another cryptocurrency which was founded in 2014, it’s commonly know as USDT, and is currently trading at $1 Binance Coin (BNB) Binance Coin was developed in 2017, it’s commonly know as BNB, and is currently trading at $307.89 How to check Cryptocurrency Current Trading Price? There are multiple website through which you can check their current trading price which includes CoinMarketCap Weissratings Crypto.com What are different Crypto Exchanges? There are different crypto exchanges which you can use to do crypto trading including Coinbase Binance Crypto.com BlockFi Conclusion So crypto is an amazing space to be in but be careful as the volatility is very high, so you need to have deep understanding before investing into the crypto world or consult crypto advisors who can help you get started with your crypto investing journey.
Leveraging Dynamic Pricing Strategy to Drive Sales
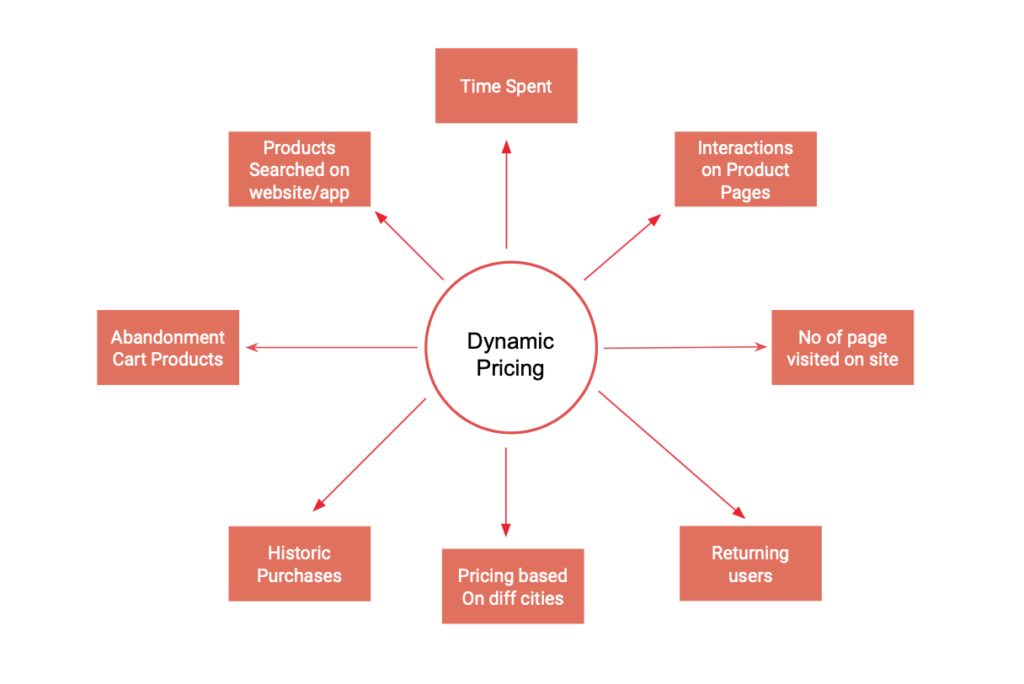
Dynamic pricing, is one of the effective strategies which online businesses are leveraging to drive customer acquisition. Dynamic pricing is often observed in Airline, Hospitality and Ecommerce industry. So let’s understanding what is dynamic pricing and how brands are leveraging it What is Dynamic Pricing? Dynamic pricing is a pricing tactic which changes dynamically on the website based on the users engagement with the website and the probability of them converting. This technique has been tried and tested in multiple industries and has proven effective to drive acquisition. Advantages of Dynamic Pricing? Improves Conversion Rates Dynamic pricing allows brands to improve customer rates, as the dynamic pricing is based on different logics, brands can offer different pricing based on the number of times the customer has visited the product page, time spent on the website, interactions happening on the page and if the customer has move in the customer Maximise Sales As dynamic pricing changes dynamically based on user behaviour the sales improve, for eg: When you try to book a flight from A location to B destination, let’s say you see the price is $100 and later when you visit the same flight, you would see that the flight price has increased to $105 or by some percent, so here the customer feels that if the price goes beyond $105 or whatever the new price is, it would be quite expensive, so the customer ends up booking the ticket Examples of Dynamic Pricing Here is an example of Flipkart, when I visited this product page, I saw the furniture prices as Rs, 26,499 ($341). I spend around 3 minutes reading the content including the features, offers, reviews and more on the page, and I exited the website. After 3 days I resisted the same product page and I found the pricing to be different as below Rs. 23,849 ($207) As I had spend decent time on the page when I had first visited, plus I resisted the page after 3 day, Flipkart showed me a lower pricing, because the data signals learnt that I am seriously interested in the product and if I see a lower pricing I might end up buying the product. So this how Flipkart, Amazon and other online businesses reduce or increase the price to drive action on their website. How to define Dynamic Pricing? So what are the different way or different scenarios in which you can define your dynamic pricing strategy There are different scenarios in which you can define dynamic pricing strategy which are as below Conclusion: Dynamic pricing should definitely be implemented if you are an Ecommerce, Airlines or a Hospitality Business. SAAS companies also try to push different pricing if they observe that you have tried their product (during free trial) and have effectively used. Dynamic pricing will help to improve conversion rate and also drive sales and an automated level.
Digital Marketing for Fractional Real Estate Investing Case Study

Real Estate Investing has been there for a while and we have seen a great participation by investors since a long time, but now fractional investment is the new trend, and these opportunities offered by multiple brands are allowing investors to invest in properties and earn higher returns. In this article we will discuss Digital Marketing case study of AssetMonk, a smart fractional real estate platform, which we marketed and generated 518% growth in FY 21-21 compared to last FY 20-21 Let’s first understand the concept What is fractional investment? Fractional investment is a type of property investment, in which the investor buys a fraction or a portion of the property, and receives fraction of the capital growth or rental yield. Benefits of Fractional Property Investment Higher Returns Fractional property investing allows investors to earn higher returns compared to mutual funds, fixed deposits, gold, saving, ppf etc Diversification By investing only in a fraction of a property you can invest into several assets and increase your portfolio Low Volatility The volatility is low and hence it becomes a lucrative choice for investors to invest in fractional property investment Our Digital Marketing Strategy to Drive Investor Acquisition In order to market a fractional property investment brand it’s important to understand the investor behaviour and aspects that influences their decisions. So we did a intense research to understand the investor behaviour and based on it defined the below strategy: 1. Awareness: Created awareness of the brand and product through teaser campaigns, below are references of ads done for one of the product awareness The Landing in Hyderabad This created a huge buzz about the product leading to greater visibility of the product and brand. 2. Engagement: Creating humour based content to educate about different aspects of fractional investing, how the brand helps investors and why they should choose fractional investing, few creatives as below 3. Acquisition: Our acquisition strategy included targeting investors who have interest in Mutual Funds, Investing, Stocks, Gold Investment and Real Estate investments. These investors were then targeted through different channels including Social Media, Search, Display & YouTube to drive acquisitions. We used different types of communication pieces which helped to convert investors in the funnel. Video ads were also pushed to drive visibility and consideration on YouTube and Social channels 4. PR Activation: Publishing multiple PR stories on different business websites about what the business does and what’s there for investors with AssetMonk Results: 518% growth in FY 21-21 compared to last FY 20-21 Marketing Cost less than 1%
Guide to Performance Max Campaigns
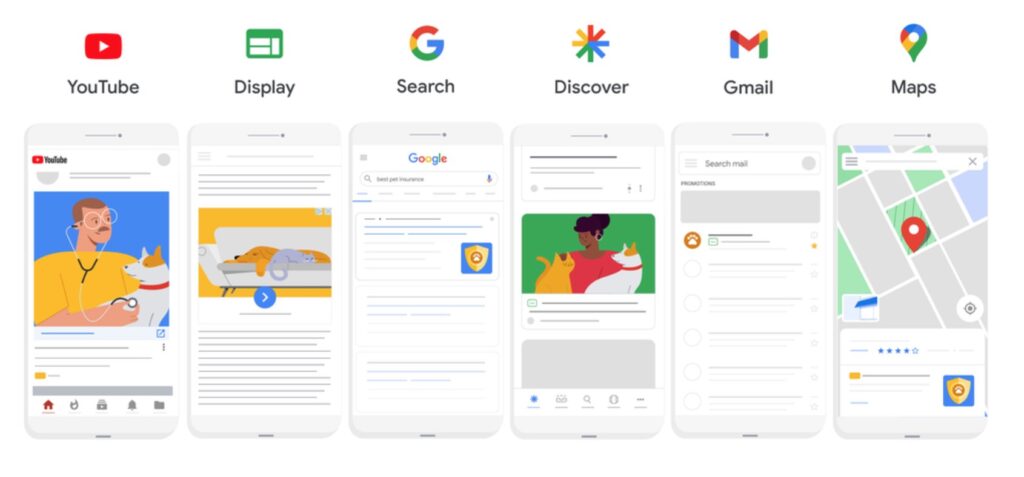
Google has recently launched Performance Max campaigns. Marketers can leverage this type of campaign to drive maximum traction for their business. This article will guide you about what is performance campaign, how they are different and how to create them. So let’s get started. What is a Performance Max Campaign? Performance max campaign is a type of a campaign in which Google automates the targeting and delivery of the campaign based on the audience signal defined by the advertiser. Through performance max campaign advertisers can reach audiences on below networks including Youtube, Display, Search Discovery, Gmail and Maps What are the benefits of Performance Max Campaign? Google machine learning algorithm is used to drive maximum value to advertisers from this campaign 1) Finds more converting customers As this campaign allows advertisers to target all types of networks across Google inventory, the algorithm identifies more customers who are relevant to your business 2) Maximum value from your budget The budget used in single campaign is optimised across different network to drive maximum value from your budget 3) Rich Insights From insights advertisers can learn which audiences and creatives are driving the performance 4) Saves Times As the campaign uses a single budget to target audiences across all Google network, advertisers can save lot of time managing & optimising multiple campaigns within their ad accounts How do Performance Max ads look? Performance Max ads will look the same they way they appear on Search, Display, Video, Shopping & Discovery How to create Performance Max campaign? Creating performance max campaign is quite easy, let’s understand step by step how to create performance max campaign. I am going to create performance campaign for a product which is a resort in hampi Step 1: Step 2: Next is to choose the objective, so I am selecting objective as sales as I want the campaign to be optimised for booking happening on the site Step 3: Next is to define goal, so I am defining purchases as the goal, because I have selected sales as my campaign objective To learn more about conversion tracking, do visit Conversion Tracking Guide Step 4: Next is to select the campaign type, here we need to select performance max campaign type Step 5: Now Define your campaign name, I have defined it as Hampi Performance max Step 6: Next is to define the budget for your campaign, I am defining Rs. 10,000 per day ($133 per day), I am running campaigns for this product and I know my CAC is Rs. 2,500 ($33), so keeping slightly higher budget for the campaign as it’s going to run across different networks on Google Step 7: Next step is to define bidding strategy, there are two bidding strategies to choose from conversions and conversions value. I am choosing conversions, as I want to drive conversions and optimise the campaign for conversions. Also, don’t set a target cost per action, let the algorithm run the ads on different channels, post a period of 12/14 days you will get a clarity to define the right CPA for the campaign Step 8: Next step is to define the location in which you would like to run ads. I have defined as Bengaluru, as I want to target users in this location Step 9: Next is to define language setting, by default it’s English, you can choose based on the audience you are targeting. I have defined English for my campaign Step 10: Next step is to define the final URL expansion. There are two options as you see in the below screenshot: Send traffic to most relevant URLs on your site: Won’t recommend this, as Google will auto select the URL for targeting Only send traffic to the URL’s you’ve provided: Any URLs from Merchant Center or business data feeds will be used in addition to final URLs in the asset group, so would recommend to go with this Step 11: The next step is to define ad schedule, start and end dates and campaign URL options, I am not discussing this as these are common settings in all types of campaigns, but do make sure you define the same before you move ahead Step 12: Next step is to define the asset group name, which you can define based on your campaign audience, I have defined as Resort in Hampi searches as I want to target users interested in Hampi resort Step 13: The next step is to define assets which is your ad copy for search, display, youtube, gmail and discovery ads. I have defined as below, you can define based on the assets you have to promote your business. Step 14: Next step is audience signal which is the important step in the campaign creation process. The set defines the targeting of your campaign which you give as a signal to Google, and based on this Google targets users on different networks available within Google inventory. So click on add an audience signal, if you already have an audience you can search from here and choose it. If you don’t have one, you can create a new one and select it as the audience signal . So I am clicking on new audience to create a new audience. Now from here define the audience name, and then use custom segment option if you already have an audience, if you don’t have create a new custom segment by clicking on the +new custom segment option I am creating a new one, my audience is for people who have searched for below keywords. Now say save and continue, you audience is defined Step 15: The last step is to define ad extensions. Once you have defined the ad extensions, publish the campaign. The campaign will go in review and will be live in sometime. Great you have setup you performance max campaign! Conclusion: Performance max campaign is a great way to set campaigns at an automation level and target all inventories and types of
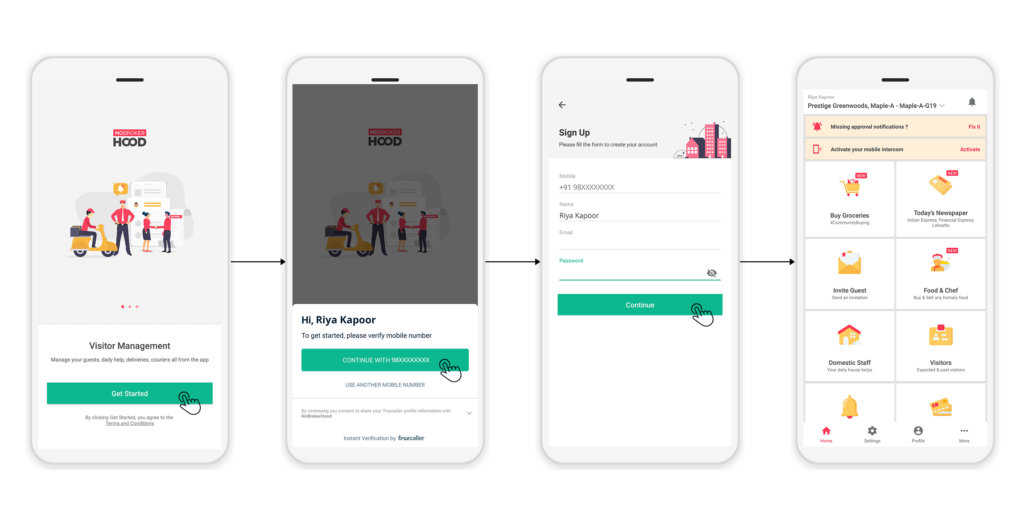
Guide to TrueCaller Advertising

TrueCaller was launched 11 years ago and is available across the world with multiple languages. TrueCaller has around 300 million active users as on November 2021, which brings in huge audience that can be targeted by advertisers to communicate their business, products and services. What is TrueCaller? TrueCaller is leading caller ID and spam blocking smartphone app. Apart from giving the name of the person calling, TrueCaller also allows you to find phone number by searching their name, wow how cool is that 🙂 Other features of TrueCaller includes: Messaging: You can directly send sms through TrueCaller, you can also chat within TrueCaller app Smart SMS: You can track upcoming bills, delivery status, recent bank transactions, PNR status and other important SMS. This feature is available in selected countries. Intelligent Dialer: This feature allows you identify the names of unknown numbers as you dial. Call Recording: You can save important call recordings. Because of these interesting features the user base is just growing and advertisers are finding it very effective to reach a wider audience. How to Advertise on TrueCaller? Let’s understand step by step, how to advertise on TrueCaller. Step 1: In order to advertise on Truecaller, you need to visit ads manager.truecaller.com Once you visit, you will see the screen below, now sign up for a free account Once you have signed up, you will see the screen as below Step 2: Let’s take an example to create a campaign. I am taking an example of promoting R Academy’s Digital Marketing course on TrueCaller for Mumbai region To start with click on the create an ad blue button (in the above screenshot) Once you click on create an ad, you will see the below screen, where you need to enter the name of the campaign, I have entered as Digital Marketing Course Mumbai as I want to promote in Mumbai, and then select the ad product, which is Native Ads Step 3: The next step is to define the budget. You can either setup your budget or setup number of impressions which you would like to receive. You should always go with budget, to have a better control over the campaign. The pricing model setup in TrueCaller is CPM, you can see fixed Rs. 25 is set as the CPM Once the next step is to setup the start date and end date, you can setup the start date and end date, just make sure you run the campaign for minimum of 3 weeks if you are using no targeting, run 4 weeks if you are using minimal targeting and 6 weeks+ if you are using detail targeting. Step 4: Next step is TrueCaller ads targeting, this is the important step where you defined which users are to be targeted for ads. Let’s understand each of them. Category: With this option you can targeting users who are interested in different categories, these categories include business, communication, entertainment, finance, food, drink, music, news productivity, shopping & social. Offcourse these categories are very broad for targeting, but these are the only options to go with. I have selected business & communication, as I feel these are the closet ones for my course. Carrier: Carrier allows you to target users with of a specific carrier including Aircel, Airtel, BSNL, Idea, Jio, Jio 4G, Reliance, Reliance Jio and Vodafone. Obviously your target audience could be using any service provider, so you can skip this step Gender: Allows you to target Male & Female Operating System: Operating system allows you to target iOS & Android users, again your audience can be on both the platforms, so I am again not selecting any operating system Step 5: The next step is to define the location in which you would like to target your ads, I have defined as Mumbai, you can select based on your requirement Next is to define day & time, this allows you to showcase ads on specific days for specific time. I am not adding any time window as I want to target users for all days Next is frequency capping, frequency capping allows you to control number of impressions per day, I have defined as 10 impressions per day
Master Guide To Setup Your Store on Shopify
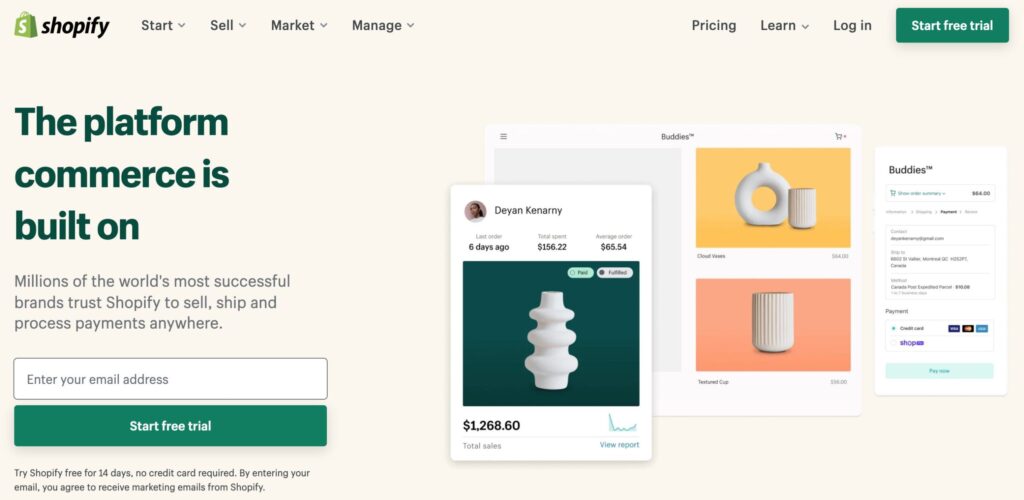
Shopify is the most popular ecommerce platform to create your online store. Around 2,297 million websites are today on Shopify, it offers a lot of customisations to create your store within minutes. If you are a startup or you are looking to test your idea, Shopify is the platform to go with, you can do most of the website setup yourself without having website development knowledge. And believe me, you can create your online store on Shopify free, plus there is a 14 days free trial to explore the platform. So let’s understand in detail how you can set up an online store with Shopify. What is Shopify? Shopify is a software as a service platform, through which you can build websites for ecommerce. It has free and paid themes through which you can select different design templates for your store. More importantly, on Shopify app store there are multiple apps which you can use to create different features within your store eg: Loyalty program, Subscription payments, Social Proof, Personalisation and more. Below are few examples of websites which are built on Shopify SKYN UK Made In Earth US Made in Earth AU Step 1: Defining website structure Before you start on shopify, you need to first define the structure of your website, eg: What are the options on the main menu, what are the categories within the site, blogs and so on. Let’s take an example of a Jewelry store to understand this. If I am creating a Jewellery store online, my website structure would look something like this. Under shop I have different categories including Rings, Pendants and Earrings. In future if I need to add additional categories like Necklace, Chains and Bracelets, I can still add Defining the website structure is important at the initial level, because that also defines the user journey on the website.
Guide To ShareChat Advertising
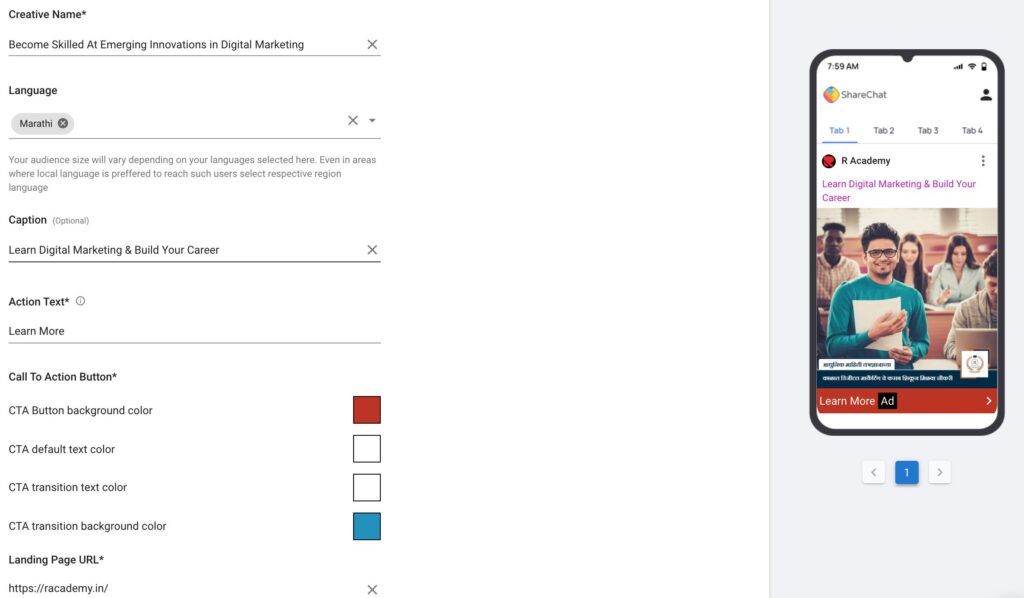
ShareChat is a social networking app with 15 languages, and has around 160 mn users from tier 2 & tier 3 cities of India. ShareChat offers advantage to advertisers to reach out to a wider audience beyond Facebook & Instagram. So let’s understand how we can leverage ShareChat to drive visibility, create engagement and drive conversions for a brand. In order to run ads on ShareChat, visit ads.sharechat.com, and create your account, by adding details related to your business. Once you have created an account, you will view a dashboard like this You can complete the profile if it’s incomplete or complete it latter. Further you can also get ad credits you you add money in your ShareChat wallet Let’s now understand step by step, how to create an ad campaign on ShareChat Step 1: Click on the create campaign button to start, you will now view a dashboard like this Step 2: Now define the name of the campaign and select the objective of the campaign. Here I am taking a example of creating a campaign for a Digital Marketing course of R Academy, so I am naming the campaign as Digital Marketing Course and selecting the objective as consideration. You will select awareness when you would like to create awareness about the product/business you are marketing. Consideration to be selected, when you want customers to visit your website/landing page and take action. The third option which is conversion is still not available. So I have selected consideration, as I want customers to visit my website R Academy and take action on the website. Step 3: Next step is to select the ad format, there are 3 types of ad formats which you can choose from 1) Native in-feed Display – This will allow you to place your ad in the news feed of the users 2) Native in-feed Video – This is a video format which will allow you to place your ad on “Video Trending” and “Video suggestion” feeds 3) Interstitial – This format is currently unavailable, but once it’s available, advertisers can use this to run ads as interactive full-screen ads that will appear when a user exists the app, it will cover full screen I am selecting Native in-feed Display and moving ahead. Step 4: The next step is to set up the budget & schedule. The pricing model is set to default as cost per click because I have selected campaign objective as consideration Now set the daily budget, how much you want to spend and CPC for your campaign. I have defined Rs. 1000 and CPC as 10 Now set up the schedule with the start date and end date. I have kept the campaign to run immediately and continuously. You can also apply time band by choosing the option “Apply campaign include time band” Step 5: Next step is to define creative rotation. I have kept it as click based because I want the performing creative to be showed more often. Post that you need to define frequency cap, I have kept 3 impressions per day, you can define frequency with respect to how much you want to be aggressive on advertising. Step 6: Now you need to define the target audience, here you need to define the age and of your target audience, further you need to define in which geography you would like to show your ads in, I have selected as below. Step 7: This is the most important step where you define the detailed targeting through ShareChat, it allows to audiences who would be interested in your product/business/service. So let’s look at each option Telcos: These are telecom service providers like Airtel, JIO, Vodafone etc. If you select a specific telecom service provider, users who are using their services will get targeted. This targeting is very broad, because our customers can use any telecom service, so you can skip this. So in what scenarios you can use this option, if you are Airtel and you want to market to JIO service providers to switch to Airtel, in that case you can use this. Device Manufacturer: Here you can choose from Samsung, VIVO, Oneplus, Sony etc. Again your target audience could be using any device, so this doesn’t make sense to choose, I am moving ahead Maximum Device Age & Maximum Device Age: Again this is irrelevant unless you are selling mobile phone, it won’t make sense if you are providing education service, ecommerce products or hospitality services. City Tiers: You can choose from Tier 1, 2 & 3. As I have targeted Mumbai, I am not selecting any option because I want to target all users in Mumbai matching other targeting options defined below. You can select basis your audience. Network Speed: It has options including high, low and medium. Again this is only applicable if you are providing data services, but not applicable for promoting most of the products & services, so I am skipping this Device Price Buckets: This is again applicable if you are selling mobile phones or your want to target a premium audience by selecting device price bucket as high Now comes the 2 most important targeting options, in market category and content affinity. In Market Category: In market category is the audience which share chat has which is consuming content related to what you select. For eg: I have selected education, educational, business and strategy, so users who are consuming content pieces related to these categories will see my ad. Offcourse the targeting is very broad here, because I am promoting a digital marketing course, and few users might be consuming content related to JEE or NEET, so there is not way that I can target users who would be more closer to digital marketing. You can also select the categories which you feel your audience would be relevant to. Content Affinity: Content affinity is the audience who has interest in a particular topic. So in my campaign example, I have selected
Guide To TrueCaller Advertising
Guide To Facebook Lookalike Audiences

Facebook lookalike also known as similar audience is one the interesting targeting options on Facebook/Instagram advertising. Facebook has around 2 billion daily active users, so targeting the right audience becomes an important aspect to drive value from the media investments you are making. Furthermore, finding the right audience on Facebook network becomes an integral part of your strategy, and that’s when lookalike audiences comes into picture. What is Facebook Lookalike Audience? Facebook/Instagram lookalike audiences are a segmentation tool that helps to discover new users whose demographics and interests are similar to those of your customers. It discovers audiences based on different parameters including website visitors, app users, engaged users and converted users. Value of Facebook lookalike audience Lookalike audiences improve reach, engagement and conversion for your marketing campaigns, which in simple words improves brand visibility and revenue. How to Create Facebook lookalike audience In order to create Facebook lookalike audience, visit your Facebook business manager account and then click on audiences as below. Once you click on audiences, you will land on the below screen, now click on create audience blue button and then click lookalike audience. Further once you click a popup would appear as below Now select the source from the first option or say create a new source as below. As we need to have a base to create lookalike audience, we are first going to create an audience and then create lookalike audience of it. Once you click custom audience, below screen will appear. From here you can create a custom audience, I have already discussed Facebook custom audience in this article earlier Facebook Custom Audience In this article I am going to create custom audience for Facebook users who have engaged with my Digital Bharat Page (R Academy), and then create a lookalike of this to find more users who would engage with Digital Bharat page. So once I click the Facebook page option under Facebook sources, below screen will appear. Now select the page from the page option and then select the event from the events option. As I want to create a custom audience of engaged users, I am going to select 2nd option. You can select option based on your requirement. Next is to define the name of the audience. I have defined as Digital Bharat Engaged Users (this is for our internal reference, as we would create multiple lists, and it would be easy for us to know what the list stands for) Now say create audience. Once you click below screen will appear which will now allow you to create lookalike audience. Now click on the first option create lookalike audience. Once you click below screen will appear, where you will see the lookalike source (as we have created a custom audience, the source is automatically selected). Now select the location, I have selected India as country, you can select a specific geography with respect to the region you want to target. City level location selection is not available while creating lookalike audience. Now select the audience size, which is the number of lookalike audiences you want to create. I have selected 1, as I only want to create 1. Further, you will see a range from 0% to 10% to select. Select 1% because the broader the range the broader the audience, as we most similar audience, so we are selecting 1%. You will now see estimated reach at the bottom and then say create audience. Now the audience is created and you will be able to view it under audiences as below Conclusion: Facebook/Instagram lookalike audience is a powerful technique to drive reach, engagement and customer acquisition. The efficacy depends upon what kind of custom audiences you are creating and how you are testing these audiences. Also, it’s important to create differential communication to these audiences so that the users are influenced towards getting into the funnel.
Understanding Customer Adoption


