Guide To Terminologies Used in Digital Marketing
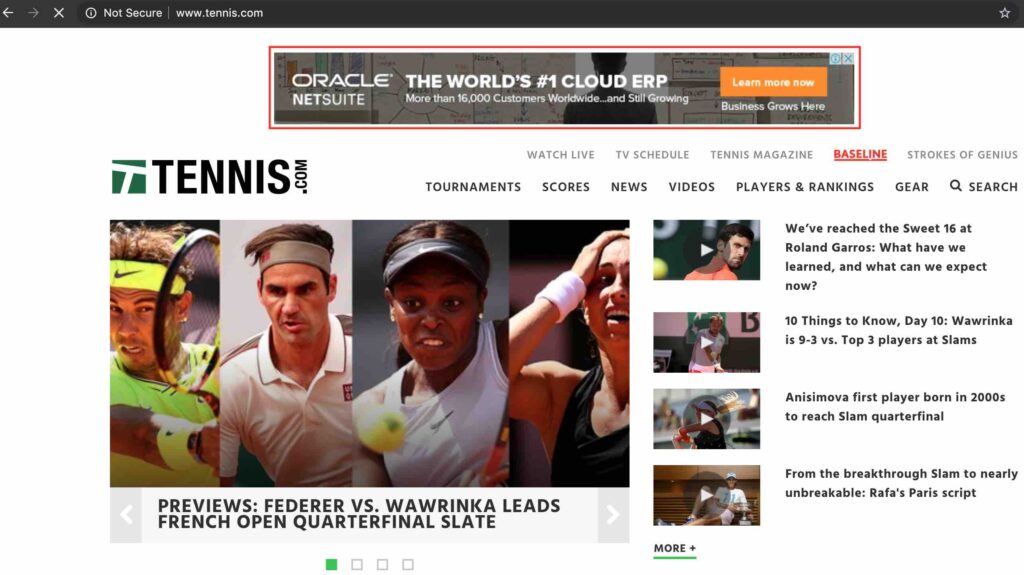
If you are new to Digital Marketing, it is important for you to understand the common terms used in Digital Marketing. These terms are widely used across digital domain including Search, Display, Social, Email etc. So let’s understand Terminologies Used in Digital Marketing in detail! Advertiser An advertiser is someone who is advertising or spending money to promote his products or services on Digital media. Eg: In the example below, you can see, Oracle is advertising on Tennis.com website. So in this scenario Oracle is an advertiser Take the Introductory Digital Marketing Free Course by Rahul Gadekar Publisher A publisher is someone who is serving advertiser’s ad on his website. Publishers are content based websites who’s revenue model is advertising. Few examples of publishers include ndtv.com, toi.com etc. In the example below, Tennis.com is the publisher. Impression Impression is when an ad is triggered on a website. When an ad is triggered once, it would be called as 1 impression. If it has been triggered 10 times, then it would be called as 10 impressions. CPM (Cost Per Thousand) CPM is called as cost per thousand (M is the roman numeral for 1000). CPM is the amount an advertiser pays for 1000 impressions of an ad. For Eg: if a publisher charges $15 CPM, and you ad is shown around 5000 times, then you would pay $15×5, which is $75. CPM model is used by advertisers when they want to create awareness about their brand/product/service, where visibility is more important than clicks or leads or sales. CPC (Cost Per Click) CPC is called as cost per click, it is the same as pay per click. CPC is when an advertiser pays basis clicks, in this scenario the impressions don’t matter. For Eg: If your ad is shown 5000 and you receive 100 clicks, where the Avg CPC is $2, then the total cost you pay is $100 x2, which is $200. The CPC is defined on real time basis and different from keyword to keyword or publisher to publisher. CTR (Click Through Rate) CTR is click through rate, which is the percentage of clicks received depending on the no of times the ad was shown. CTR is one of the important terms in Digital Marketing because the more the users you drive to the website, the more the chances of sales/conversions/ Eg: If your ad is shown 1000 times and you receive 100 clicks, then the CTR is 10% Advanced Google Adwords Course by Rahul Gadekar – Access Now Conversions Conversions in digital is an action taken by a user on the website, the action could be filling up a form, purchasing a product, subscribing to the newsletter etc. In order to measure conversions it is important to setup conversion tracking. Every advertising platform has a separate code which has to be placed on the thank you page of the website. To understand how to setup conversion tracking in Google Ads, refer article – Google Ads Conversion Guide Conversion Rate Conversion rate is the percentage of clicks converted received on the ad. For Eg: if you have received 100 clicks and 5 users have filled up the form, then the conversion rate is 5%. Advertisers spend a lot of time optimizing their landing pages and their ad communication strategy to improve conversion rates. CPA (Cost Per Acquisition) Cost per acquisition (CPA) is the cost spent to acquire one lead or purchase. Eg: If you have spend $500 and have received 10 conversions, then the CPA is 50 CTA (Call to Action) CTA is a call to action, which is an element placed on the website, which guides users to take specific action. For Eg: Book Now, Buy Now, Apply Now etc, it is usually a text on a button on the website or a display banner ad. Ad Copy Ad copy in digital is the ad format with the message which you are advertising. Eg: Any ad on publisher website will be called as ad copy Landing Page Landing page is the page on which the user lands after clicking the ad or search result organic link. Final URL Final URL is also called as the destination URL or the landing page URL. It is the webpage on which the user lands after clicking a particular link on search or clicking an ad copy CPV (Cost Per View) Cost per view is the amount an advertiser pays for a particular view. The cost will depend on publisher basis real time bidding. View Rate View rate is the percentage of users who have viewed the video depending on the no of times the video impressions served. For Eg: 100 impressions appear for a video and only 10 views are recorded, this means that the view rate is 10% Engagement Engagement is when a user either likes or comments or shares a particular post/content piece. Eg: On a particular facebook post, there are 50 likes, 5 comments and 2 shares, in this case the total engagement is 57 Engagement Rate Engagement rate is the percentage of people engaged with your content. Eg: You have 1000 users on your page, and around 100 people are engaged with your content, then the engagement rate of the page is 10% Banner Ad Banner ad is an image ad which is used on display network. This ad consists of image and text. Few advertisers also try to run banner ads with GIFs to engage with your audience. Crawler A crawler is an automated program used by search engines or publishers to crawl the website content. The crawler scans the webpage content which can be used to show results, display content in one place etc. Every search engine has a crawler eg: Google, Bing, Yahoo etc. Crawlers are also called as “robots” or “spiders” or “bots”. Google’s search engine crawler is called as bot Indexing Indexing is saving the content in the database. Once the crawler crawls the content, the content has to be
An Ultimate Guide to Google Shopping Ads & How To Create Them
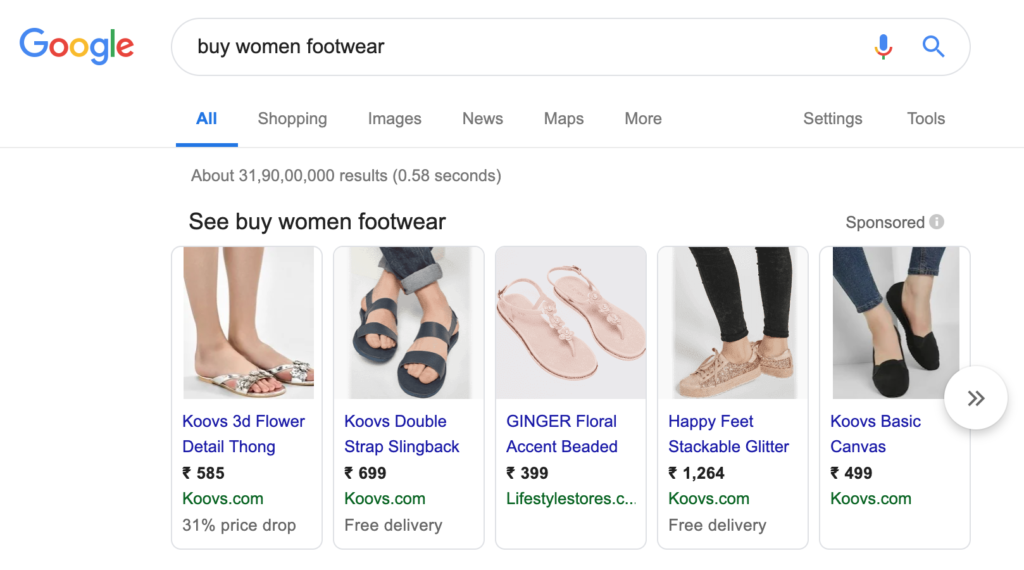
More than 50% of the Digital Marketing budgets by retailers are defined to shopping campaigns. Shopping campaigns are very effective for ecommerce website to convert searches on Google. If you have an ecommerce website, shopping ads should be the first priority for promoting your products on Google Search. In this article, you will understand what are shopping ads and also learn to create high ROI shopping campaigns for your online store. So let’s get started! What are Shopping Ads? Shopping ads are ads which appear on Google Search with an image, below is how shopping ads look like on Google Search. Google Shopping Ads are also called as product listing ads (PLAs). According to Google, you can only advertise products which can be delivered at a doorstep. For Eg: If you are a home tutor and you want to market your services on Google Shopping, in that case you won’t be allowed to advertise on Google shopping, as home tutor is considered as a service and not a product. Shopping ads are very effective as they show image, product name and price on the ad copy itself. So How to Setup Shopping Ads? In order to set up shopping ads, the first thing you need to setup is the Google Merchant Center Account. So what is Google Merchant Center Account? Google Merchant Center account is an account where you add all your product details including price, size, color, landing page link, title, description etc. Merchant Center Account is a separate account which is outside Google Ads/Adwords. You need to create a merchant center account to start with. So let’s create a merchant centre account and then create Google Shopping Ads campaign. Step 1: Go to https://merchants.google.com/Signup and create a Google Merchant Center Account. I am going to take an example of a business and help you understand how to create merchant center and shopping ads. So I am talking an example of an ecommerce store which is called La Marca, it focuses on women footwear and purses. So, once you click on signup, you need to select the country where the business is based. I have selected India as the business is in India. If your business is in India but you want to market in another country like US, then also I will select India as the country. Next is to define what’s the name of your store. You can define the name of store as the brand name of your store. Then define the website URL, which is the domain name of your website. Step 2: Once you have created merchant center account, you will enter the account. Once you enter the account, click on product, feed & then click on plus blue button to create a feed So What is a product feed in Google Merchants Account? Products feed is where you add all information of your products including price, color, size, gender, title, description etc. Step 3: Once you click on the plus blue button, you will view the below screen. Select country basis the country in which you would like to market. Next select the language basis the country language or you can go with default english language. Next is destinations, in this select display and shopping both because, you can use the same feed for display campaigns also in the future. Step 4: The next step is to define the feed name and to choose how you want to connect your data feed and connect your data to merchant center. There are 4 options to choose from, to setup data feed: Google Sheets Scheduled Fetch Upload Content API Google Sheets – With the use of Google sheets you can list all your products which can be automatically applied to your account. Scheduled Fetch – Through schedule fetch you will have to host a file on your website that contain details of your products, this can be fetched on regular basis. Upload – With upload option, you can upload a file which is on your system. This file has to be regularly updated with the help of FTP, SFTP, Google Storage or with manual upload process. If you are not familiar with FTP, SFTP etc, you would need to connect with a developer to do so. Content API – The last option is content API. In this option you can upload the product sheet through content API. From the above 4 options, the best option to go with is Google Sheets, as you can add all the product details in the sheet itself. But if you are having a large inventory of products then you can go with Content API Eg: Amazon, Flipkart etc. I am going with Google Sheets as I have around 100 products on the website. Step 4: Once you click next, after clicking Google sheets, it will take you to Google Sheets where you need to add the below options: ID Title Description Link Condition Price Availability Image Link GTIN MPN Brand Google Product Category Let’s Understand Each one of them Field Description id It is the ID defined by the online store owner title It is the title of the product. Ideal practice is to add the name of the product description It is the description of the product. You should add all the details about the product. Description is very important because shopping ads don’t have keywords in it, the ads will trigger basis the description content in your product feed. link Link is the landing page link of the product page image_link Image link is the image link of the product. Google shows the image on Google search basis this link (you don’t have to manually add images) condition Condition of the product which includes new, used or refurbished price It is the selling price of the product. Make sure you use the selling price which is after discount availability Whether the product is in stock or out of stock brand It is the name of the brand. For Eg: If
Ultimate Guide To Remarking Lists For Search Ads (RLSAs)

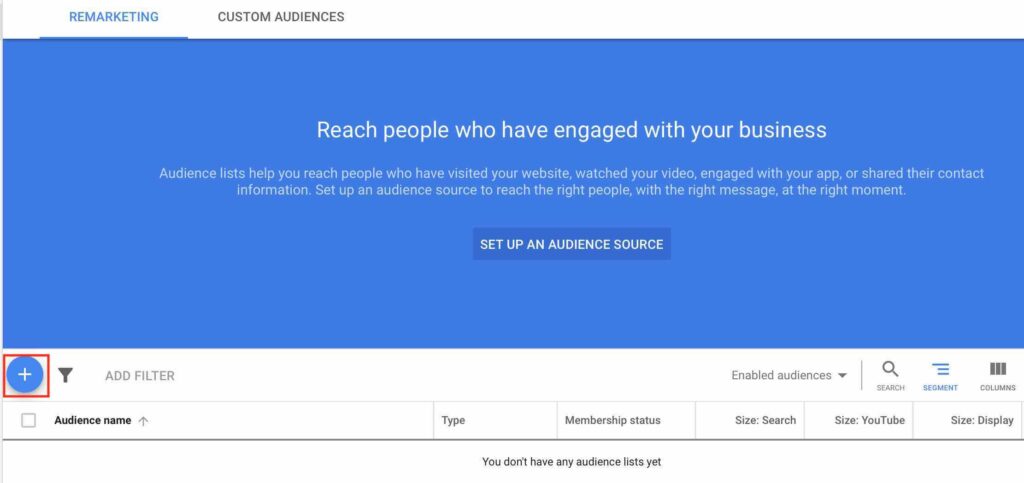
As we know that Remarketing is one of the effective ways to increase conversions by showing ads to users who have visited your website. We have seen Display Remarketing in our previous article (Refer here – Display Remarketing Campaign) which focused on showing ads to users who visited our website on Google Display Network. Today we are going to look at remarketing on search network. This guide will help you understand What is RLSA, benefits of RLSA, how it works and how to create RLSA ads in Google Ads. RLSA is also known as Remarketing Lists for Search Ads! So What are Remarketing Lists for Search Ads (RLSAs)? Remarketing Lists for Search Ads (RLSA) is a Google Ads feature which allows you to remarket users on Google Search network to users who have previously visited your site. So How Does Remarketing Lists for Search Ads (RLSAs) Work ? Let’s say you are marketing a real estate residential project in balewadi (Pune, India). The user has visited your website and is still searching on Google with different combinations of keywords matching “properties in balewadi”, your ads will be shown to them with the audiences lists defined in the RLSA campaign. So what is actually happening in the RLSA process? A cookie is dropped on the users browser once the user visits the website which has a remarketing code The user again goes back to Google Search and searches for a similar term which is related to the business he/she visited Basis the audience list used by the advertiser, the user is able to see the search ad, which is a remarketing search ad So How To Create Remarketing Lists for Search Ads? Here is a step by step guide to create Remarketing Lists for Search Ads (RLSAs) Let’s get started! Step 1: Login to your Google Ads account – Login Step 2: The first step in remarketing is to add a remarketing code and add it on the header of the website. The remarketing code in Google ads in part of the conversion code, to understand the setup process for remarketing code, refer article – Google Ads Conversion Tracking Guide (the code which has to be added in the header of the website, acts as the remarketing code). Always remember, once you add the code, users who visit your website from that day, will be a part of the RLSA. Step 3: Once you have added the remarketing code on your website, the next step is to go to audience manager, which is in tools, under shared library. Follow the screenshot as below Step 4: Once you click on audience manager, click on the plus blue button to create a new remarketing list (if you have already created a list, you can use this same). I am creating a new one because I want to show you from the beginning. Remarketing lists is also called as audience lists in Google Ads. Once you click the blue button, you will see below 5 options including Website Visitors, App Users, YouTube users, YouTube Users, Customer List & Custom Combination. We have discussed this in our regular display remarketing campaign, you can follow the same here to know more – Display Remarketing Campaign Right now, I am going with website visitors, as my objective is to remarket users who have visited the website and are still searching for my business. Now let’s take an example of a brand who wants to create a RLSA campaign and understand how to set up RLSA. So here I am taking an example of a brand who have a real estate project in balewadi (Pune, India) and wants to remarket users who are still searching for similar set of keywords on Google search. Step 5: Once you have selected website visitors, the next step is to define the remarketing lists name. So I am defining the name as below Step 6: The next step in the process is to define list members who you want to add to the list which you are creating. In Google Ads, you have 5 options to choose from list members option as below Visitors of a Page Visitors of a page who also visited another page Visitors of a page who did not visit another page Visitors of a page during specific dates Visitors of a page with specific tags To understand each option in detail, refer step no 6 of article Google Display Remarketing Campaign For this campaign, I am going with the third option which is “Visitors of a page who did not visit another page”. I am going with this option because I want users to remarket who have not filled up enquiry form on the website. So below is how I have setup the options post selecting list members. Visited Page is the page which is my landing page. Unvisited Page is the page which is the Thank You page. Step 8 The next step is to setup the initial list size. In this step, if you go with Include people from the past 30 days, then Google will try to add visitors from previous 30 days to your list. You can go with this option as you are starting from today, so the visitors will start adding to your list from today and Google will try to include visitors from previous 30 days. Step 9 The next option is to select membership duration. Membership duration is the no of days for which you would like to remarket users on search. I have kept 60 days because, buying a property is a high involvement product and it takes time to make decisions, hence keeping it 60 days to remarket. Step 10 The next step is description, which is optional. This is to describe the list in detail so that if multiple users are using your ads account, then it would be easy for them to understand in detail. I am keeping it blank as there are few
Master Guide To Using UTM Parameters

In today’s scenario of Digital Marketing, marketers use different channels, platforms,devices, campaigns etc to drive leads/sales for businesses. It is important for marketers to know which channels, platforms, campaigns etc are performing for their business, so that they further define their marketing strategy on Digital. UTM parameters can help you in measuring each of this! In this article we will discuss about UTM parameters, their benefits, setting up UTM parameters & measuring the effectiveness for your campaigns. So What are UTM Parameters? UTM (Urchin Tracking Modules) Parameters, also known as UTM tags, are custom tags/codes added to your web page URL in order to track source, campaign name, medium, device, keyword etc which helps you to measure the effectiveness of your marketing efforts. The tracking can be viewed in Google Analytics or you can also use third party softwares/CRMs/LMS to capture the data as required for your online marketing efforts. UTM (Urchin Tracking Modules) was acquired by Google in 2005 which laid the foundation to develop a product called as Google Analytics. Below is an example of a URL with UTM parameters http://www.rinteractives.com/blog/en/what-is-dynamic-creative-optimisation-dco/?utm_source=facebook&utm_medium=social&utm_campaign=dco There are 5 components to a URL when you add UTM parameters, which are as below: The Protocol: Http or Https, which indicates the framework used to transmit data between server and browser. URL’s ending with an “s” indicate that these URL’s are secured for data transfer, to get https URL, you need to have an SSL certificate which can be bought from Godaddy or Bigrock Eg: In my case of the above URL, http is the protocol here Host: Host is nothing but the domain name of the website address. It also consists of subdomains, top level domains with country codes. Eg: In my case of the above URL, www.rinteractives.com is the host here Path: Path is the specific web page of your website, which should open once a user clicks on the link. Eg: In my case of the above URL, “blog/en/what-is-dynamic-creative-optimisation-dco” is the path Parameters: Parameters are also called as query string. They are preceded by a question mark, which are customizable and can be used for effective tracking and identifying the users. Parameters are the ones who send the information to the servers, which then helps us to understand which campaigns are driving results. Eg: In my case of the above URL, “utm_source=facebook&utm_medium=social&utm_campaign=dco” are the parameters which I have added to the URL Fragment The last part is a fragment which is preceded by hash symbol #. By adding #, the users automatically reaches to a particular section of a webpage. I have not added fragment, as I don’t have users to scroll to any specific section of my web page As we have understood different components of the URL once we add the utm tags, now let’s understand different types of UTM parameters Different Types of UTM Parameters There are 5 types of UTM parameters which are commonly used as below: Campaign Name (utm_campaign): It is the name of the campaign which you are using on different advertising platforms. In the above example, I have added campaign as dco, which you can see. Campaign Source (utm_source): It is the source from where the traffic is getting generated. Example: Google, Facebook, Twitter, Bing etc Campaign Medium (utm_medium): This is the marketing medium of your content. Eg: paid, organic, social, email etc Campaign Keyword/Term (utm_term): This is for search advertising when you want to track the exact keyword which generated sale/lead. You can also track the matchtype used for a particular keyword which generated a sale/lead. This is quite effective while measuring keyword level data for your campaigns Example: utm_term:dco, utm_term:dynamic_creatives Campaign Content (utm_content): It is subset of utm_campaign, you can try different content pieces for a particular campaign and understand which one is performing. In other words, it can be used for A/B testing of different aspects from the same campaign. Example: utm_content=features, utm_content=price Lets now build UTM tag for a URL So How To Build UTM Parameters for a URL? You can build UTM parameters for a URL with different tools. One of the popular one is by Google called as Campaign URL Builder. I am going to show you now, how to build your URL with different UTM parameters using Campaign URL Builder. So lets go for it. Step 1: Go to campaign URL builder – Click here Step 2: Once you go to Campaign URL builder. Add the webpage url for which you want to build utm parameters. I have added a url as per below screenshot. Next is to add campaign source. I have added Google, as I would be using the URL in Google Next is to add campaign medium. I have added CPC, as I am using this for Google Ads Next is to add campaign name. I have added campaign name as DCO, as it’s the name of my Google Ads campaign Next is to define campaign term. I have added Dynamic Creative Optimization as I am using this term in my Google Search Ads campaign. Once you have added all the parameters, automatically a URL is build with the UTM parameters, have a look at the bottom of the screenshot. Now I can use this URL in my ad copy of search ads and start tracking once I start receiving clicks. You can similarly create, different URLs for different sources, mediums, campaign etc and start using for your online marketing campaigns. For Eg: I have created multiple links for different sources and mediums, have a look below: http://www.rinteractives.com/blog/en/what-is-dynamic-creative-optimisation-dco/?utm_source=facebook&utm_medium=social&utm_campaign=dco&utm_content=cases http://www.rinteractives.com/blog/en/what-is-dynamic-creative-optimisation-dco/?utm_source=twitter&utm_medium=social&utm_campaign=dco&utm_content=benefits And so on …. So How To Setup UTM Parameters in Google Ads? Once you have built your UTM parameters, you would like to add them to Google Ads, so lets set it up. Step 1: Login in to your Google Ads Account – Login Step 2: Go to any campaign which you have created, and click on the settings option on the left hand side as below. Once you click on settings, you will
An Ultimate Guide To YouTube Advertising
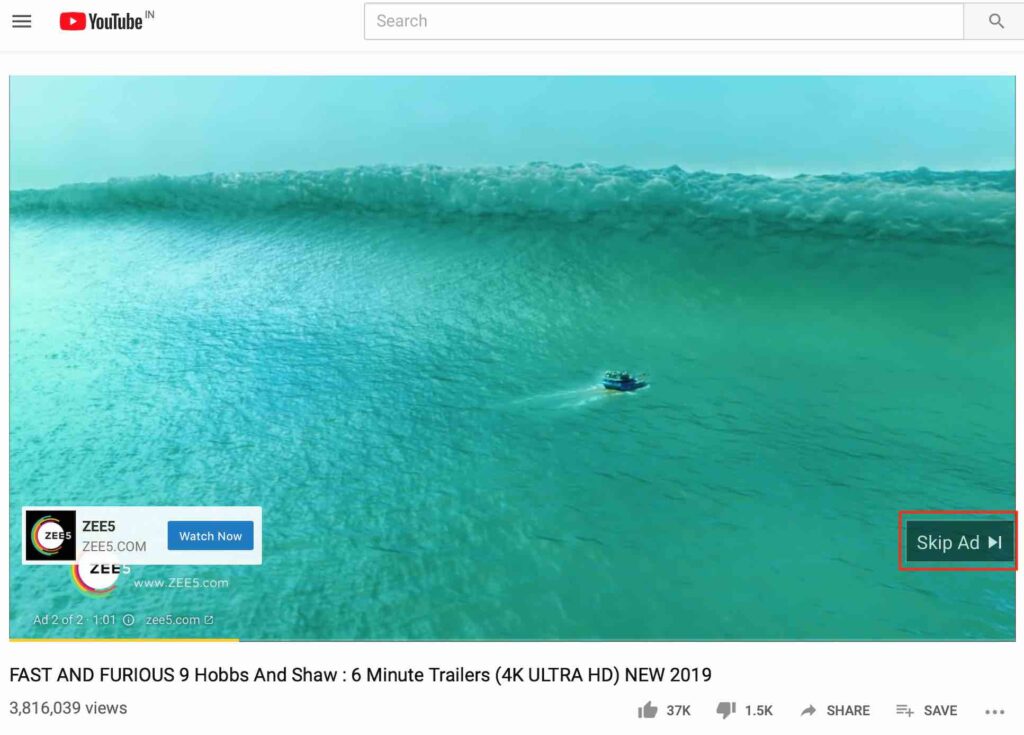
YouTube is one of the popular video advertising channels in Digital Marketing. YouTube has over 1.9 billion users logged in users every month, which is almost one third of the internet population. YouTube is available in 91 countries and 80 languages. Mobile devices contributes to around 70% of YouTube watchtime. YouTube is a highly effective platform to reach massive audiences helping creating awareness & brand recall. Lot of artists, singers, musicians etc see YouTube as a channel to launch themselves Eg: Justin Bieber was discovered through YouTube. Content creators also see a huge opportunity to monetize their content through YouTube and have become top influencers in different verticals through YouTube channels. Eg: Ryan Toys Reviews, Logan Paul, PewDiePie, Jeffree Star etc. It is important to increase engagement of your YouTube Channel or YouTube Video, the content has to be impactful. Content creation activity needs to be thought with a deep dive approach, which then drives engagement.The content should align with the brands thought or the youtube channel content category and should be engaging. I would say, content creation is more a creative exercise than a marketing exercise. In this article we are going to look at different format of YouTube ads and how to create them. So let’s get started! Different Types of YouTube Ads: All Youtube ads are run through Google Ads platform, Google offers different types of advertising options on YouTube which are as below, basis your objective you can choose which one to go with: Skippable YouTube Video Ads Skippable video ads are ads which appear before, during or after the video.Skippable video ads allows users to skip the ad after 5secs. Skippable ads are available for Mobiles, Desktops, TV & Game Consoles Skippable ads are one of the very popular ads which advertisers use while running ads on YouTube as they allow users to skip if they don’t want to view the video. Below is an example of a skippable video ad on Youtube (Source: YouTube) Non Skippable YouTube Video Ads Non skippable youtube video ads are ads which can’t be skipped till they are completed. These ads appear before the video, after the video or during the video. Non skippable ads are available on Desktop & Mobile devices. The length of the video’s could be upto 15 to 20 secs, anything more than that won’t be allowed for running Non Skippable YouTube Video Ads Below is an example of a non skippable video ad on Youtube Bumper YouTube Video Ads Bumper ads are video ads which are non skippable ads with length upto 6secs only. These ads usually appear before the video. They are available for Desktop and Mobile devices. Do note that they are only allowed with 6secs of lenght. Below is an example of Bumper Ad Overlay Ads Overlay ads are ads which appear on the lower portion of the youtube video in the format of a banner ad. They only appear on the Desktop and are available with only 2 sizes which includes, 468×60 and 728×90. Below is an example of Overlay Ad Display Ads Display ads on YouTube appear on the top right hand side of the video and above the autoplay video. They are only available on Desktop with two sizes available including 300×250 and 300×60 Below is an example of YouTube Display Ad YouTube Discovery Ads Youtube discovery ads are ads which run on Youtube search. If you are looking to target different searches on youtube, you can use this type of advertising option and reach out to intent based users. Below is an example of YouTube Discovery Ad YouTube MastHead Ads Masthead is one of the most expensive ads on Youtube it may cost upto Rs. 1 Cr per day. You can’t run this format of ads from Google Ads platform, in order to run this ad, you need to contact the Google Advertising team and book the ad, depending upon the availability of the ad space. Below is an example of YouTube Masthead Ad Other Terminologies Used in YouTube Advertising: Different marketers use different terminologies while talking about youtube advertising, so below are other terminologies which are used in Youtube Ads In-Stream Ads – In Stream Ads are video ads which you can run before and during the video. These ads are part of skippable and non-skippable ads Pre Roll Ads – Pre roll ads are ads you can run before the video content starts playing. These ads are part of non-skippable ads. Mid Roll Ads – Mid roll ads are ads which you can run at the mid point of 10 minute video or any video longer than 10 minutes. TrueView Ads – Skippable ads are also known as TrueView ads The key objective of YouTube ads is to reach maximum users on youtube and gain maximum views on YouTube. So how does Google calculates 1 View on YouTube? Google will calculate 1 view when a user views at least 30 secs of the content or click on the ad, irrespective of the length of the video. If the user views only 25 secs of the video, then it won’t be considered as a view, but it will account for 1 impression. If the video is less than 30 secs for eg: if the video is 28 secs, then Google will calculate 1 view only when a user watches the entire video or if he clicks on the ad. Let’s now move towards creating YouTube ads! So How To Setup YouTube Video Ads Campaign? Step 1: The first thing to startup before creating video campaign is to upload the video on your Youtube campaign. Always remember, if the video is not available on Youtube, you won’t be able to advertise on Youtube From the Youtube channel, you can upload the video, refer screenshot below Step 2: Once the video is uploaded, Login to your Google Ads account – Login Step 3: Now let’s take an example and create a campaign, which will help you
Master Guide To Setup Google Display Remarketing Campaign
Remarketing is one of the effective Digital Marketing tactics used to increase conversions, as per Google, remarketing can help you achieve 2 to 4% of conversion rates through effective remarketing campaigns. In this article, we will look at creating high ROI display marketing campaign through Google Ads. As we know that remarketing is a concept where we follow users on different publishing websites, once they have interacted with our website. We are following them because we want them to transact/convert on our website. To know more about What is Remarketing & Different Types of Remarketing – Refer Article – Ultimate Guide to Remarketing in Digital Marketing So How To Create Display Remarketing campaign in Google Ads Let’s start step by step Step 1: Login to your Google Ads account – Login Step 2: The important part in remarketing is to first generate a remarketing code and then create a remarketing list to market. The remarketing code is now part of the conversion code, in order to setup the remarketing code – Refer Article Google Adwords Conversion Tracking Guide (the code which we add in the header acts as a remarketing code, refer article) So once you login, click on tools on the right and then click on audience manager option under shared library. Follow the screenshot below Step 3: Once you click on audience manager, you will come across below screen, now click on the plus blue button. Step 4: We are trying to create a remarketing list here, which is also called as audience lists, which we will use to remarket audiences. So let’s move ahead! Once you click on the plus blue button, you will see 5 options as below. Let’s understand each of them Website Visitors Website visitors remarketing list is a list which can be used to remarket users who have visited your website. This list can be used for lead generation campaigns or websites which have purchase option to transact. Eg. Ecommerce websites, Real Estate Websites, SAAS product websites etc App Users App Users option is to create a remarketing lists for users who have used your mobile app or who have transacted on your mobile application. Businesses whose focus is to re-engage with the users, increase repeat purchases etc can use app users option for creating remarketing list. Eg: Uber, Ola, Myntra App, Swiggy app etc can use this option for mobile app remarketing YouTube Users YouTube users option can be used by YouTube channel’s whose objective is to re-engage users with the new content published on their channel. Youtube remarketing lists can increase views of your videos and it can increase engagement on your channel. Any business who have YouTube channel can use YouTube users remarketing list Customer List Customer list option can be used if you have email database of customers, you can upload the database in customer list and remarket users on gmail ads and youtube ads. This is an effective way to target prospects who had shown interest in your brand, it’s personalised and effective Custom Combination Custom combination option allows you to use different combination of URL and remarket users who have visited your website. If you are new to remarketing, would recommend to leave custom combination. Once you have hands on experience on remarketing campaigns, post that you can move towards custom combination of remarketing lists. Let’s take an example to setup the remarketing list and then create a campaign. I am taking an example of a real estate brand for which I want to create a remarketing list of visitors who have visited the website and who didn’t filled up the form on the website. Let’s go! Step 5: I am selecting website visitors from the 5 options. Once I click on website visitors, I can see this screen as below, where I need to define the audience name. So I have defined the name as below. The name is for your reference, so that if you create multiple lists, you would be able to easily identify the list. Step 6: The next step is to define the list members. List members means, who you want to add in the list. There are 5 lists members to choose from Visitors of a page Visitors of a page who also visited another page Visitors of a page who did not visit another page Visitors of a page during specific dates Visitors of a page with specific tags Let’s understand each one of them Visitors Of A Page In this list member type, you can add all the visitors who have visited your web page. You can use the landing page you are marketing. But this will include all the people who have visited that page. In an ideal scenario, you would like to exclude people who have transaction on your site or exclude people who have signed up on your site. So you need to define what visitors you want to market before using visitors of a page list. Visitors of A Page Who Also Visited Another Page In this list member type, you can add users who have viewed multiple products. You can use this list member type while remarketing for ecommerce products or blogs remarketing under similar topic or for real estate, if there are multiple projects by the same developer in the same location.This is only available only on the display network. Visitors of A Page Who Did Not Visit Another Page In this list member type, you can add visitors who have visited your website but have not transacted on your site or you can add visitors who have visited your site but haven’t filled up form on your site. Ideal for every business, when you want to remarket users who have not converted on your site. Visitors of A Page During Specific Dates In this list member type, you can add visitors who have visited during specific dates. For eg: You can create a list of users who visited your site
Ultimate Guide to Remarketing in Digital Marketing
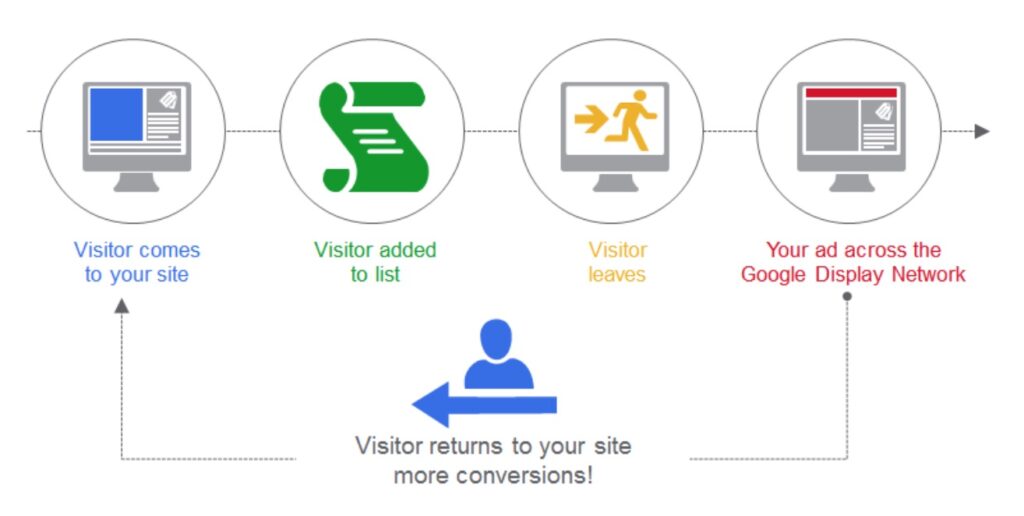
In early business scenarios when customers visited an offline store and did not buy the product, the sales executive would call the customer saying that they had shown interest in buying the product and if they have made up their mind to go ahead with the product! In this scenario, the sales executive is actually following up with the customer in terms of his decision and also in the process, the sales executive is persuading the customer to go for the product, that’s what remarketing does in today’s scenario through Digital Marketing! So What is Remarketing ? Remarketing is a tactic of Digital Marketing to follow up with the users who have visited their website or mobile application, by showing ads on different publishing websites when they visit them. The ads can be shown on websites, mobile apps, youtube, new sites, blogs etc in order to encourage users to come back and make a purchase or enquire about the business. Remarketing tactic will always have high conversion rates, as users who have visited your business are more likely to convert as they are familiar with your product/business or service. So How does Remarketing Works? In order to start with Remarketing, it is important to define, whom to follow and with which product to follow. If the website is receiving traffic in millions, it is difficult to identify who is viewing which product, so in order to tackle this issue, we use a remarketing code (some call it as pixel) on your website. The first step is to add the remarketing code on your website, this remarketing code is shared by the advertising platform you are using (Eg: Google Ads, Facebook Ads etc), once you add the code on the website, now any visitor who visits your website, a cookie will be dropped on his browser (this happens at the backend), once the cookie is dropped on the browser, the user is now part of your remarketing list (which defines which product to remarket, to whom). Now once the user leaves the website and moves on to any website, your ads will follow him. Have a look at the below flow which will help you to understand the working fundamentals of remarketing. (Source: Google) Different Types of Remarketing Different types of remarketing options available in Digital Marketing are as below! Search Remarketing Display Remarketing Dynamic Remarketing Video Remarketing Customer List Remarketing App Users Remarketing Engaged Users Remarketing Let’s understand each one of them: 1. Search Remarketing or Remarketing Lists for Search Ads (RLSA) Search remarketing ads are also called as RLSA, which is remarketing lists for Search Ads. In this type, you can remarket your search ads to users who have visited your website and still searching for your product. For Eg: If someone has come to your website after searching for “Resorts in Goa” (assuming that you are a resort property in goa), and is still searching for a resort property in goa, in that case you can remarket the user with a different offer in the text ad. This will help you to increase conversion and also reduce the time from click to conversion. 2. Display Remarketing Display remarketing format is used largely by advertisers to increase brand recall and conversion, as it’s grabs users attention with a visual and it can communicate with different content pieces while the user is browsing. In this format of remarketing, if a user visits a website, you can remarket users with the same product the user visited but didn’t not transact/enquire on your website. In the entire process you follow users trying to encourage them to come back to your website. 3. Dynamic Remarketing Dynamic remarketing is a type of remarketing usually used by e-commerce websites, eticketing websites, travel websites etc. It is basically used by websites who use feed for marketing. When users visit a website like e-commerce, they usually view 3 to 4 products or may be more than that, also the inventory is high on e-commerce websites, so how do you push products to users and encourage them to buy the product?, dynamic remarketing helps to remarket hughe inventory products by showcasing the same product, similar products, different brand products, different pricing products etc. Dynamic remarketing is part of display remarketing format 4. Video Remarketing Video remarketing format is usually used by advertisers to remarket videos on YouTube. Let’s say I am a YouTube blogger and I specialise in Travel. I would like my audience to view whenever my new video is uploaded, so using video remarketing, I can target users who are have viewed videos of channel or who have viewed specific videos of my channels or who have interacted with my channel. This will help me to increase the reach of my new video, plus it will increase shareability quotient of my video. Videos are a great way to increase brand recall and connect with users, as we know, video is a storytelling format which works beautifully, if created and marketed effectively. 5. Customer List Remarketing Customer list remarketing is an interesting feature which platforms like Google Ads & Facebook Ads offer. In this format of remarketing, you can remarketing users whose email database you have. For Eg: You have an email database of 10,000 users and you only want to remarket them, so through customer list you can remarket them. In Google ads, you can directly upload the database and you can remarket users in gmail ads and on youtube. But in Google ads, only gmail ids are allowed, if you are using yahoo or any other service provider email ids, then you won’t be able to remarket them. Similarly, through Facebook, you can upload email ids and phone nos and remarket users who are having account with those email ids and phone nos. Customer list remarketing type is very effective as you are precisely targeting to the users who have shown interest in your product or service. 6. App Users Remarketing App users
How To Create Google Display Ads an Ultimate Guide
Display Advertising is push advertising, majority of the advertisers are using display as a key channel to create brand awareness, engagement and sales. In my last article we had seen an introduction to Display Advertising, you can refer the same here – What is Display Advertising! As compared to search campaigns, display campaigns are quite easy to create, in this blog, I will help you to create display campaigns to achieve maximum ROI. Google Display ads will only run on Google Display Network So What is Google Display Network? Google Display Network is a network of millions of third party publishing sites, apps, video’s etc, where you can show your ads through Google Ads platform. Different Types of Google Display Ads There are 4 types of Google Display Ads as below Banner Ads Banner Ads are ads which are graphics ads with text on it, these ads you can run on any publisher site which is under Google Display Network. Banner ads are the most popular format of ads in display Responsive Display Ads In responsive display ads, Google automatically generates ads basis the assets you upload including Images, logo’s, descriptions, headlines etc. Responsive ads are good if you want to use multiple ad sizes and create display ads within seconds. The issue with this format is that, you won’t be able to change the design layout as these design layouts are fixed by Google, it’s like an automated design tool for display Gmail Ads Gmail ads appear in your gmail box, that show up towards the top of your gmail inbox. There are maximum two gmail ads shown at a time, if user clicks on the ad, the ad expands with graphics/text or event HTML App Ads App ads are mobile banner ads with smaller ad sizes for mobile devices. As the content consumption on mobile devices have increased, the need for mobile display advertising has increased. Display Ads Bidding Strategies There are different types of display ads bidding strategies in Google ads which you can use basis the objectives you are looking to achieve. Below are the three key bidding strategies which most of the advertisers go with basis their objectives, let’s understand each of them. CPM (Cost Per Thousand Impressions) CPM is the amount which advertiser will pay for thousand impressions, irrespective of the no of clicks on the ad. CPM strategy is used when your key objective of the campaign is brand awareness and reach CPC (Cost Per Click) CPC bidding strategy is a strategy where you pay, only if user’s click on your ad irrespective of the no of impressions served for your ad. This type of bidding strategy is good if you are trying to drive users who are interested in your brand/product/service. CPA (Cost Per Acquisition) Cost per acquisition bidding strategy is a strategy which you can use to define a cost for one acquisition. In order to activate CPA strategy, you need to fulfill two conditions as below First, you should have the conversion tracking setup done for your Google Ads account To know more about conversion tracking setup – Refer article Google Adwords Conversion Tracking Guide Second, your adwords account should show at least 15 conversions in the last 30 days. This helps Google to define the best possible conversion for the product/service you are marketing. So How To Create Display Ads in Google Ads? Let’s take an example and create display ad for a real estate business which has a product in a location called as Balewadi, Pune (India). The key objective of the campaign is to generate leads from display ads Let’s get started! Step 1: Login to your Google Ads account – Login Step 2: Click on the plus blue button and say new campaign Step 3: The next step is to select the goal for your campaign, below are different goals from which you can choose from Sales Here if your objective to generate sales from the display ads campaign, in that case you can move ahead with this goal, but make sure that sales is only applicable for website which have payment gateway integration or purchase option on the site Leads If your objective is to generate leads, in that case you can select this as the option. This can be used for form fill websites or signup websites. In our case for the real estate campaign, our objective is to generate leads, so I am going to go with leads option. Website Traffic If your goal is to drive visitors to website, in that case you can go ahead with this goal type. If a brand is new in the market and wants to drive visitors, this is a good option to go with, also If you want to promote your blog, you can select website traffic Product & Brand Consideration If your goal is to educate users or you want to differentiate from other advertisers or if you want users to explore your products/services, in that case you can go with this option. Brand Awareness & Reach If your product is new in the market or if you are expanding your business in new geographies or if you are introducing your business in new category, in that case you can go with brand awareness & reach. This will help users to know your brand. Apps This goal type is only applicable for apps promotion, in this goal type, if your objective is app installs or app interactions, then you can go with this goal type. Selecting the right goal type is important for your display campaign because the performance of the campaign will depend on your goal type. Step 4: The next step is to select the campaign type, as we are creating display campaign, we would be selecting display as below Step 5: The next step is to select the campaign subtype, there are two types of campaign subtype as below Standard Display Campaign Gmail Campaign As we are planning to create
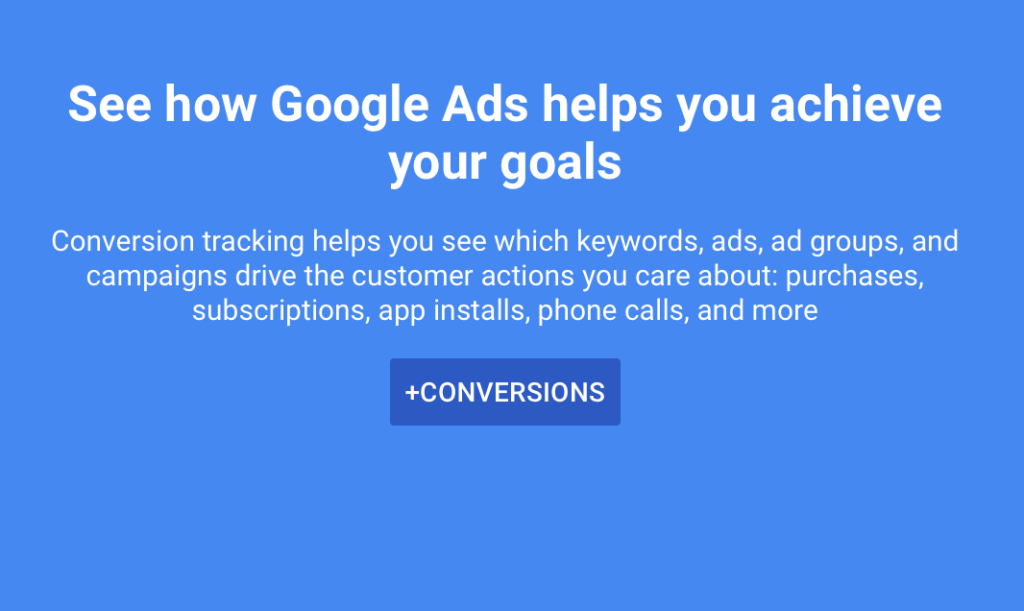
Google Adwords Conversion Tracking Guide
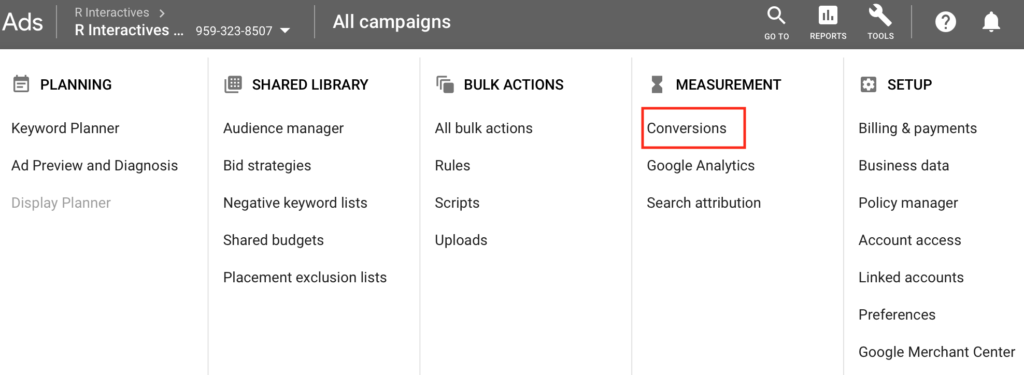
You have a website and your are running Search & Display ads which are generating impressions, clicks, calls, purchases etc, but you don’t know how many people are actually enquiry because of your ads or how many people are actually transacting on your website. In order to do so, you need to setup conversion tracking with Google Ads! So What is Conversion Tracking in Google Ads? Conversion Tracking in Google Ads help you to understand what users do after they have interacted with your ads. If users fill up a form, or buy a product, which is a valuable action to you, then the action is termed as conversion. Complete tracking of the conversion is termed as conversion tracking in Google Ads! Conversion Tracking helps you to understand what returns are you generating on your ads spends! So How to Set Up Conversion Tracking in Google Ads? Below is a step by step guide to set up conversion tracking in Google Ads Step 1: Login to your Google Ads account – Login Step 2: Click on the tools option on the top right hand side of the bar Step 3: Now click on conversions under measurement section as below Step 4: Once you click on the conversion option, you will see the below screen Now click on the +CONVERSIONS blue button to move ahead Step 5: Once you click on conversions, you will see the below screen There are 4 options to select for different conversions you want to track: Website App Phone Calls Imports Website Conversion Tracking – This option will help you to track sales, form fills, page visit, new subscribers added etc App Conversion Tracking – This option will help you to track app installs and in app actions/purchases for your mobile app Phone Calls Conversion Tracking – This option will help you to track no of users calling on the phone no on your site from a mobile device Step 6: Let’s now setup website conversion tracking for a business whose objective is to track no of leads generated from their Google Ads campaign So, I am selecting first option which is Website Step 7: Once I select website, I am taken to a new page, where I am supposed to select “Category” for which I want to setup the conversion, so I am selecting lead, as my objective is to generate leads from Google Ads and track the no of leads generated Step 8: Once I have selected Lead option, I need to define the conversion name. I have defined “Website Leads” as below, you can define the text as per your requirement, which helps you to understand the conversion. Step 9: The next step is to define the value of a conversion. Now this is not applicable for a business who objective is to generate leads, as a lead is a prospect and it does not guarantee that the lead will convert to an acquisition. So, lead for me in this case right now has no value, it might get acquired later (may be offline). So I am selecting don’t use a value for this conversion. If I am an ecommerce website, in that case I can go with the second option which is use different values for each conversion, as each cart value will different from product to product. Step 10: The next step is to setup the conversion window, conversion window is the timeframe for which you want to consider that conversion as unique. For Eg: Mr. Thomas fills in a form on the website twice within a period of 30 days, in that case only 1 conversion will be considered. But if Mr. Thomas fills in form today and also fills a form on the 35th day, then 2 conversions will be recorded as per Google Step 11: The next step is to define view-through conversion window. View-through Conversion means if a conversion happens without any interaction of the user, but he has viewed the ad in the past, in that case it would be considered as a view-through conversions. Chances of view-through conversions are very low, but Google can still track these conversions through their algorithms. You can set a window of 30 days for the same. Step 12: The next option is to Include In Conversions, you can see by default the option is checked, you can keep the box as checked because you want the conversion data to appear in the conversions column of your reporting dashboard. Step 13: The next step is to select an attribution model for your conversion. Attribution model is basically to whom you want to give credit for the conversion. There are 5 different attribution models, which are as below Last Click First Click Linear Time Decay Position Based Right now I am going with Last Click model. To know more about different attribution models in Google refer article here : Attribution Models in Google Ads Step 14: Say create and continue to move ahead. Once you click create and continue, you will come across three options including Install the tag yourself Email the tag Use Google Tag Manager Install the Tag Yourself If you go with this option, you will have to manually insert the tag yourself on website backend Email The Tag If you go with this option, the tag will go to your webmaster on email, you can ask them to add the tag on your website backend Use Google Tag Manager If you are using Google Tag Manager, you need to select this option to setup the tag. Step 15: I am going with Install the tag yourself option, as I will also take you guys through installation of the code for a wordpress site. Once I click, Install the tag yourself, I can see the below options As I am installing the code for the first time, so I am going ahead with the first option which says, The global site tag isn’t installed on all
Using Google Ads Customizers A Complete Guide
Creating multiple ad copies for your campaign would be tedious and time consuming. Also when you are marketing huge inventory of products, it’s difficult to manually setup the ad copies, with different discounts, different coupon codes etc for each product. With the help of Ad Customizer you can automate your ad copy! So What is Google Ad Customizer? Ad Customizer is an interesting feature of ad copy, which will help you to dynamically insert text in your ad copy with a feed based solution. You can automate the entire ad copy till the date you want to run your promotional offers on search. So How to Setup Google Ad Customizer for Search Ads? Below is a step by step guide which will help you to set up Ad Customizer for your search ads. Let’s take an example and set it up! Example: Let’s say I am an advertiser who has an online store which sells women’s footwear. I have huge inventory in my store. I want to automate my text ads with different discounts every day with a different coupon code every day, and I also I want to show that offer is going to end in xyz days. So let’s get started! Step 1: Login to your Google Ads account – Login Step 2: Click on the tools option on the right hand side of the navigation bar Step 3 Click on Business Data under the Setup category Step 4: Once you click on the business data, you see a screen as below We need to upload a feed here. Step 5: As we don’t have a feed right now, let’s create a feed which has all the information, which we want our ad copies to shown for different date’s. So let’s create this feed on an excel sheet or a csv file. I have created a feed as below on a csv file, wherein I want to show different discounts for different days and I want to also shown different coupon codes for different days. Also, I want to show the no of days remaining to grab the offers to build urgency! Date Discount in Percentage Coupon Code Days Left 2019/04/28 5 ABC 13 2019/04/29 8 DEF 12 2019/04/30 10 GHI 11 2019/05/01 12 JKL 10 2019/05/02 15 MNO 9 2019/05/03 18 PQR 8 2019/05/04 20 STU 7 2019/05/05 23 VWX 6 2019/05/06 25 YZA 5 2019/05/07 28 ACB 4 2019/05/08 30 ACC 3 2019/05/09 33 ACD 2 2019/05/10 35 ACE 1 You can see that I have different discounts on different days and different coupon codes on different days. The most important part is the date column, Google is going to understand which data to be dynamically pulled for what date, so date column is important to add in the sheet. You can add any additional information you want by adding additional columns to the sheet, this is what I am looking for. Eg: You can add additional column as phone names, if the discount is specifically applied to a particular phone, you can add brand name if a discount is applied to a specific brand etc. Step 6: Now go to data feeds and click on the plus blue button and select, Ad Customizer Data Step 7: Now upload this csv file after selecting Ad customizer data, have a look at the below screenshot, I have uploaded the sheet named as Women’s Sandals, as I am planning to market women’s sandals through ad customizer Once you click on the blue text “Women’s Sandals”, you can see the data which you had added in the sheet as below and the sheet is under review for policy check as per Google’s Advertising Policies To know more about Google Advertising Policies – Refer Article Google Advertising Policies & Best Practices Review usually takes 4 to 5 hrs for approval, sometimes it might take a day for approval. Let’s move towards the next step. Step 8: Now go to ads & extensions section of a particular campaign for which you would like to set Ad Customiser Step 9: Now create a new ad by clicking on the blue plus button. Step 10: After that click on the text ad option as below to create a new text ad Step 11: Fill the details for Headline 1, Headline 2, Headline 3, Path 1 & Path 2as per the message you want to communicate. Now, we need to set up Ad Customizer. I am going to set up the Ad Customiser function in the description 1 option as want to communicate discount, coupon code and days left for the offer. So uses braces “{“ to get the ad customizer function as below, which says, insert an attribute defined in “business data” Step 12: Now click on Ad Customizer, now I am going to define the attributes in the description, so I type manually, Buy Now & Get {, once I open the braces, I can see a dropdown which says Women’s Sandals, so this is the sheet from which the data would be pulled. Step 13: Post this, select discount, then select coupon code and lastly, select days left as below screenshots. Also keep checking the preview text on the right hand side, which is the text to be shown in the ad copy when triggered on Google Search. Discount Selection Coupon Code Selection Days Left Selection Below is the final ad copy, wherein you will see the attribute on the left hand side and on the right hand side you can see the preview of the ad copy. Step 14: The next step is to save the ad copy, the ad copy will go under review and will be live post review. The ad copy data will be dynamically fetched matching the date on the csv file for 13 days (as mentioned in the csv file). You can automate the ads till the time you want to run your ads. Benefits of Ad Customizer in Google Text Ads Saves Times

