Difference Between Google Ads & DV360

Google Ads & DV360 are two effective platforms of Google to buy inventory on different publishing websites. Both platforms have different targeting capabilities which can be used by advertisers to reach their target audience. In this article we will understand, what is Google Ads and DV360, and what’s the difference between them. So let’s get started! What is Google Ads? Google Ads (formerly known as Google ads), is Google’s advertising platform through which you can buy media on search ads, display ads, video ads, hotel ads and shopping ads. DV360 (Display Video 360) DV360 (formerly known as DoubleClick Bid Manager) is Google’s demand side platform (DSP) for programmatic media buying on display and video network. This can be used when advertisers have higher budgets in display advertising. What is the difference between Google Ads & DV360? There are couple of differences between the two platforms Feature Google Ads DV360 Fee’s No set up & media fee Set up & media fees on spends Inventory Limited Large inventory (wider reach) Programmatic Buying Not available Available Frequency Cap By day By hour & minute Bid Type CPC, CPM & CPV CPM preferred Creatives Image, Banner, GIF, Responsive, Video ads Rich media, HTML5, Native, Video ads Targeting Keywords, Placements, Affinity, In-market, Topics 1st & 3rd Party, Affinity & In-market, Custom Lists, Behaviour Targeting 1st & 3rd Party Data Not available Available Dynamic Creative Not available Available Auctions & Deals Not available Open Auction, Private Auction, Preferred deals, Guaranteed deals Which to choose Google Ads or DV360? You can choose platforms basis below objectives: Wider Reach If you are looking for wider reach on display and video, you should go with DV360 Dynamic Creatives (DCO) If you are looking to use dynamic creatives (DCO), you can go with DV360. Dynamic creatives will allow you to define a communication journey to your audience on programmatic network Search (Pull Marketing) If you are looking for pull marketing, go with search ads, as search ads are intent based ads, which will help you to drive more conversions for your campaigns. Cost Effective If you are planning an aggressive campaign for awareness and looking for better cost, go with DV360, as it will allow you to buy inventory at better cost. Story Telling If you are looking to tell a story on display and video, you should go with DV360 as it will allow you to define a journey to your audience communicating the story of the product. Lower Budgets If you have low budgets, you can go with Google Ads. As DV360 is preferred for higher reach on display and video network. Conclusion You should select the type of advertising platform, basis the objective or requirement of your campaign. DV360 is very effective if you are looking for programmatic campaigns. Major brands consider DV360 as it’s has better targeting capability then Google Ads!
Guide To Create LinkedIn Website Conversion Ads
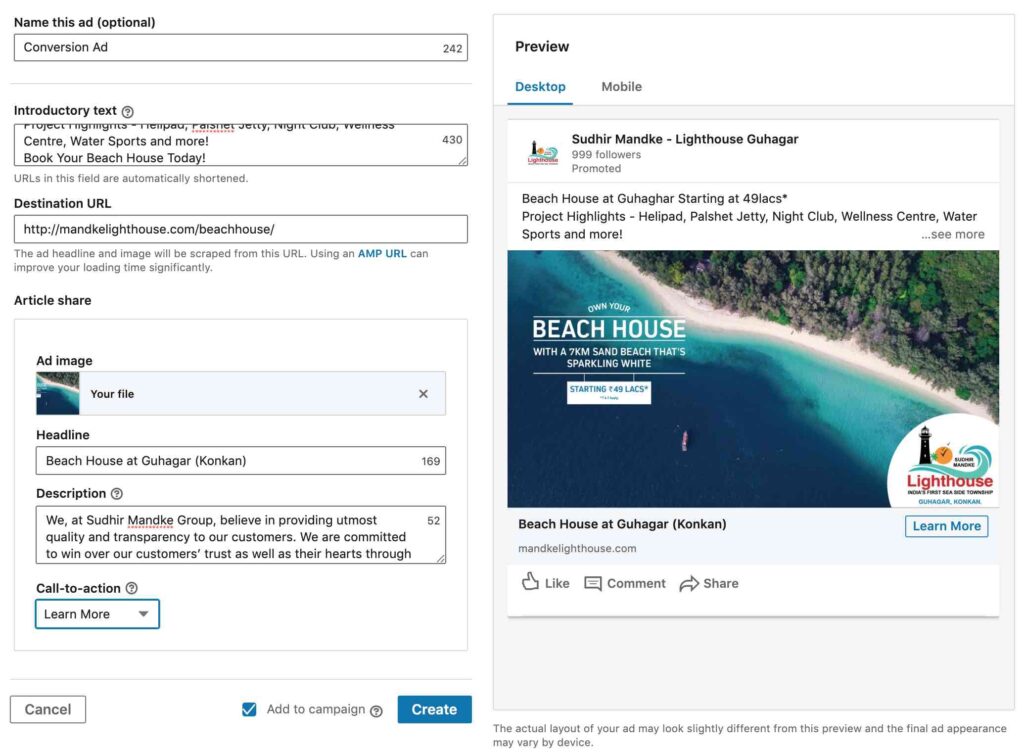
Linkedin website conversion ads are very effective if you are looking to drive conversions by targeting decision makers who are on LinkedIn. In this article we will understand what are linkedin website conversion ads and how to create them. What are LinkedIn Website Conversion Ads? Linkedin website conversion ads are ads which help you to measure conversions happening on a landing page or website through Linkedin ads visitors. These ads help advertisers to give more information about their product or service by diverting users to specific pages of businesses. Advanced LinkedIn Advertising Course by Rahul Gadekar – Access Now How to Create LinkedIn Website Conversion Ads? Let’s understand step by step, how to create LinkedIn website conversion ads Step 1 Log in to your LinkedIn ads account Step 2 Now say create campaign Step 3 Next step is to select the objective of the campaign. So I am selecting website conversions, as I am creating a website conversion campaign for a Real Estate brand. Step 4 Next step is to select the location for the campaign. So I am selecting the location as below, you can select basis the geography, you are looking to target. Step 5 Next step is to define language. As I am targeting English users on linkedin, I have selected English as the language. You can select the language basis the language of the region you are targeting. Step 6 The next step is to define the target audience. I have defined the target audience as below, you can define the target audience basis the decision maker for your product or service. To understand in detail about target audience selection, you can refer to article, Master Guide To Linkedin ads, step 6 Step 7 Next is to select the ad format. I am selecting a single image ad, you can select basis your requirement. Step 8 Next is placement. Placement will allow you to reach users on LinkedIn audience network. Always keep the placement option enabled. Step 9 Next is budget, schedule and bid type. I have defined the same as below, you can define as per your daily budget. In the bid type, there are three options as below: Automated Bid – Linkedin will automatically set the bids for your campaigns. Never go with automated bid because you won’t have control over the bids for your campaign Enhanced CPC Bid – Basis the bid you have set, Linkedin will increase or lower your bid to get more conversions Maximum CPM Bid – It’s a CPM model, recommended only if you are looking for awareness and reach. Not recommended for conversion based campaigns. I am going with an enhanced cpc bid for my campaign. After selecting enhanced cpc bid option, you will see an option, enable conversion optimization, which will lower or increase the bids to give you more conversions. If you uncheck the box, it will switch to maximum cpc bid. Step 10 The next step is conversion tracking set up. How to Set up Conversion Tracking in LinkedIn Ads? Let’s understand step by step, how to set up conversion tracking in LinkedIn ads Now click on the + add conversions option, you will be able to see the below screen. Now name the conversion and enter your setting details as below: Action Type – If it’s a lead or a purchase or a download for the action you want to measure Estimate Conversion Value – If your website has different products with a buy now option, you can add the average product value in this option. But if you want to track exact conversion value, then you need to set up conversion value tracking Conversion Window – Keep the conversion window as 30 days Attribution Model – I am keeping the attribution model as last touch as I want to understand the last touch for conversion. There are different types of attribution models to choose from, you can refer article – Master Guide To Attribution Models to know more about attribution models and which to choose from. Now the next step is to define how you would like to track your conversion. There are two options to choose from Use my site-wide insight tag (recommended) – This is useful to track users who have reached specific pages on your website eg: thank you page or order completion page. Use an event-specific pixel to track when there is no unique URL – This is useful to track specific actions taken by uses on web pages eg: click on a button, click on different call to actions or click on different tabs/menus of a page I am going with the first option, as I want to track users who have reached the thank you page, so I have defined the thank you page as below on the conversion dashboard. Once you say create, you will see the below screen with the Thank You page conversion which we defined above. Now in order to track the conversions, you need to add an insight tag on your thank you page body copy. In order to access the tab, click on conversions as below. Once you click on conversion, click on manage insight tag as below and click on see tag. Once you click on the see tag, you see the below screen, how to install your tag. Here you will see three options to choose from, to install the tag on your thank you page. You can select any option to set up the Linkedin insight tag to measure conversions. Once you have added the tag on your thank you page body section, say done. Note: The conversions on Linkedin ads dashboard will only be tracked if the tag has been installed properly. Step 11 The next step is to define the ad copy for your campaign. Define the ad copy with respect to your product or services. I have defined the ad copy as below, as I am marketing a real estate product. You need
Beginners Guide To Email Marketing
Email Marketing has been in the digital domain for a long time and many businesses leverage email marketing to connect with their prospects and drive growth to their business. Email Marketing is done through different email marketing platforms like mailchimp, sendgrid, constant contact etc. In this article, we will understand email marketing and also understand how to create email marketing campaigns through an email marketing platform. What is Email Marketing? Email Marketing is a channel to promote your product and services through email. Email marketing helps to build relationships with customers and nurture them over a period of time. Email marketing helps to acquire new customers, nurture leads, build relationships and improve ROI. Advantages of Email Marketing? Tells a Story Email Marketing helps you to tell a story to your prospect about the product or service you are marketing. You can show infographics, videos and carousel images within the email, which helps you to tell a story to your customer. Personalisation Email Marketing helps you to send personalise messages to users. Personalisation helps to engage the audience effectively and improves the probability of a conversion. You can also send personalisation emails through users interaction on the website, making the buying journey more relevant and effective. Cost Effective One of the greatest advantages of email marketing is it’s cost effective. Compared to your other digital media advertisements including search ads, social ads or display ads, email marketing is cost effective and hence the cost for acquiring a customer is very low. Targeted Reach Email marketing has a targeted reach. The list which you use for email could be related specific segments of audiences, which makes the reach more targeted, helping you to drive more value out of it. Builds Relationship Email Marketing helps to build relationships with your customers. As it’s a one to one communication, you can stay connected with your customers post acquisition and engage them in the long run. Lead Nurturing Lead nurturing is one of the important aspects of email marketing. As prospects are at different levels of sales funnel, email marketing helps to nurture them and drive them to the bottom of the funnel. Different Types of Email Marketing? Direct Emails Direct Emails are emails which you send to customers which directly talk about your products and services. Direct emails also talk about offers, coupons and discounts as the objective is sales or lead through the email. Newsletter Emails Newsletter emails talk build to engage the audience or build a conversation with the audience. The newsletter email can be about a company update, news, blog, report or a case study. Newsletter emails keep the audience connected with your brand and build relationships. Transactional Emails Transactional Emails are mails which are sent to customers once they have taken any action, eg: booked a flight ticket on the website, registered for an event or downloaded a brochure. What are the different email marketing platforms? There are different email marketing platforms you can choose from, below are few of them which I would suggest! Mail Chimp Constant Contact Sendinblue Drip Get Response SendGrid Different Terminologies Which You Should Know in Email Marketing? Few important terminologies used in email marketing are as below Opt-in Opt-in subscribers are those subscribers who share their information on your website, for eg: if you have a form on the website and the user fills up the form, then it is considered as opt-in database Double Opt-in Double Opt-in users are those users who are part of your list, where they have verified their email address, for eg once a user fills in the form or sings up on your website, an email is sent to his email address to verify, and once the user verify the email address, the user is added to the subscriber list Soft Bounce Soft bounce is when the email is not delivered to the mailbox due to receiving server being offline or the mailbox is full or email file is too large Hard Bounce Hard bounce is when the the email address is not correct or the recipient server has completely blocked the delivery of mail. Open Rate Open rate is the percent of people who have opened your mail basis the no of mails sent. Drip Marketing Drip marketing is a set of emails sent to subscribers based on their behaviour. What Do I Need To Start With Email Marketing? Email List The first thing you need is an email list. Email list is the list of email id’s to who you would like to send the email. Email lists can be built by different campaigns on Google ads, Facebook ads, Twitter Ads, SEO, offline events and database vendors. Email Id You need a email id to send mails. Make sure you don’t use gmail or yahoo email id’s, you should always use company email id’s. Email Platform As you would be mailing to a list of 10K users or more than that. You would need an email platform. Email platform is the same which I have discussed above which includes mailchimp, send grid, constant contact and similar other email marketing platforms Email Communication Strategy As we know email marketing helps to build relationships with users, we need to define the email communication strategy to the users, this strategy will include a series of mail to the target audience list for your product or service. In order to define an email communication strategy, a thorough understanding of the customer has to be done including interest, behaviours and motivations, which will help you to define the email communication strategy. Email Content Once you have defined the email communication strategy it’s important to define the content. The content can be informative, engaging and drive action. You can use different content formats including video, text, image or infographic while sending emails. Conclusion For any email campaign to be successful, the strategy has to be defined effectively and there has to be further automation basis users interaction or behaviour. Many email
Ultimate Guide To Google Hotel Ads Campaign Creation in 2025
Millions of users search on Google every day to book hotels. The planning for booking a hotel starts with Google search, so the visibility of your hotel should be very high, which can be achieved through Google search ads. But how do you reach more users using different Google properties and increase bookings for your hotel?, this can be achieved using Google Hotel ads! In this article, you will understand what are hotel ads, and how to create them. So let’s get started. What Are Hotel Ads? Google hotel ads are paid ads which appear with prices, reviews, photos and check availability options. Where Do Hotel Ads Appear? Hotel ads appear on Google Search on the right hand side of the screen and on the Google maps search results. Below is an example of how Hotel ads appear on Google search result page. How To Create Hotel Ads? Let’s understand step by step, how to create hotel ads! Step 1 The first step to start with hotel ads is you need to have Google hotel center account, where all the information related to your hotel should be hotel. What is Google Hotel Center? Google hotel center is an account for hoteliers, to manage hotel rates, hotel photos and hotel availability across Google. What Do You Need To Set Up In Hotel Center? In order to get are ads live, we need to set up the below: Set up Hotel List Feed – Here you set up different types of rooms available in your hotel property Set up Price Feed – Here you set up different types of price feed for different rooms Setup Point of Sale URLs – Here you define the point of sales URLs which are the booking URLs How to Create Google Hotel Center Account? In order to create a Google Hotel center account, you can visit – Google Hotel Center or you can also connect with partners who can help you set up a hotel center account. To connect with partners, you can visit – Google Hotel Partners Once you have set up your hotel center account, you can now start creating campaigns from Google Ads account. Step 2 The next step is to link your Google Ads account to your Google Hotel Center Account. How to Link Google Ads Account to Google Hotel Center Account? Go to your Google ads account and click on tools & settings. Under tools and settings, click on linked accounts and then click on details under Google Hotel Center, refer below. Now, click on the plus blue button and enter the hotel center Id and say send. The request will be sent to the hotel center account, and once it’s accepted, your Google ads account will be connected to Google Hotel Center account. Now you can start creating campaigns from Google ads. Step 3 Next step is to create a new campaign from Google ads account, so go to Google ads account and say new campaign. Step 4 In the goal type, select option, create a campaign without a goal’s guidance. Once you have selected, create a campaign without a goal’s guidance, you will see campaign sub type options which has hotel ad, now select hotel ad from the below options. Once you have selected, create a campaign without a goal’s guidance, you will see campaign sub type options which has hotel ad, now select hotel ad from the below options. Post selection, you can see the hotel account Id as below. Now say continue and move ahead. Step 5 Define the name of the campaign. I am defining as below, you can define basis your hotel brand and location. Step 6 Next step is bidding strategy. There are 3 bidding strategies available in hotels ads: Commission – Commission bidding strategy is a strategy which allows hoteliers to only pay when a booking happens through hotel ads. In this strategy you need to define the commission in percentage which you are ready to pay to Google basis your hotel room price. For Eg: If you Hotel Rate is $100 and you have defined 10% as the commission in the bidding strategy, you would pay $10 for every booking through Hotel ads to Google It’s an interesting strategy to go with but if other hoteliers are bidding with higher percent, you will have to relook at the commission defined. CPC% – In this bidding strategy, you actually set the maximum cost per click as a percentage of the hotel room price. If you are going with this bidding strategy, make sure you specify maximum bid limit, so that you don’t end up paying a very high amount. Manual CPC – Manual CPC is the maximum amount you are ready to pay for a click on the ad. I am going with a commission model for my campaign with 10% as the commision bid, you can define basis your bidding strategy. Step 7 Next is budget, define the budget as per the amount you are willing to spend for this campaign. Step 8 Next is networks and devices. Networks will be only search and devices will be all eligible devices by default, you won’t be able to change these settings. Step 9 Next is location. Now in location, you won’t be able to set city wise campaign, you will have to select a country only. I am selecting UK for my campaign, as I want to reach out to users in UK Step 10 Next is, start date and end date. Define the start date and end date as per your requirement. Now say, save and continue. Step 11 Next is to define ad group, so I am defining ad group name as below. Step 12 You can further subdivide the ad group by Hotel country/region Hotel ID Hotel Class If you have multiple hotels in multiple locations, I would recommend you to break it down by hotel Id, so that you know how each hotel property is performing. If you have
Guide To Create LinkedIn Dynamic Ads

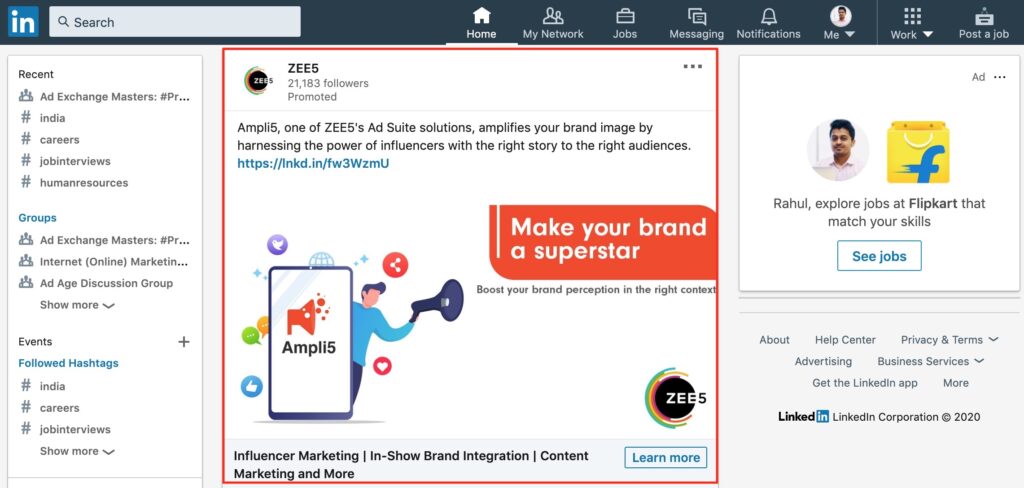
As we have seen dynamic ads in programmatic (DCO), dynamic ads in Facebook and dynamic search ads in Google, LinkedIn also offers dynamic ads. In this article, we will understand what are linkedin dynamic ads and how to create them! What are Linkedin Dynamic Ads? LinkedIn dynamic ads are personalized ads that help you to build relationships with your target audiences, by adding information automatically on the ad creative which is available on linkedin member profiles. As these ads are personalized ads, they help you to increase click through rates on your ad sets, driving more users to your campaign objectives. Below is an example of dynamic ad on LinkedIn What are the different types of Dynamic Ads on LinkedIn? Dynamic ads are available in 3 types: Job ads – Job ads are used to reach out to recruit users based on their skills. If members are not looking for jobs, you can still show them what jobs are available in your company and encourage them to apply. Below is an example of a job ad Follower ads – Follower ads can help you to increase the followers of your LinkedIn page. Below is an example of follower ad Spotlight ads – The third one is spotlight ads, which helps to increase whitepaper downloads, generate leads, install apps or drive users to the landing page. Below is an example of spotlight ad Advanced LinkedIn Advertising Course by Rahul Gadekar – Access Now How To Create LinkedIn Dynamic Ads? I am going to create a Linkedin Dynamic Ads campaign for follower type, for a real estate brand. Let’s understand how to create it step by step! Step 1 Log in to your LinkedIn ad account Step 2 The next step is to define the location. I have defined the locations as below, you can define as per your target geography. Step 3 Next is languages. I am selecting English, as I want to target users who are using English LinkedIn interface. You can select the language as per your target audience language. Step 4 Next step is to define your target audience. I have discussed about selecting target audiences on LinkedIn in detail, in article – Master Guide To LinkedIn ads, do refer for more details So for my campaign, I have defined the target audience as below. Step 5 Next step is to define ad format for your campaign. So I am selecting as follower ad format, as I want to increase followers through dynamic ads. Step 6 The next step is to select placement. So for my objective type, the audience network is not currently available. If it’s available for any objective type which you have selected, you can go with the enable option, which will allow you to show ads on Linkedin network. Step 7 The next step is budget & scheduling. Define the budget for your campaign and always go with optimized traffic pacing option, as it will allow you to spend your budget when members are active. You can also schedule the campaign basis your requirement by defining start date and end date. Then you need to define the bid strategy. Always go with CPC as you will be charged only when the user clicks the ad. Linkedin suggests you the CPC bid (refer below), you can define your bid close to the suggested bid. Step 8 Next is conversion tracking. Conversion tracking is not applicable for my campaign. So I don’t need to set up the conversion tracking. Step 9 The next step is to create a new ad for the campaign. Below are the components of the ad copy which you need to define. Ad Headline – Ad headline is the copy which is displayed below the image or logo on the ad creative, refer below Company Name – Company name will be the name of your company Ad Image – Upload an image or a logo, it will appear next to the users image as below Ad Description – Ad description is the description of the ad which appears above the logo and the members profile picture, refer below Call To Action – It’s the call to action for your ad copy Now say create, your ad is ready and will go live once it’s approved! Conclusion LinkedIn dynamic ads are very effective for engagement and lead generation as it’s personalises the ad experience on Linkedin. The key success of the campaign will depend upon the targeting parameters used in your target audience setting. So create LinkedIn dynamic ads and boost your lead generation process today! Related Articles: Master Guide To Create LinkedIn Lead Generation Ads in 2020
Master Guide To Create LinkedIn Ads in 2025
LinkedIn is one of the effective marketing platforms for B2B marketing. If you are looking for awareness, lead generation or promoting content in B2B space, then Linkedin is the channel to go with. In this article, I will take you through different formats of LinkedIn ads, how to create them and what are the effective targeting methodologies to go with for driving success from your LinkedIn ads. So let’s get started! Different Types of LinkedIn Ads Sponsored Content Ads Sponsored content ads are linkedin page posts which you can promote on linkedin network. These ads can be a single image ad or a video ad or a carousel ad. You can use sponsored content ads, if your objective is to drive engagement for content pieces on your LinkedIn page Below is an example of how sponsored content ads look like in the Linkedin news feed. In Mail Ads In mail ads are ads which reach users’ message box on LinkedIn. These are direct ads to their inbox. These ads have higher conversions because they are directly in the users inbox with a higher percent of open rate. Below is an example of in mail ads. Advanced LinkedIn Advertising Course by Rahul Gadekar – Access Now Text Ads Text ads are text based ads which appear on the top or on the right hand side of the screen. These ads include a headline, description and an image. Below is an example of a text ad. Dynamic Ads Dynamic ads are ads which appear on the right hand side of the news feed. These ads are targeted on linkedin with a profile picture of the user and address them by their name. Below is an example of a dynamic ad. Linkedin dynamic ads include job, content, follower & company spotlight ads. Direct Sponsored Content Direct sponsored content ads are ads which you can run directly without posting them on your LinkedIn news feed. It looks similar on the news feed as sponsored content ad. Below is an example of a direct sponsored content ad. These are the different types/formats of ads, which you can consider while advertising on LinkedIn. Now, before we get into creating a LinkedIn ads campaign, let’s understand how to create a LinkedIn ad account. How To Create a LinkedIn Ad Account? Step 1: Log in to your linkedin account and click on advertise as below from the work option. Step 2: The next step is to to click on create account as below Step 3: Now fill in the information of your account including account name, currency and define a company page as below You will then see that you account is created as below Now you account is ready and you can start creating Linkedin ad campaigns How to Create a LinkedIn Ads Campaign? Step 1: Log in to your LinkedIn ad account Step 2: Click on create campaign as below Step 3 Now the next step is to select the objective of the campaign. There are different types of objectives you choose from as below: Brand Awareness Website Visits Engagement Video Views Lead Generation Website Conversions Job Applications Let’s understand each one of them! Brand Awareness – If you want to create awareness about your product or service on linkedin, you can go with this objective. The objective type is ideal if your business is new in the category and you want to tell users about your business. Website Visits – Website visits objective type can be used if you are looking to drive visitors to your website or landing pages to tell them more about your business. Engagement – Engagement objective type can be used, if you are looking to promote your content to your audience on linkedin. If you want to increase followers of your company page, engagement type is the ideal option you should go with. Video Views – Video views objective type can be used, if your objective is to promote a video on Linkedin network. Lead Generation – Lead generation objective type can be used, if you are looking to generate leads for your business. In this campaign objective, if a user clicks on the ad, a form open there itself with users information populated in the form fields. Users are not directed to a website or a landing page. This objective type is widely used across business to generate more prospects for business. Website Conversions – Website conversions objective type can be used, if your objective is to generate conversions on website or drive actions which are valuable to your business. In order to track conversions on your website through Linkedin campaigns, you need to set up an insight tag. Job Application – Job application objective type can be used by companies to recruit people for various profiles in their company. So these are the different objectives in LinkedIn ads. In this article I am going to create a lead generation campaign for a Real Estate brand, in order to show you different settings, options and targeting in Linkedin ads. So I am going ahead with Lead Generation Step 4 The next step is to select the location in which you would like to show your ads in. So I am selecting the locations below for my campaign. Step 5 The next step is language selection. You can select the language basis the country you are in. I am selecting as english for my campaign. Step 6 Next step is setting up a target audience. Target audience are the people who you would like to reach out to. You need to make sure that you target decision makers on linkedin who would be interested in going for your products or services. There are multiple targeting audiences options to choose from, to target your audience on Linkedin and these options are further divided in multiple sub options as below Different Targeting Audiences in LinkedIn Ads Company Company Connections Company Follower of Company Industries Company Names Company Size Demographics Member Age Member Gender Education Degrees Fields of Study
Guide To Set Up Goals in Google Analytics
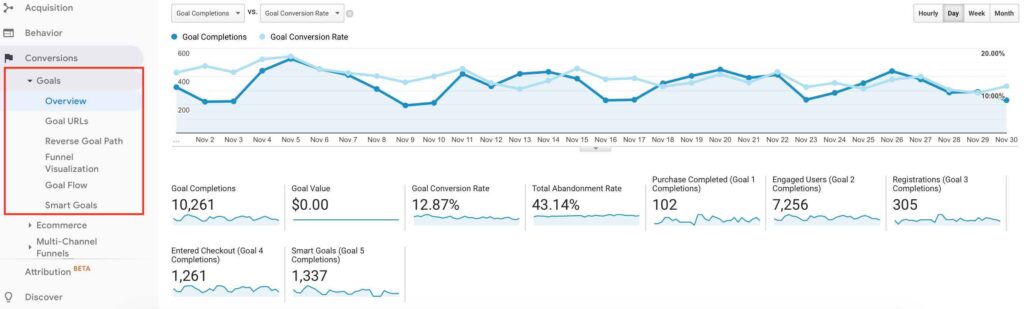
Measuring how your channels are driving value to your business is important, it also helps you to make further business decisions for your marketing campaigns. Every business has its own objective while marketing through different channels, so how does one know which channels are performing and which are not? By setting up goals in analytics you will be able to measure which channels are performing for you in meeting your business objectives. Once you have set up goals in Google analytics, you will be able to view conversions, conversion rates and goal flow, on your Google analytics dashboard under goals, as below. What are goals in Google Analytics? Goals in analytics allows you to track specific actions taken by an user on your website. This action could be product purchase, form fillup, newsletter sign up, enquiry, lead or clicking on specific call to actions on your website. When should I Set Up Goals in Google Analytics? Different businesses would have different objectives, so you can decide what your objectives are to create goals for them on analytics. You can set up goals in analytics if you want to track below actions in Google Analytics: Product Purchase Lead / Enquiry Newsletter sign up Appointment Scheduling Registration Free sign up Watch Video PDF Download White paper download Set reminders Click on specific CTA’s Advanced Google Analytics Course by Rahul Gadekar – Access Now What are the Different Types of Goals in Google Analytics? There are different types of Goals in Google Analytics which are as below: Destination Duration Pages / Screen per session Event Smart Goals Destination Goal Destination Goal will help you to set up a goal to understand how many users have reached a specific page, for eg: “thank you” page Destination Goal is one of the common goal types which is used by the majority of the websites to understand the number of conversions happening on their website. Duration Goal Duration Goal helps you to measure, for how long the session lasted on your website. So you can set up duration goal of 5 minutes or 10 minutes, which will give you an idea of the sessions lasting for 5 minutes of 10 minutes Duration Goal helps you to understand for how long the users are engaged with your website, the longer the length of the session, the higher the intent of considering your brand. Pages Per Session Pages per session goal is to measure how the no of pages viewed in a particular session. For eg: you can set up 5 pages per session as goal to understand how many people are viewing 5 pages per session Page per session goal helps you to understand how users are more likely to view more about your business, you can increase pages per session by interlinking your website. Event Goal Event goal commonly known as event tracking is a type of goal if you want to measure clicks on specific buttons or tabs or links within your website. For eg: Let’s say I am using a landing page for my Google ads campaign and the landing page has two CTA’s, one on the first scroll of the page and the second one on the 4th scroll of the page, now I want to know how many users are clicking on the first scroll CTA and how many users are clicking on the 4th scroll CTA. Event tracking will help you to understand the clicks on both CTA’s helping you to make decisions on experimenting on landing pages and websites to drive more engagement and conversions. Smart Goals Smart goals helps you to automatically count conversions for the users who are engaged with your website. In order to get started with smart goals, you need to link your Google ads account with your Google Analytics account and you should have at least 500 clicks from your ad campaigns. Smart goals use machine learning techniques to count conversions. How to Set Up Goals In Analytics? Let’s now understand step by step, how to set up goals in analytics. Before you start setting up goals, just make sure that you have added the Google analytics code on your website. I am going to set up a destination goal, so let’s get started! Setting up Destination Goal in Analytics? Step 1 Go to your admin section and click on goals as below Step 2 Once you click on goals, you will see the below screen, now click on create new goal. Step 3 Once you click on a new goal, you will see the below screen, now click on custom to set up a goal. Step 4 Now name the goal for your reference, I have called it as newsletter sign up, as I am setting it up for my blog. Then select the destination option as below and say continue. Step 5 Now the next thing is to define goal details. Under goal details the first thing is to define destination. If you click on the equal to button, you will have 3 options to choose from including Equals To Begins With Regular Expression Let’s understand each one of them: Equals To – If you select equals to and add the URL, the goal will be considered only when the user reaches that specific page. For eg: In the above screenshot I have added “/thank-you” , so the goal will be only considered if the user reaches the specific thank you page which I have defined. If users reach /thank-you?id=12 or /thank-you/referral, then goal won’t be considered Begins With – If you select begins with and add a URL, goal will be considered if users reach URLs which begins with the one which you have defined. For eg: In the above screenshot I have used “/thank-you”, and let’s say I select begins with, so users who reach /thank-you?id=12 or /thank-you/referral URL will also be considered under goals. Regular Expression – If the added URL matches on regular expression then it would be
How to Link Google Ads to Google Analytics
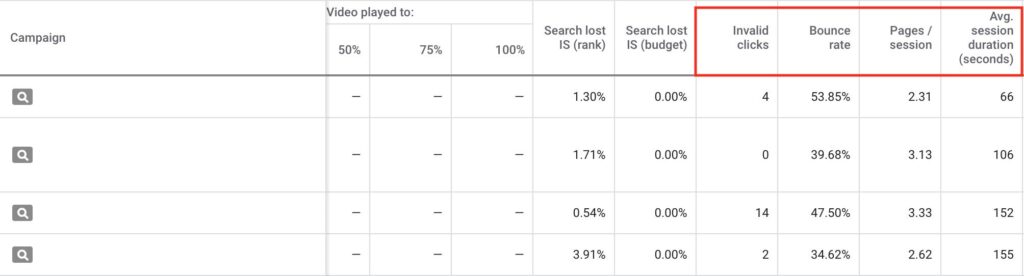
If you are running Google ads campaigns, it’s important for you to link your Google ads account to Google Analytics account to drive valuable insights of your campaigns. Why link Google Ads (Adwords) to Google Analytics account? It helps you to understand the bounce rates of the clicks you generated from Google ads It gives you insights on sessions, average session duration and pages/session of your Google ads traffic By linking Google ads to Google analytics, you can import your Google Analytics goals & Ecommerce transactions into Google Ads, allowing you to make more informed decisions for your campaigns. You can also create lists of your Google analytics data and use them in Google ads for remarketing. Advanced Google Analytics Course by Rahul Gadekar – Access Now How to Link Google Ads (Adwords) to Google Analytics account? Let’s understand step by step how to link Google ads to Google analytics account! Step 1 Login to your Google analytics account – Login Step 2 Now go to admin section on the left bottom of your dashboard and then click on Google Ads linking Step 3 Once you select Google Ads linking, you will be able to see the Google ads account associated with the email id as below. Now select the CID no of the Google ads account which you would like to connect with your analytics and say continue. Step 4 Next set is to switch on All website data as below and also check the box at the bottom which says share my analytics data with linked Google ads account. Now say link accounts. Step 5 Post that you will see a screen like this which says What’s next, it may take up to 24 hours for your Google Ads link to begin displaying data. Now say done, and your Google ads account is now connected with Google Analytics account. How to View Google Analytics Data in Google Adwords account? In order to view Google analytics data in Google adwords account, follow the below steps. Step 1 Login to your Google ads account and click modify columns Step 2 Once you click on modify columns, click on Google Analytics and select the metrics which you would like to view on your dashboard, refer below Now say apply! Step 3 Once you have added the metrics, you will be able to view the data in your Google ads dashboard with respect to each campaign as below. Conclusion You should like your Google ads account to analytics as it gives you insights of each campaign with different metrics, helping you understand how users are getting engaged with your website through Google ads traffic. One of the key advantages of linking is, you can leverage Google analytics data in Google remarketing campaigns!
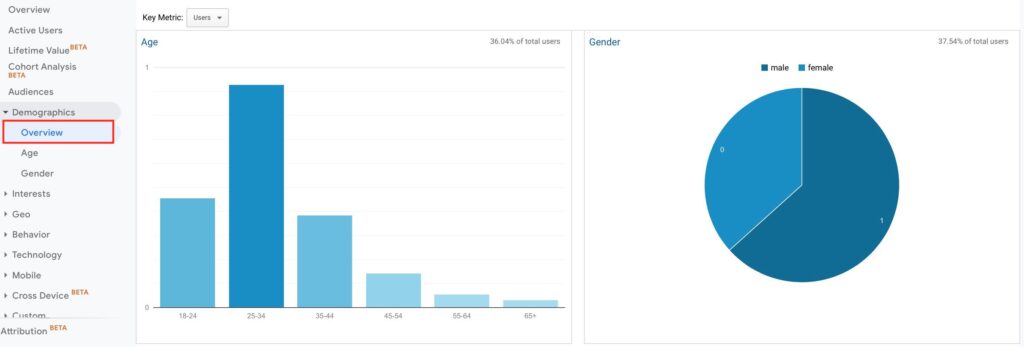
An Ultimate Guide To Google Analytics
If you are marketing your business aggressively through Digital Marketing, it’s important to measure the efforts and the ROI derived from your marketing channels, Google Analytics is a tool which will help you do that. What is Google Analytics? Google Analytics is a free tool by Google which helps us to understand the user behaviour and traffic patterns on our website through various sources. Google analytics further deep dives and gives us insights on the time spent on the site, bounce rate, top landing pages, conversions, attribution models and more! In order to read all data through analytics, we need to first set up Google Analytics for our website Advanced Google Analytics Course by Rahul Gadekar – Access Now How to Set Up Google Analytics? There are two ways to set up Google analytics for your website: Directly installing code on the website Using Google Tag Manager So let’s understand step by step, how to set up Google Analytics using the first method which is by directly installing code on the website. Step 1 Login to Google Analytics – Login Step 2 Once you are on Google Analytics click on admin option on the bottom left and then click on create account. Step 3 Once you click on create account, the first thing is to define the name of your account, this would be the name of your website or business name. I have added Demo, to show you. Next thing is to select from the option, what do you want to measure. There are three options to choose from Web – You can select this if you are looking to track your website data Apps – You can select this if you are looking to track your mobile apps data Apps & web – This is right now in beta stage, which will help to track users across the web and mobile platforms. Once you select web, the next thing you will observe is property setup option as below, here you need to set up Website Name – Website name is the name of your website Website URL – Website URL is your website URL Industry Category – It’s the business category of the website eg: travel, shopping etc Reporting Time Zone – Select the time zone as per the country you are in. Now say create. Once you say create, you will see a tracking code on the dashboard, something like this. You need to add the tracking code in the head section of your website. Once you have added the code, the data will start populating on your Google Analytics dashboard. If you are using wordpress, you can follow the below set up process to add the code. How to add Google Analytics Code on WordPress site? Go to your wordpress account and click on editor under appearance, post that click on theme header on the right and then before the closing head paste the analytics code, refer below. Now say update, the data will now start populating on your analytics dashboard from today. How to share Google Analytics Access With Team Members? Once you have created the account, you would like to share the access with your team members, so that they can read and download reports from analytics. In order to share access, click on admin option and then click on user management as below Once you click on user management, you will come to see the below screen, now click on the add button to add users. Once you click on the plus button, you will see the below screen, where you can enter the email id of the user, to whom you want to share access to. You can also define the permission levels to the user from edit and read & analyze. Now say add, the user will receive an email, and post accepting the request, the user will be able to view the data of the analytics account. Now before we start understanding different data points and reports in analytics, let’s first understand different terminologies used in Google Analytics which will help you to read the reports effectively. Different Terminology In Google Analytics Session – Session is a visit to your website with more than one page view including an ecommerce transaction or any interaction. The default session time is 30 minutes, which means that if a user visits your website after 30 minutes, it would be considered as a new session. Users – Users are total number of users who have visited your website for a specific time frame, it also includes repeat visitors New Users – New Users are unique users for a specific time frame on your website. No of Sessions Per User – It is the total number of sessions by per user who visited your website Page Views – Page views are total number of views generated by the total number of users, it also includes repeated page views. Pages Per Session – Pages per session are the total pages viewed in a particular session. Average Session Duration – Is the average time spent by a user in a session. Bounce Rate – Bounce rate is the percentage of visitors who left the website without viewing more than a single page. These are the key terms used in all the reports of Google Analytics, there are few other which we will understand while we are reading specific reports. So now let’s move ahead on the dashboard and start reading data & reports. If you don’t have a Google Analytics account to view data, then you can use Google analytics demo account, click here for DEMO ACCOUNT which is set up for Google Merchandise Store The first report in Google analytics is audience report, let’ deep dive in audience report. Understanding Audience Report Under audience report, the first thing you will see is the overview report. Overview Report Overview report is the summary report for the time frame you have selected to view data. It helps you with the summary of Users New Users Sessions
Guide to Latent Semantic Indexing LSI Keywords
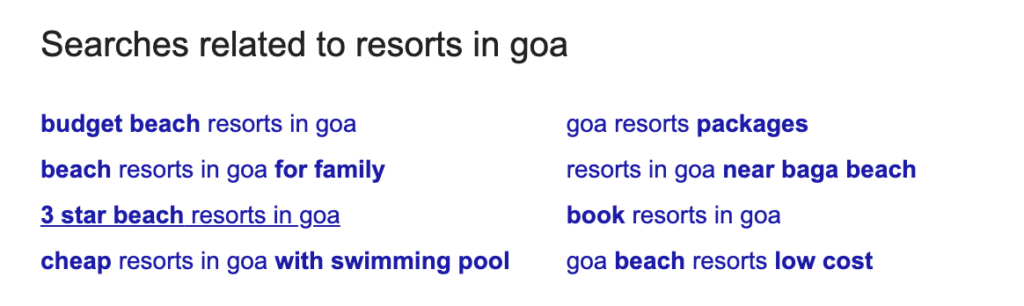
I have interacted with a lot of marketers and I still see that their definition of latent semantic indexing is not clear, so I thought I will write today about latent semantic indexing to make it simple for marketers to understand. LSI was implemented in 2004 in Google algorithm to deliver more relevant results to users. What is Latent Semantic Indexing (LSI) in SEO? Latent Semantic Indexing is a method which search engines use to analyse the relationship between two different words which users use surrounding a specific topic. What are LSI Keywords? LSI keywords are those keywords which define the intent of the search query. Let’s take an example and understand this with the below two keywords Tiger Tiger Woods Now both the keywords have tiger in it. But the first keyword is tiger so the intent of the user is to find results related to tiger as an animal, whereas the second keyword is Tiger Woods, where the intent of the user is to view results related to Tiger Woods who is a Golfer. Why Does Google USE LSI Keywords? Google takes into LSI keywords because this helps Google to trigger relevant search results basis users search query. Another simple example is of Apple, apple has multiple products on it’s website as below Apple Iphone X Apple iPad Apple Airpods Apple store etc So apple as a term is common with all the keywords but all keywords are defined for different products, so Google reads the intent of the entire search term and triggers those pages which are relevant to the uses search query. Where All Should You Use LSI Keywords in SEO? LSI keywords can be used for your on page tags as below Title Tag Meta Description Heading Tags Anchor Tags Alt Tags Content Piece How to Find LSI Keywords ? There are different approaches which you can follow to find LSI keywords, let’s understand few of them by taking an example of business which is Resort in Goa and you want to identify different LSI keywords 1. Google Search Related Terms Use Google search related terms option, which appears at the bottom of the search result page to identify different search terms, so for our example, we can see below related terms related to resorts in goa. Now from here basis our product we can choose different terms which could act as LSI keywords for our business. Also, you can use the suggestions which appear while search on Google search as below to identify LSI keywords 2. Using Google Keyword Planner Google keyword planner is one of the effective tool for keyword research, you can use Google keyword planner to identify LSI keywords for your product or service, so for our example of resorts in goa, I can see below terms which can be added as LSI keywords on the website 3. Using LSI Graph Another way to identify LSI Keywords is by using LSI Graph tool to identify LSI keywords. For our example, below are the suggested LSI keywords by LSI graph, you can observe the most relevant one to your business and select to move ahead. Benefits of Using LSI Keywords There are a couple of benefits of using LSI keywords which are as below: 1. Decreases Bounce Rate LSI keywords helps you to decrease bounce rate because you are diverting high intent traffic on website from the search terms. 2. Increases Time Spent As we drive high intent users on our website through LSI keywords, they tend to spend more time on our website and are highly engaged with our content. 3. Improves Conversion Rate As the intent is high of the user, the chances to conversions are higher on a product page or a service page. The more relevant the page is the higher the conversion rate will be, but the conversion rate also depends on the competition, the price point and the attributes of the product which we are offering. 4. Improves Search Ranking Usage of LSI keywords helps us to improve search ranking as Google algorithm triggers most relevant search results to the users basis the search query. So to improve search ranking it’s important to use LSI keywords in Title, meta description, alt tag, heading tags and content Conclusion: Use of LSI keywords in important which doing SEO because it will help you to trigger your web pages for intent driven searches on Google. It’s important while defining keywords to your web page to consider LSI keyword strategy by understanding different search patterns and combinations which are relevant to your product or service page on website!

