As we know that remarketing is a tactic where you follow your customers online once they have visited your website.
Remarketing tatic is very effective to increase brand recall and increase conversions on your website.
Before you move ahead with Facebook remarketing ads, it’s very important for you to know, what is remarketing concept & how it Works!
To know more about Remarketing concept and how it works – Refer article, Guide To Remarketing in Digital Marketing
So What is Facebook Remarketing?
Facebook remarketing is showing ads to users on Facebook network once they have visited your website or interacted with your Facebook page.
These ads will only be shown on Facebook network which also includes Instagram.
So How to Set Up Facebook Remarketing Ads Campaign?
In the article we will understand step by step, how to set up remarketing for Facebook ads.
So let’s get started!
Step 1
The first important step to start with Facebook remarketing ads is to set up Facebook remarketing pixel. If you have not added Facebook pixel on your website, you won’t be able to remarket uses on Facebook network.
To know about How to Set Up Facebook Pixel – Refer article, Guide To Set Up Facebook Pixel
Step 2
The next step once you have added the Facebook pixel on your website is creating audiences. Audiences is also called as remarketing lists. In order to set up audiences in Facebook, go to audiences under business settings as below
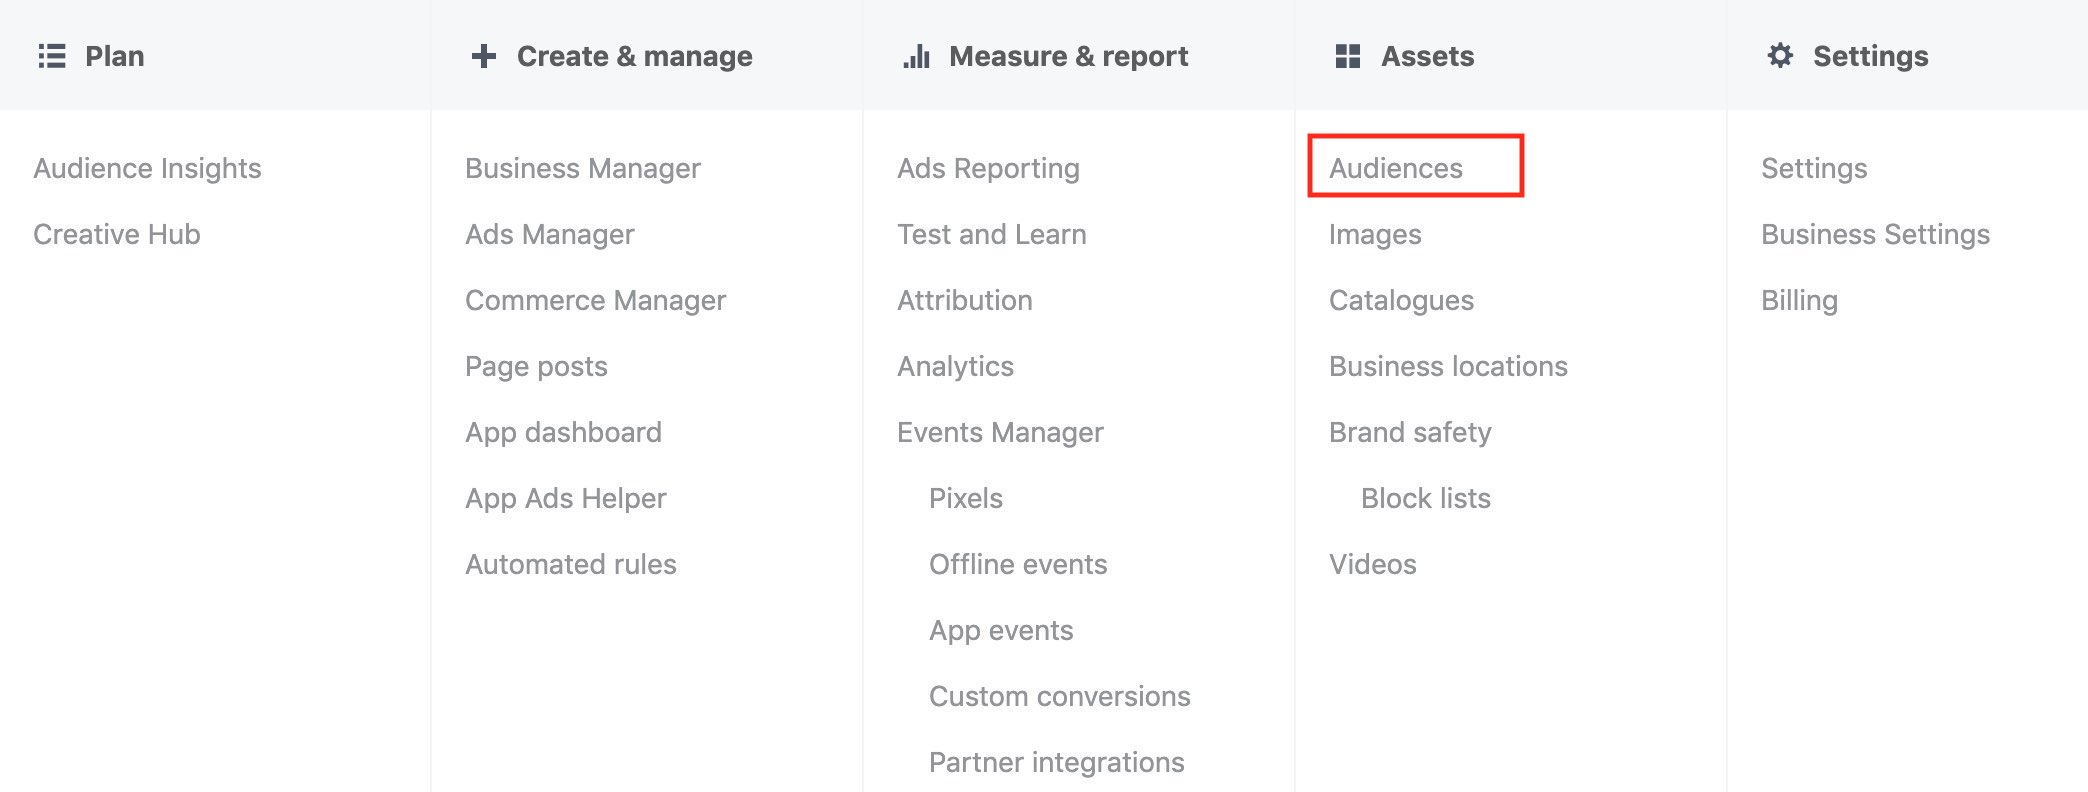
Step 3
Once you click on audiences, you will see an option, create audiences. Under create audience, you have three options as below:
- Custom Audience
- Lookalike Audience
- Saved Audience
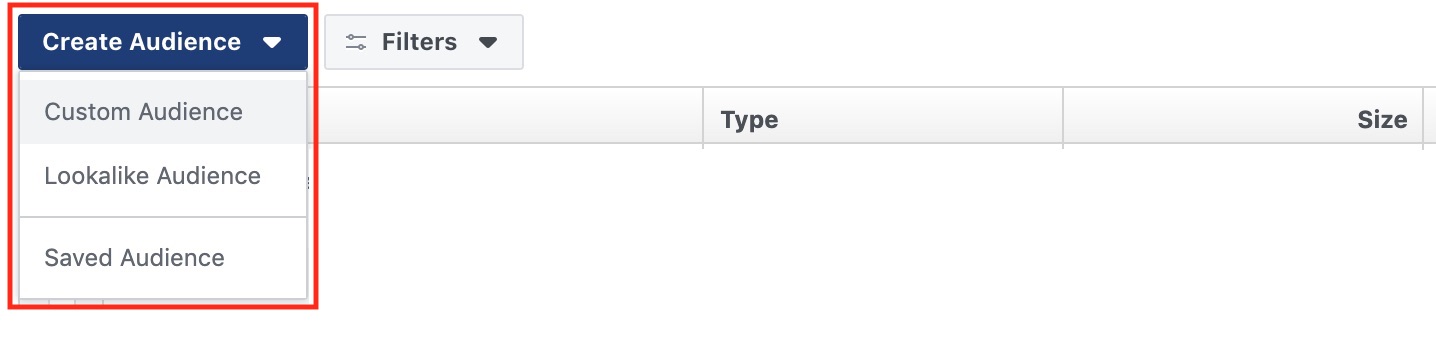
Let’s understand each one of them.
1. Custom Audience
Custom audience allows you to define custom audience list as per your requirement.
In this article I am going to create a custom audience list for the users who have visited my website but have not converted on the website. This will help you to understand how to create custom audience list for your campaigns.
So once you click on custom audience under create audience option, you will see the below screen, from where you need to select a source to create custom audience.
There are 10 different sources to choose from
- Website Traffic
- Customer List
- App Activity
- Offline Activity
- Video
- Instagram Business Profile
- Lead Form
- Events
- Instant Experiences
- Facebook Page
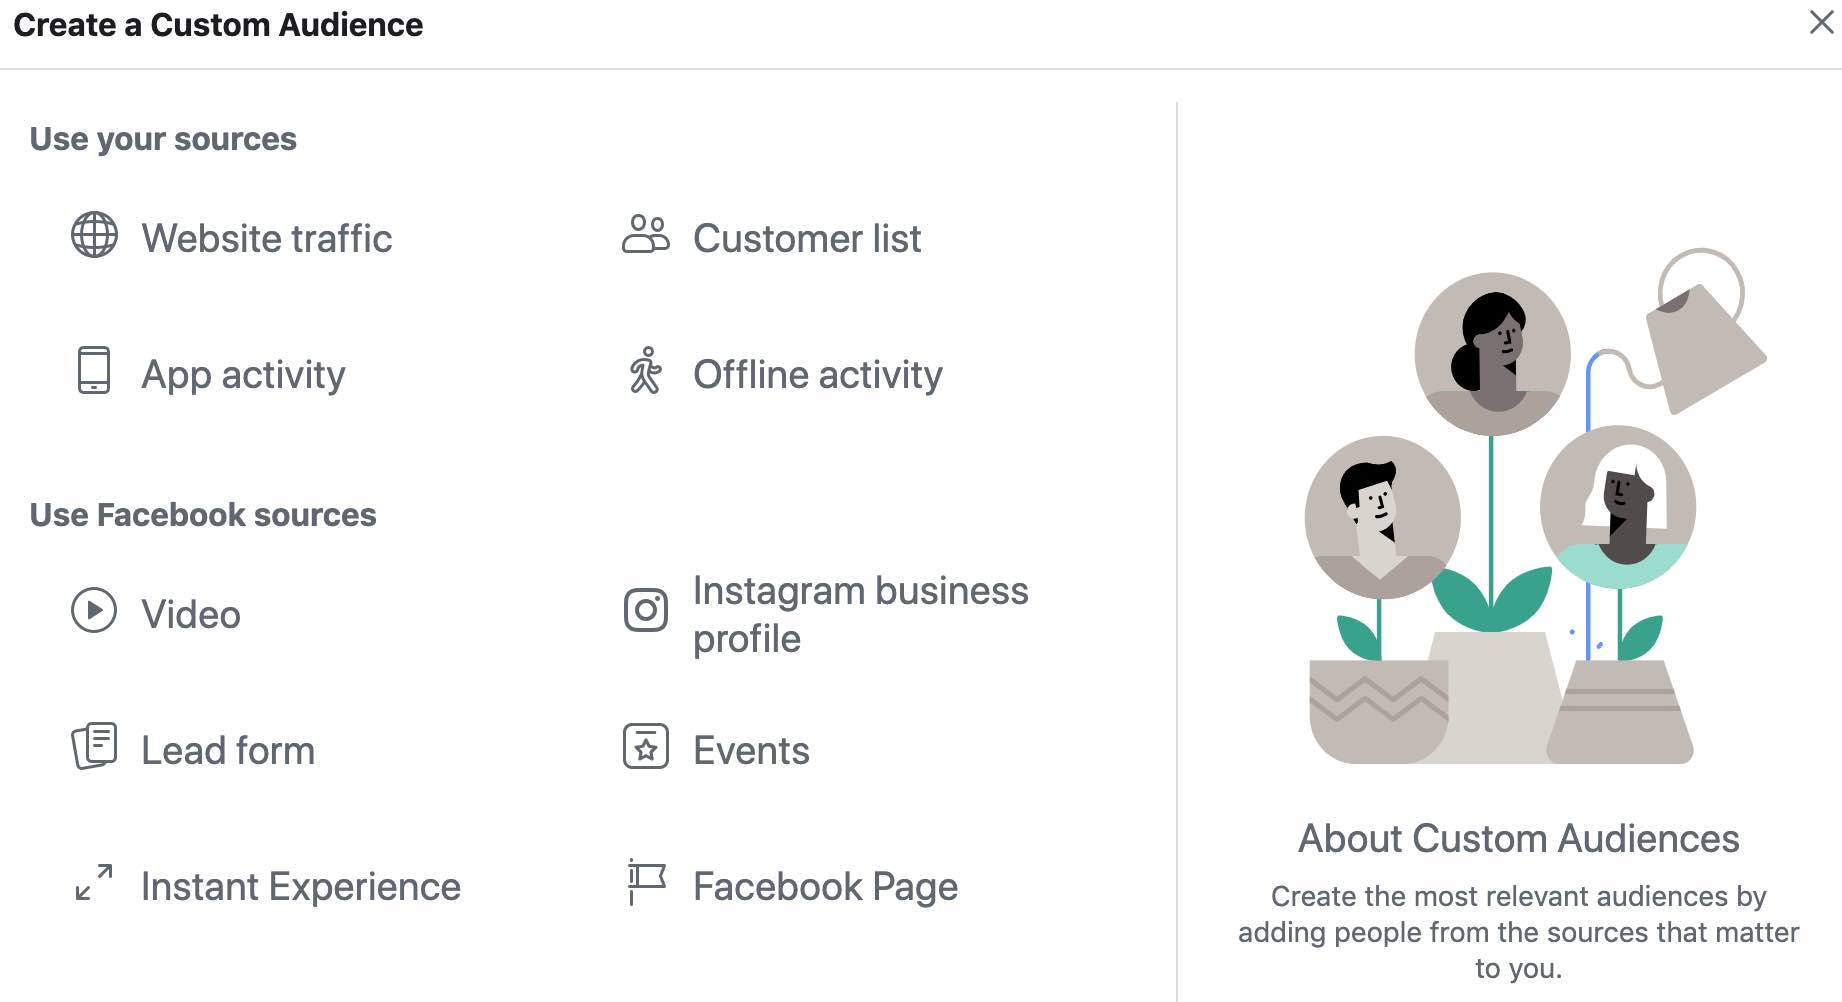
Let’s understand each source!
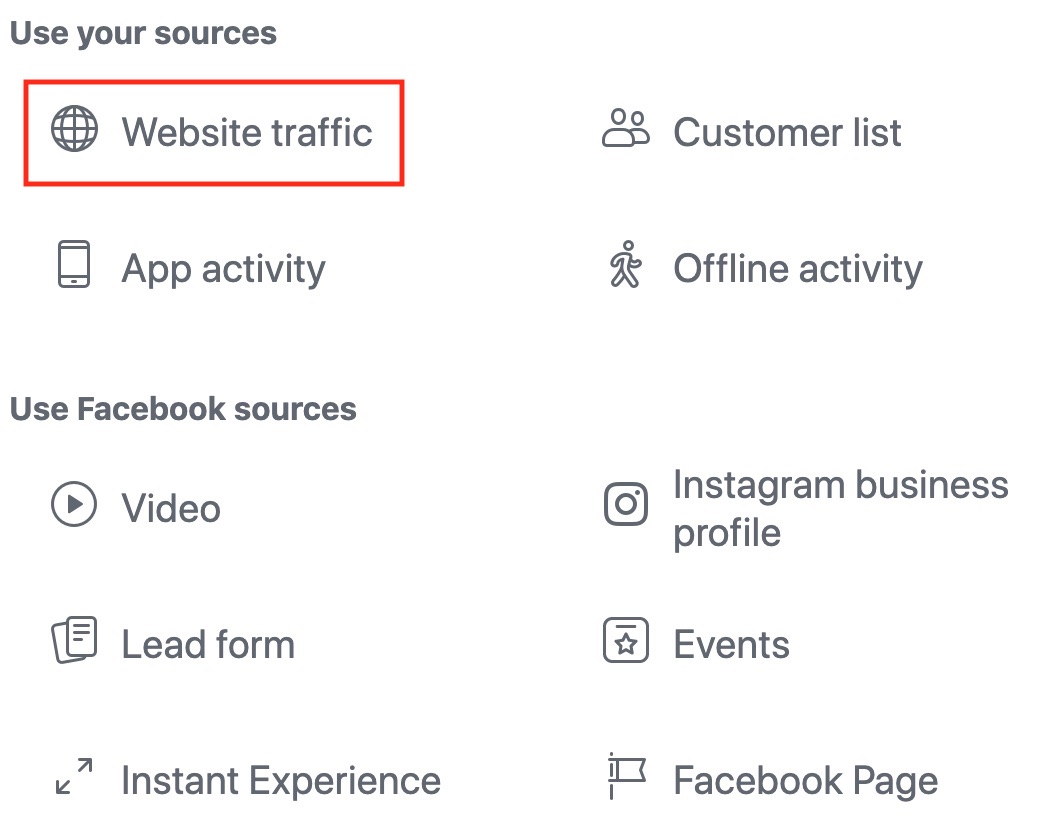
a. Website Traffic
If you go with website traffic source, you will be able to set audiences/remarketing lists of users who have visited your website
This is one of the most commonly used source types, because it allows you to remarket users who have not converted on your website. Businesses who can use website traffic are Real Estate, Education Institutions, Hospitality, Travel, Ecommerce etc.
b. Customer List
With this source type, if you have a database of your customers or prospects, you can upload it on Facebook (including email address and phone number) and remarket them on Facebook, if they have Facebook accounts with the same email address and a contact number.
Customer list source type can be used, if you have collected database from an offline event and then you want to remarket users on Facebook network.
c. App Activity
With this source type, you can remarket users who have visited your mobile application of who have taken a specific action on your mobile app. Eg: purchased a product, added a product to the cart etc.
App activity source type is very useful for businesses who are offering products, services etc through mobile application. Eg. Ecommerce businesses, Mobile games, Learning apps
d. Offline Activity
With this source type, you can remarket users who have interacted with your business in-store, over the phone or by other offline channels.
Businesses who have offline stores can use this effectively by targeting a radius of their store, to advertise on Facebook network.
e. Video
With video source type, you can remarket users who have viewed your video on Facebook or Instagram.
Brands who are creating video content can use this source type effectively to remarket users who have already watched videos of their brand.
f. Instagram Business Profile
In this source type, you can create a list of users who have visited or interacted with Instagram profile or an Instagram ads.
This source type is effective if you are marketing products or services which are into Travel, fashion, lifestyle etc
g. Lead Form
Through this source type, you can remarket users who have clicked on your form or who have not submitted a form or who have opened and submitted a form.
This source type is very effective is you are running lead generation ads on Facebook and you want to remarket your ads to those users who have interacted with your ad but have not filled up the form.
h. Events
With this source type, you can create audiences and remarket users who have interacted with your event page on Facebook.
This source type is useful, if you are promoting an event and you want to target users who have engaged with your event page.
i. Instant Experience
With Instant experience source type, you can create an audience list, who have interacted with your instant experience on Facebook or Instagram profile.
j. Facebook Page
With this source type, you can create an audience list of users who have interacted with your Facebook Page, Facebook posts or who have liked your page.
This source type is very effective, if you are looking to increase engagement of your Facebook page by reaching out to those users who have interacted with your business page. If you are regularly creating impactful content, this is the source type you should go with.
As I want to remarket users who have visited my website and have not converted on my website, I am going with website traffic as the source type.
Once I click website traffic, I can see the below screen. Here I need to define the audience list from the 4 options as below
- All website Visitors
- People who visited specific web pages
- Visitors by time spent
- Page view
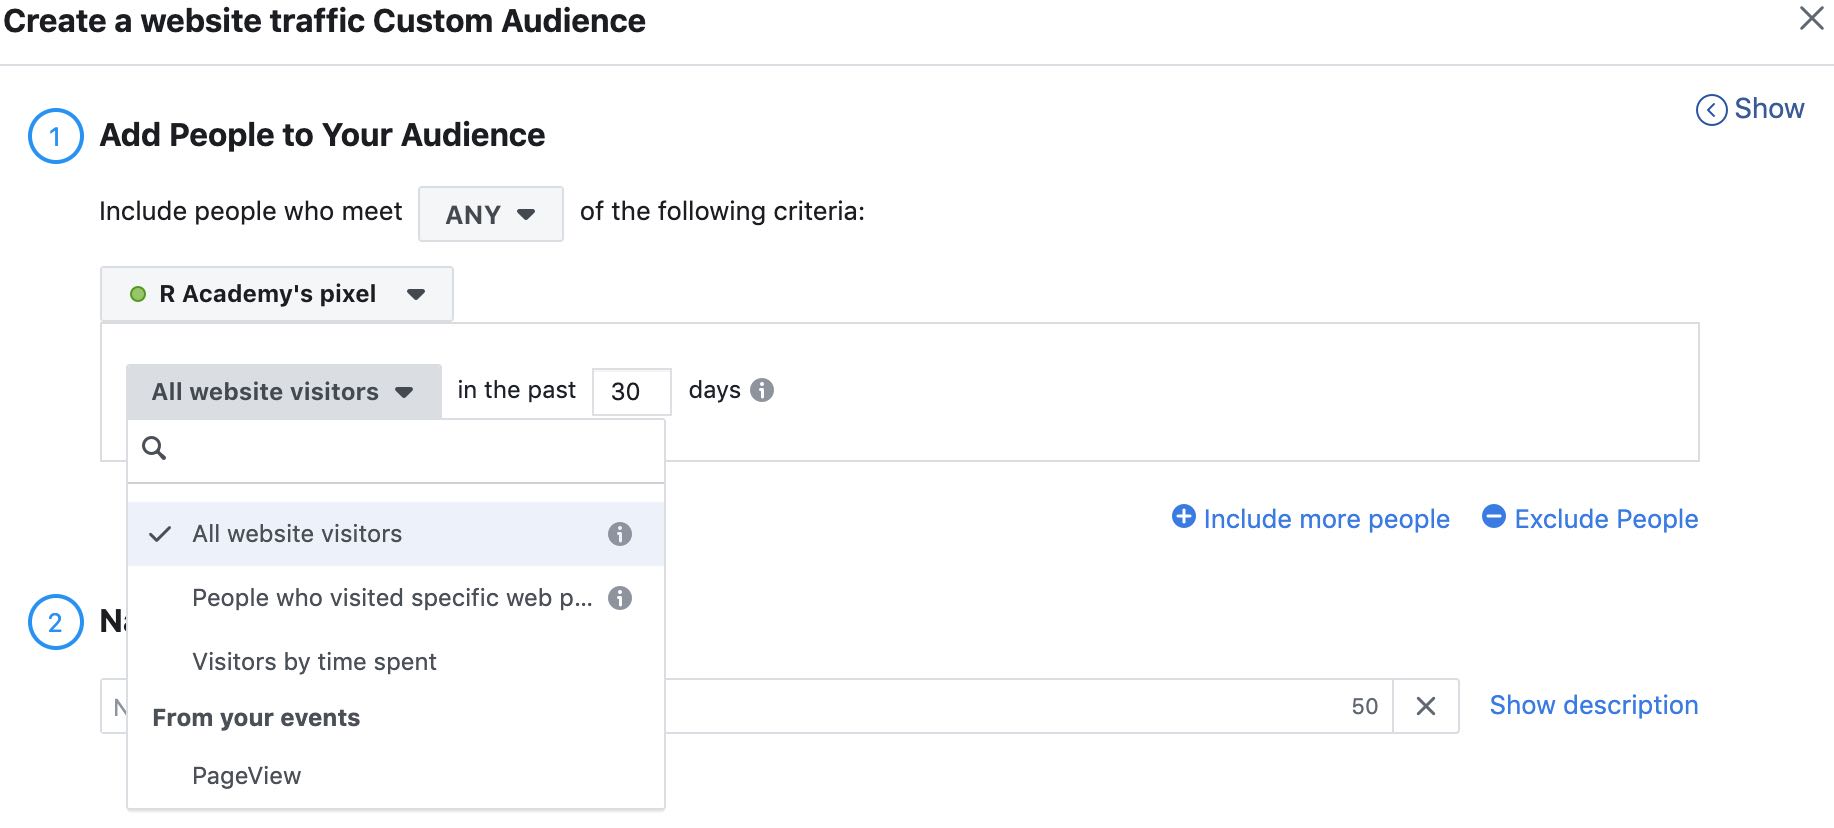
Let’s understand each one!
1. All Website Visitors
If you want to target all uses who have visited your website. You can go ahead with all website visitors option and create an audience list. This will target all users!
2. People Who Visited Specific Web Pages
If you want to target users who have visited specific web pages, you can go ahead with this option and define the pages to create a list.
For my campaign, I am going to go with this audience list, as I want to create a list of users who have visited my website but have not converted on my website. So once I click on this, option, I can see the below screen. You can see there are three options to choose from
Contains – If you go with this option, you can set the URL/s for which you want to create a list, which users visited on your website starting with a specific rule
For Eg: If I enter my URL as www.racademy.in/blog in the contains option, Facebook will add all the users who visited any blog from my website (my blog can have 100 pages, so all users visiting any blog, will be a part of the audience list)
Does Not Contain – In this option, you can add those URL’s which does not contain as specific format of the URL.
Equals – Equals means a specific URL you want to create an audience for.
For Eg: If I define this URL http://www.racademy.in/digital-marketing-courses-in-pune.html in the equals option, then users who visit only this URL will be a part of the audience list.

For my audience list, I am going with equals option, as I want to create a list of users who have visited this page http://www.racademy.in/digital-marketing-courses-in-pune.html and have not filled up the form on the website. So I have defined the the options as below.
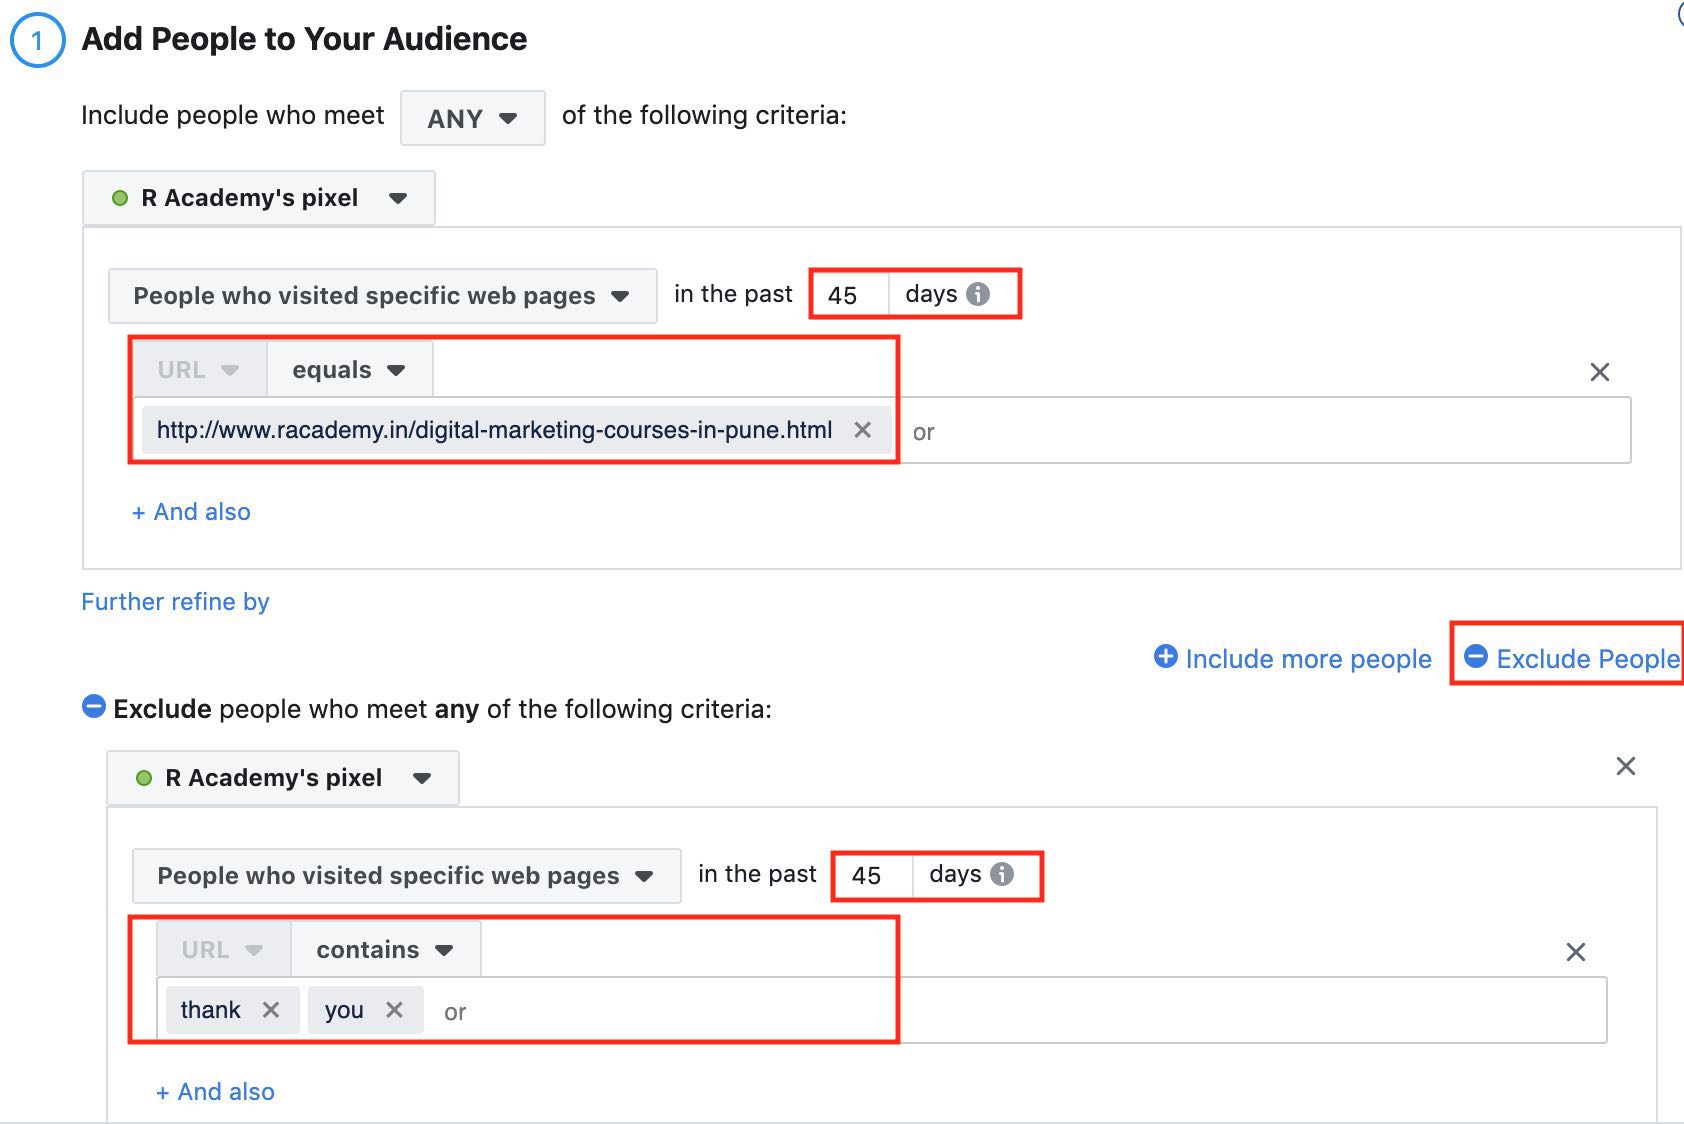
If you notice, I have added an option called as exclude and have added thank you there. This allows me to exclude visitors who have filled up a form on my website.
You can also see that, I have define days as 45 days, this is the duration for which I would like to remarket my users upto. I have defined it 45 because it’s a Digital Marketing course which I am going to remarket, so 45 days is enough for a user to decide whether to go for the course or not. You can also define basis your requirement to remarket users.
The next thing is to define the audience name. I have defined the audience name as below. Once you have defined the audience name, then say create audience.

Once you have clicked create audience, you will see that your audience is created as below. On the right hand side you can also see, it’s says populating, which means that the audience list creation has started.
Always note that in order to user this list for remarketing campaign, you need at least 100 users in your audience list.
3. Visitors By Time Spent
This option allows you to create an audience list by how time visitors have spent on your website. Once you click on visitors by time spent, you will see the below options.
You can then define the percentile and the URLs for which you want to create the audience list by time spent.
I don’t recommend this option, but you have a good content piece on your website and want to remarket users under a specific category with time spent, then you can go with this option.
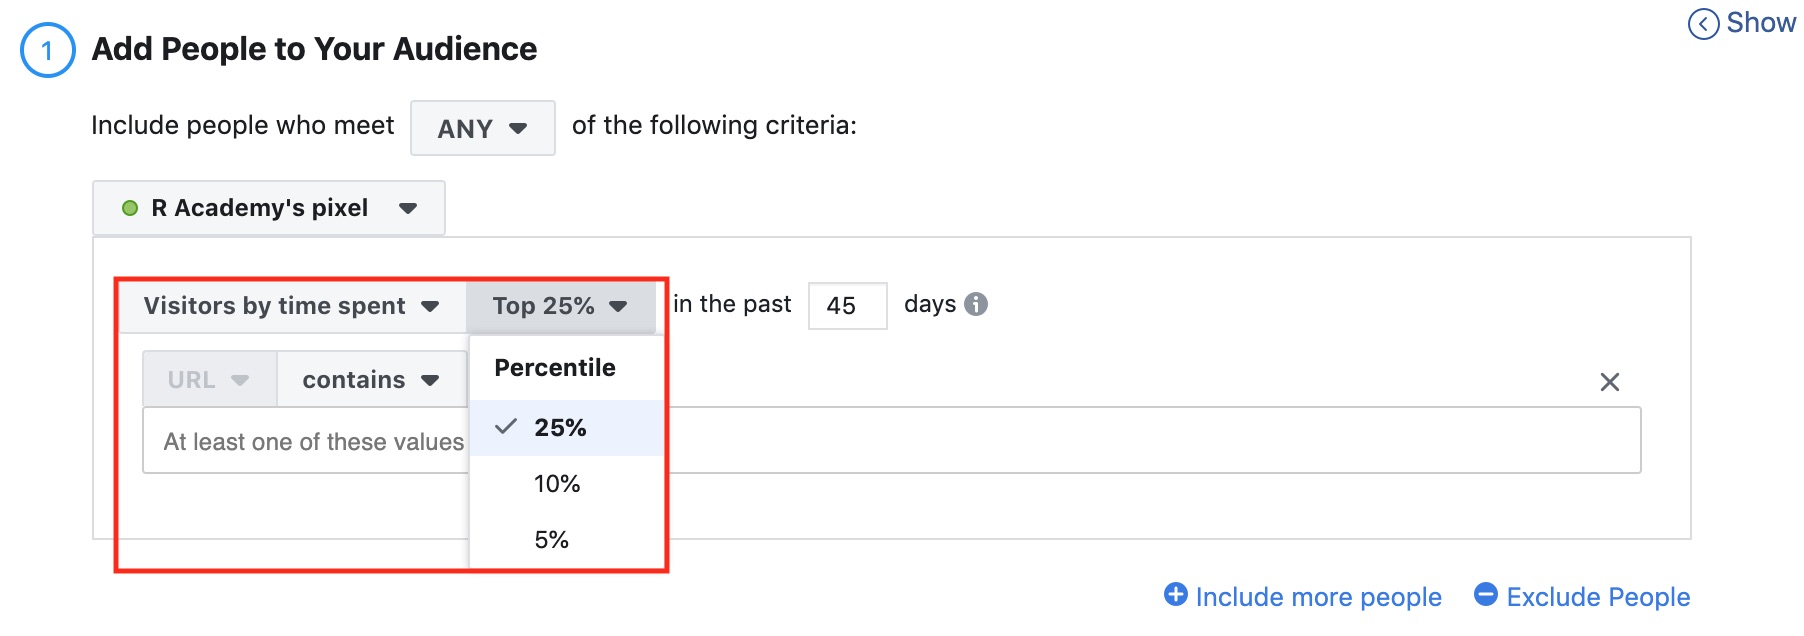
I am not selecting this option as I have already selected, “People who have visited specific web pages” option for list creation
4. Page View
With this option, you can create a list of users who have viewed specific pages by frequency and device type. If you want to remarket users who have visited specific web pages on your website more than 2 times, you can go ahead with this option.
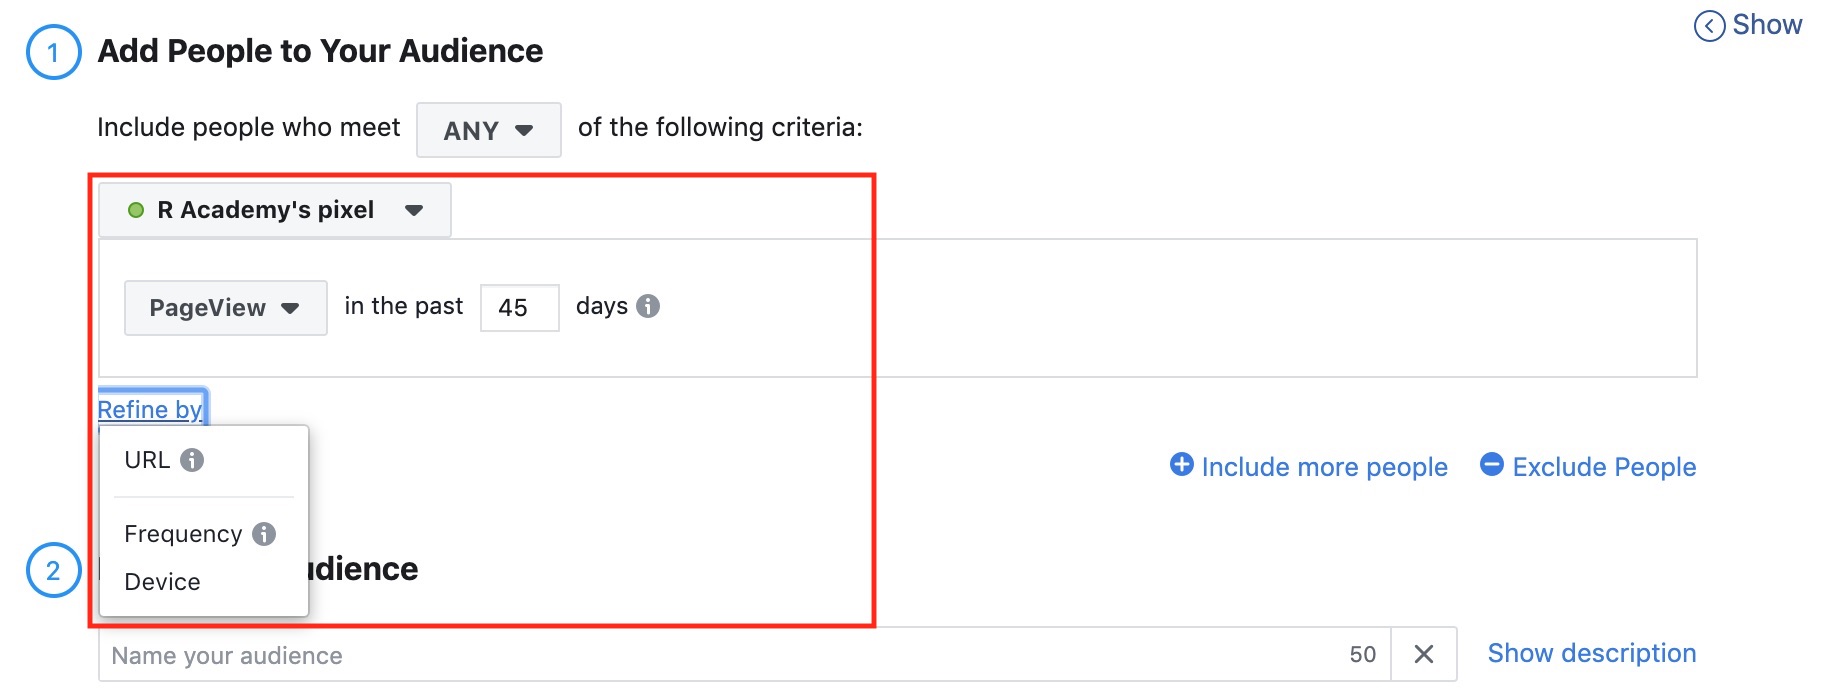
I am skipping page view type of audience list because I have already created my audience list under “People who visited specific pages”.
Now once the audience list is created, the next step is to create a campaign for your audience list and start remarketing.
So let’s create a Facebook remarketing campaign
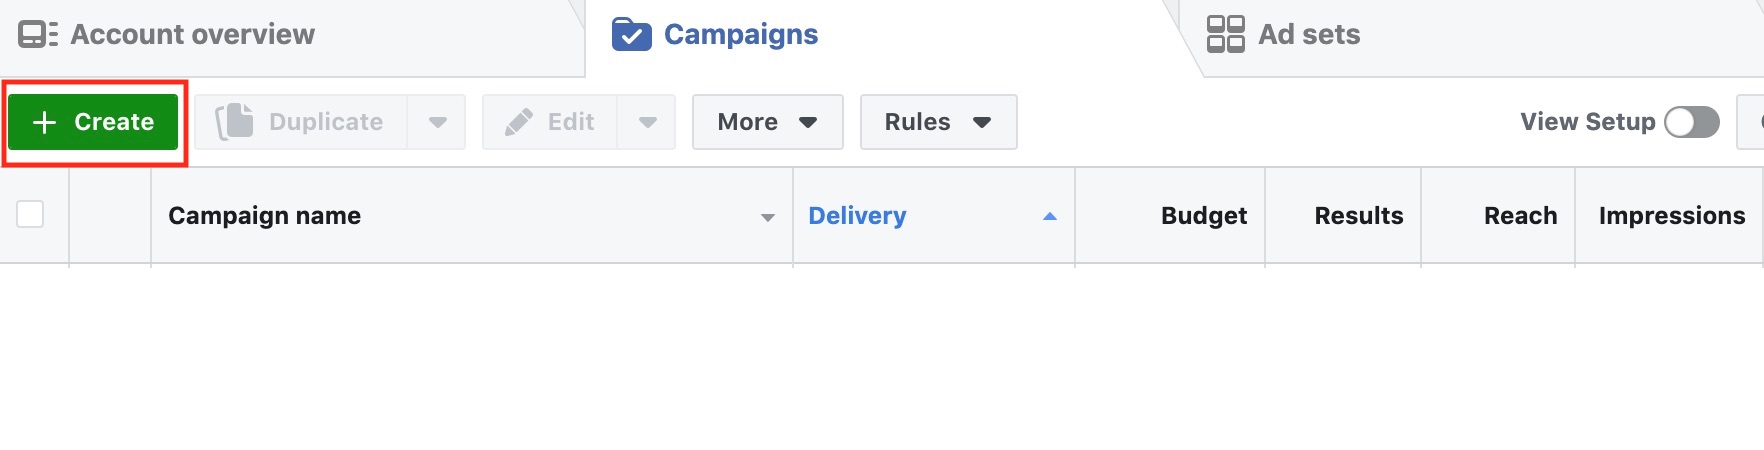
Step 3:
Now go to ads manager under business settings.
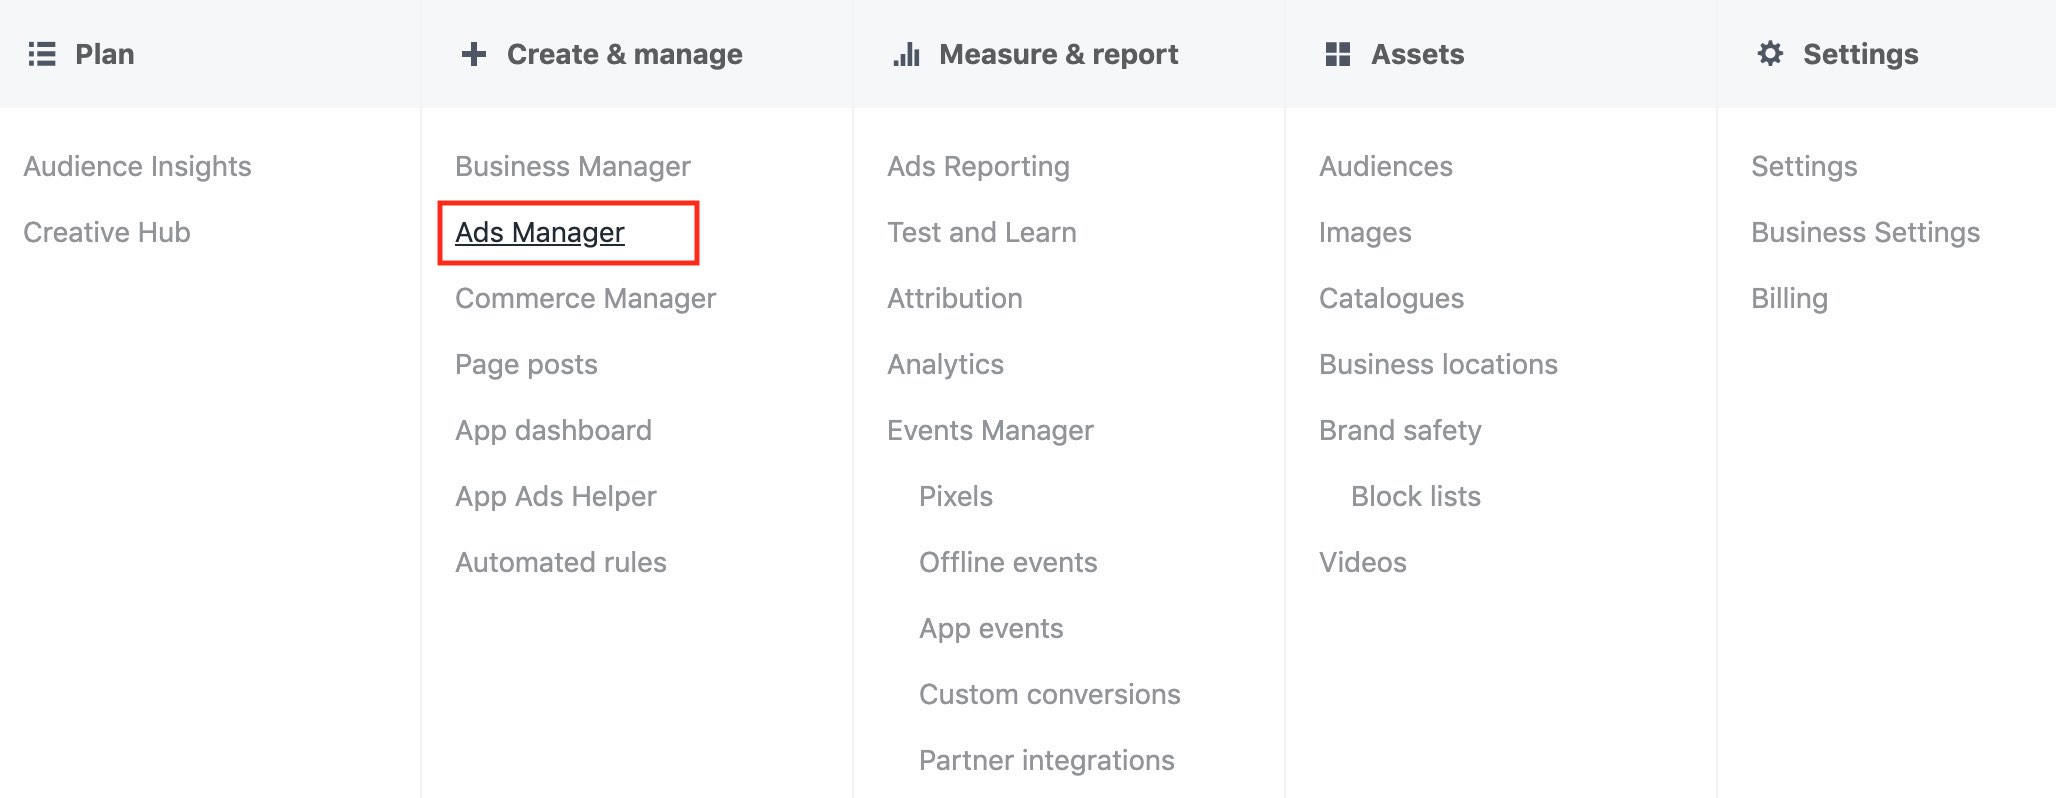
Now say, create campaign
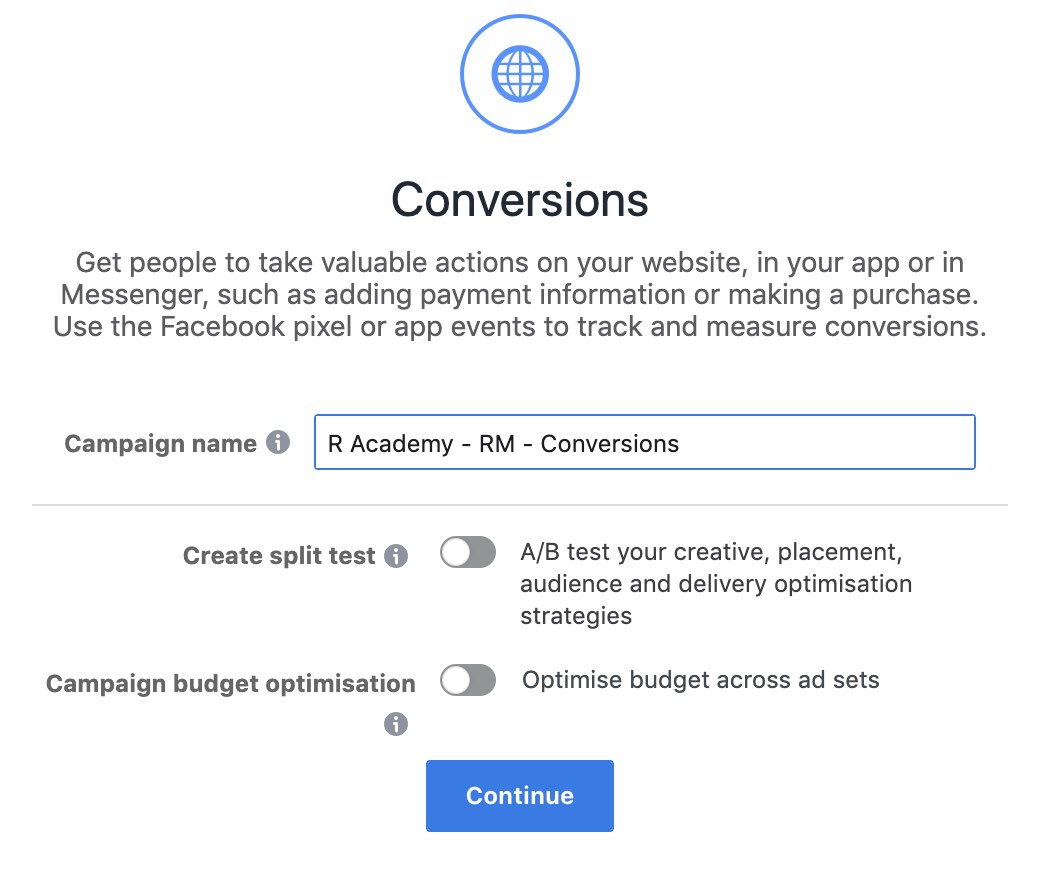
Step 4
Next step is to select the objective for your remarketing campaign. I am selecting conversions, as my objective is to drive conversions from Facebook remarketing ads.

Once you select the objective type, next thing is to define the campaign name. I have defined the campaign name as below.
Step 5
The next step is to define ad set name. I have defined the remarketing campaign ad set name as below.

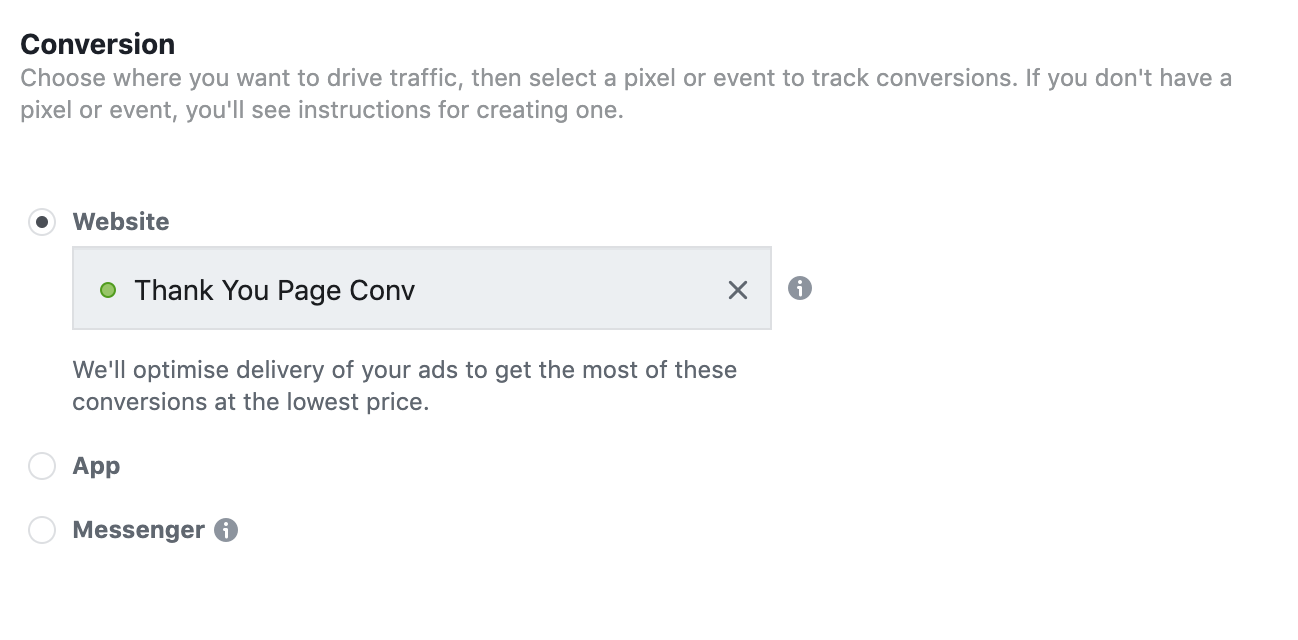
Step 6
The next step is to define conversions. I have defined conversion as below.
In order to understand how to set up Facebook conversion tracking – Refer article, Guide to Set Up Facebook Pixel To Track Conversions
Step 7
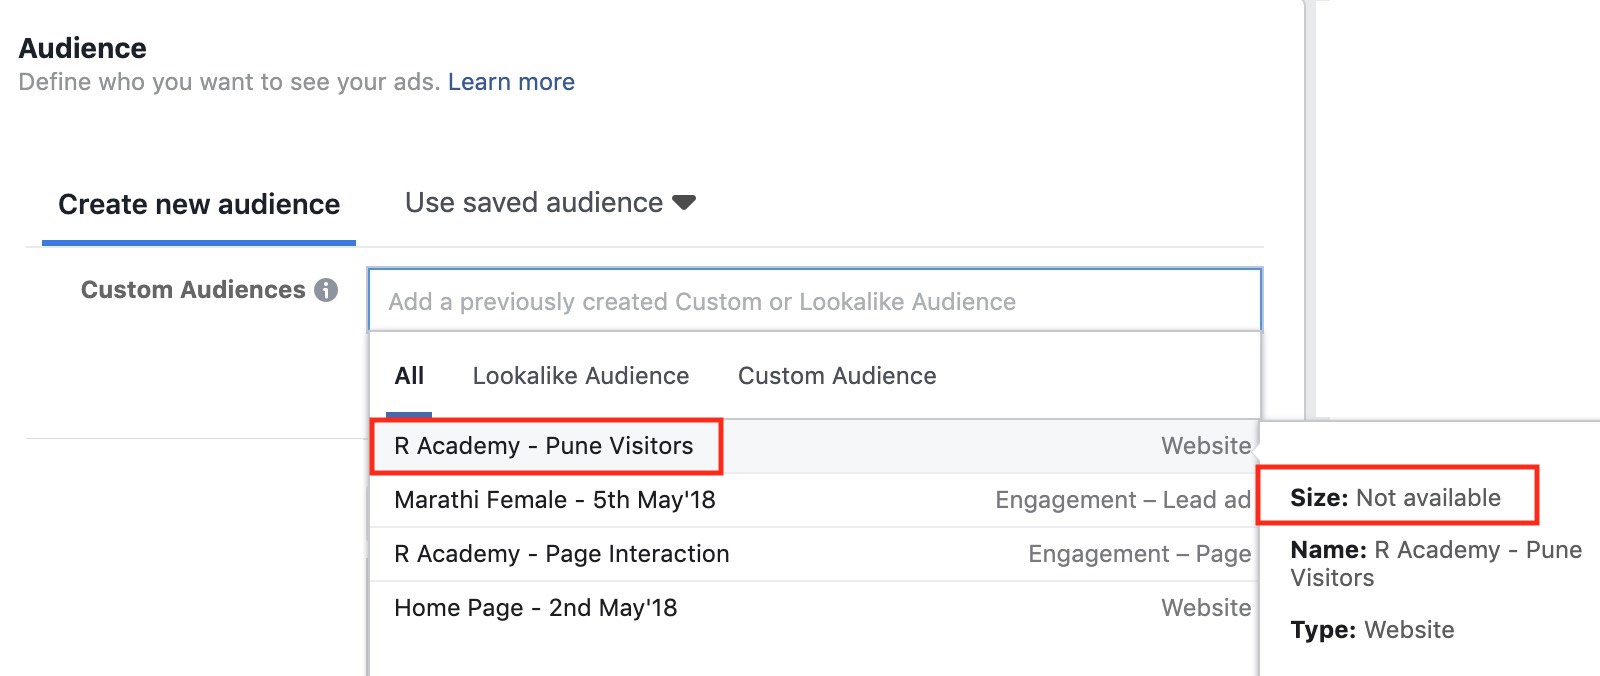
Next step is to define select audience for your Facebook remarketing campaign. I am selecting the audience which I had created in step 2.
You can see the audience, which I have selected, the size is not available. This is because, I have created the audience few minutes back, so it will take at least a day to reach a number of 100 users in the list. Post reaching 100 users, my ads will get live.
Step 8
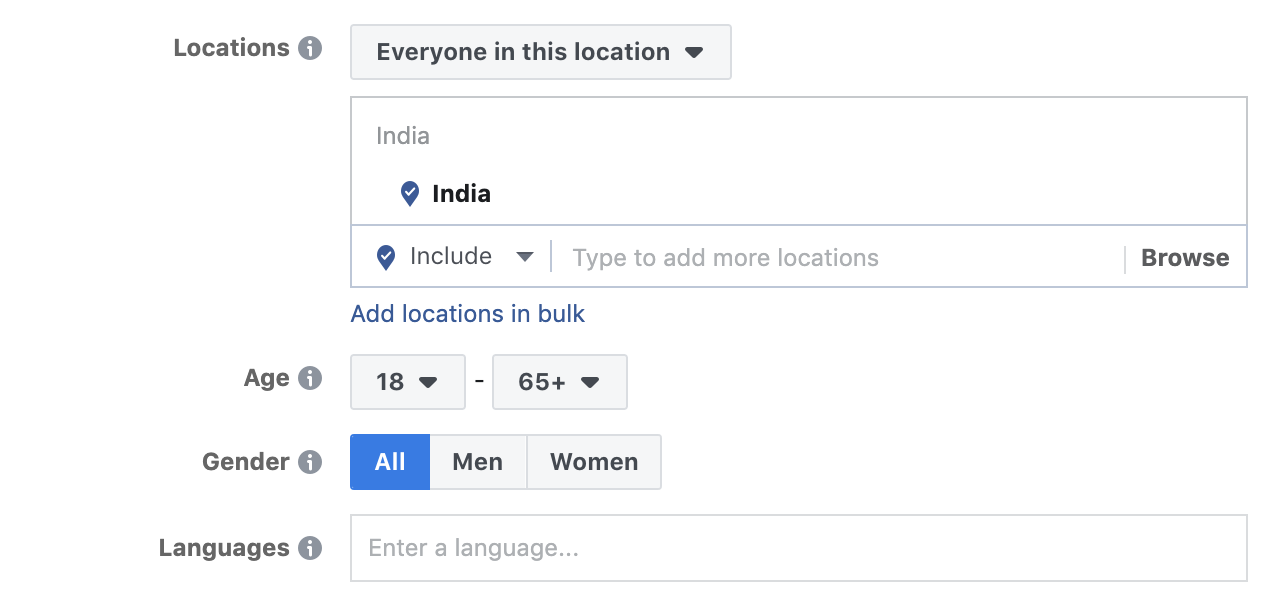
Next thing you will come across in the campaign set up is, selecting the locations. Now as this is a remarketing campaign, you don’t need to select the location, because you want to remarket users who have visited your site, so location can be anything.
You can skip this step without defining the location.
Step 9
Next thing in the campaign process is detailed targeting and connections. You can again skip this step step as you want to remarket people who have visited your website.
No need to define any targeting method here.

Step 10
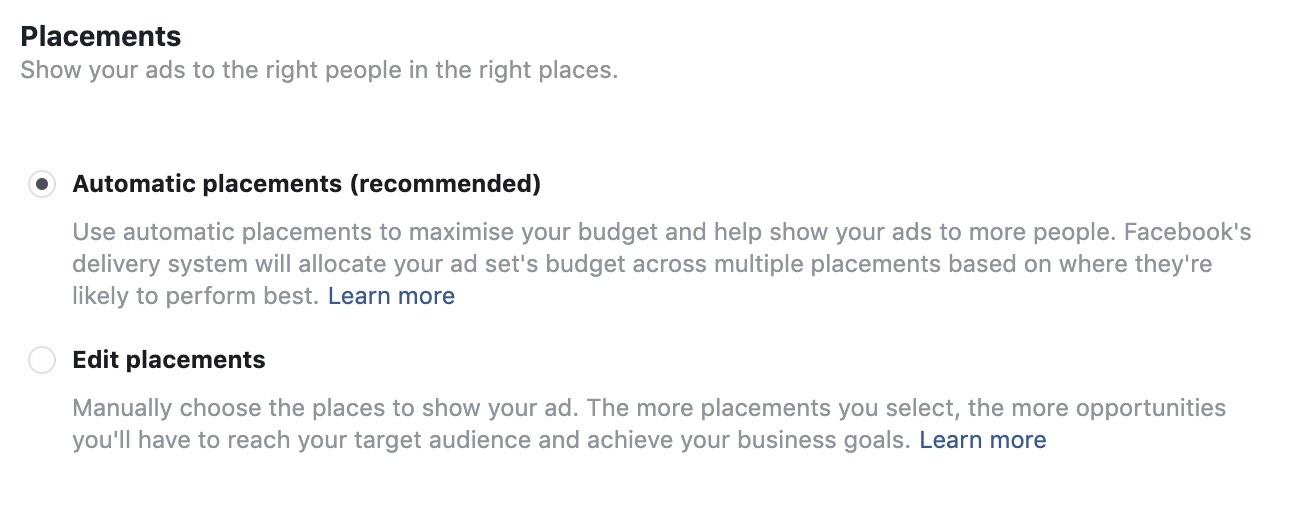
Next step is to define placements for your campaign. I am keeping placements as automatic placements for my campaign, as I want to show ads on all ad inventory types available on Facebook Network.
If you want to choose specific inventory type on Facebook network, you can go with edit placements and select the inventory types.
Step 11
The next step is to define optimisation for ad delivery. There are three options to choose from.
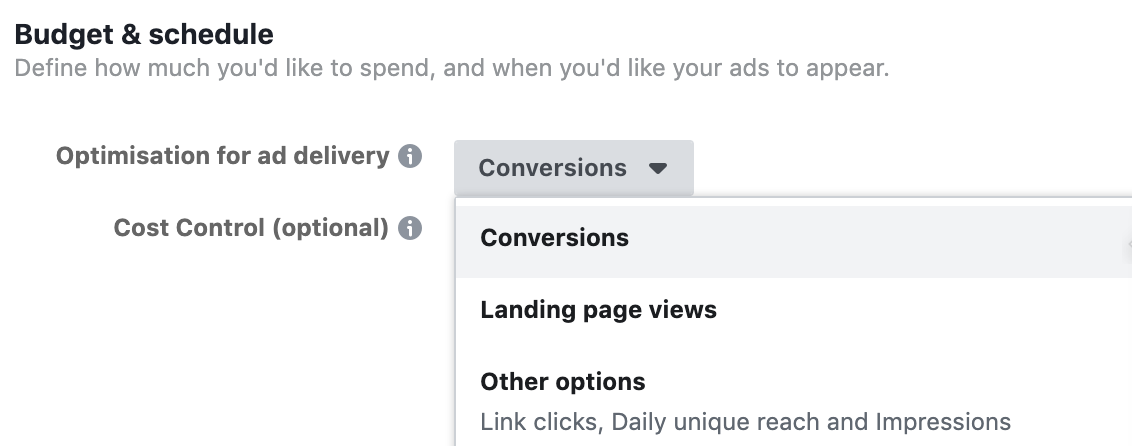
Conversions – If you go with conversions ad delivery type, Facebook will delivery your ads to users to help you get the most conversions.
Landing Page Views – If you select landing page views delivery type, Facebook will delivery your ads to users who are more likely to click your ad and view your landing page.
Other Options – Other options include link clicks, daily unique reach and impressions. If you are looking for traffic, you can go ahead with link clicks.
If you are looking for each, you can go ahead with daily unique reach.
And if you are looking for awareness of brand recall, you can go ahead with impressions.
As my campaign objective is conversions, I am going ahead with conversions
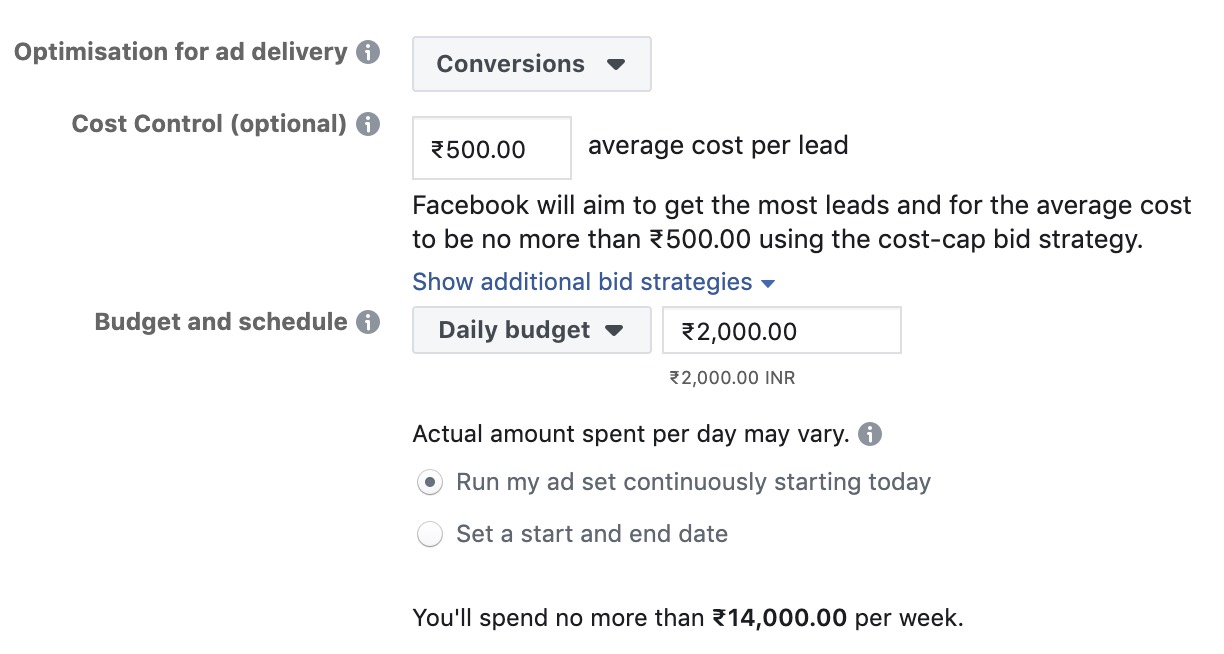
Step 12
The next thing is to define cost control which is optional, but I would recommend you to define it because it will allow you to cap your cost per conversion. You can define minimum of Rs. 500 or $10 (It also depends on the type of business your are marketing). If you are not able to see conversions, then you can increase the cap and monitor post that.
Next thing is to define a daily budget. I have defined the budget as below, you can define basis your budget for remarketing campaign.
PPost that define start date and end date for your campaign. I am not defining any end date as I want to keep the campaign going.
Step 13
The next step is to define conversion window
So What is Conversion Window in Facebook Ads?
Conversion window is the amount of time it takes for a user to complete an action (conversion) post clicking on your ad. Facebook uses data generated during this time frame to optimise your ad delivery.
For Eg: If your conversion window is 7 days, Facebook will optimize by using data from conversion that occurs within 7 days of user interacting with your ad.
I am going with 7 days after clicking as conversion window for my campaign.
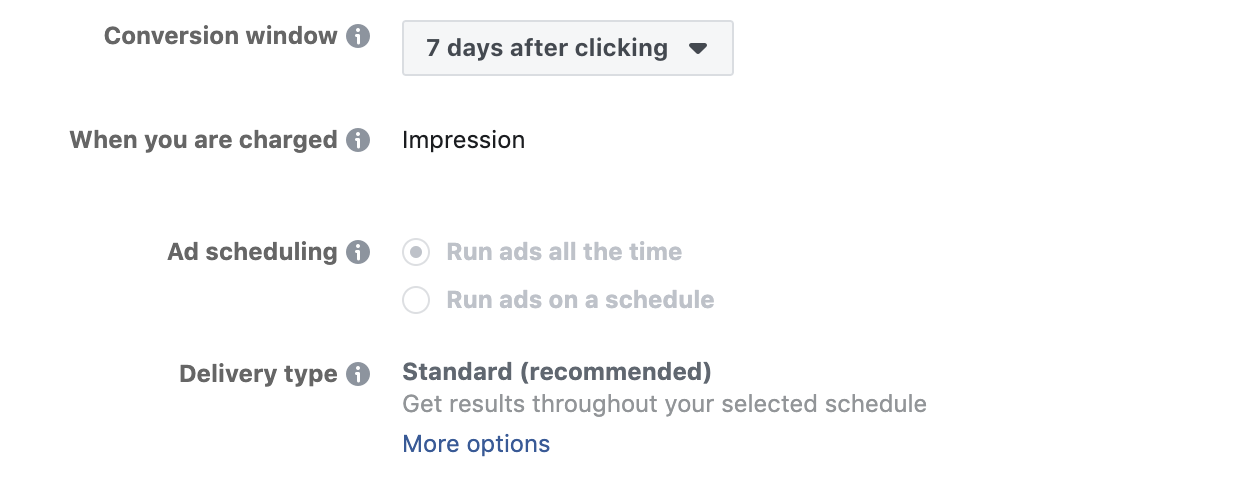
Next option in the process is when you are charged, this is by default defined as impression, but Facebook will also show you cost per click and cost per conversion on your dashboard after charging you for cost per mile.
Post that, you can see ad scheduling option, this option is only available if you have selected lifetime budget in the budget option. If you have selected budget as daily budget, this option is not available.
Delivery type – We will always go with standard delivery type, as we want to rotate ads evenly throughout the day for our remarketing campaign.
Step 14
Next step is to define ad name. I have defined as below for my campaign.

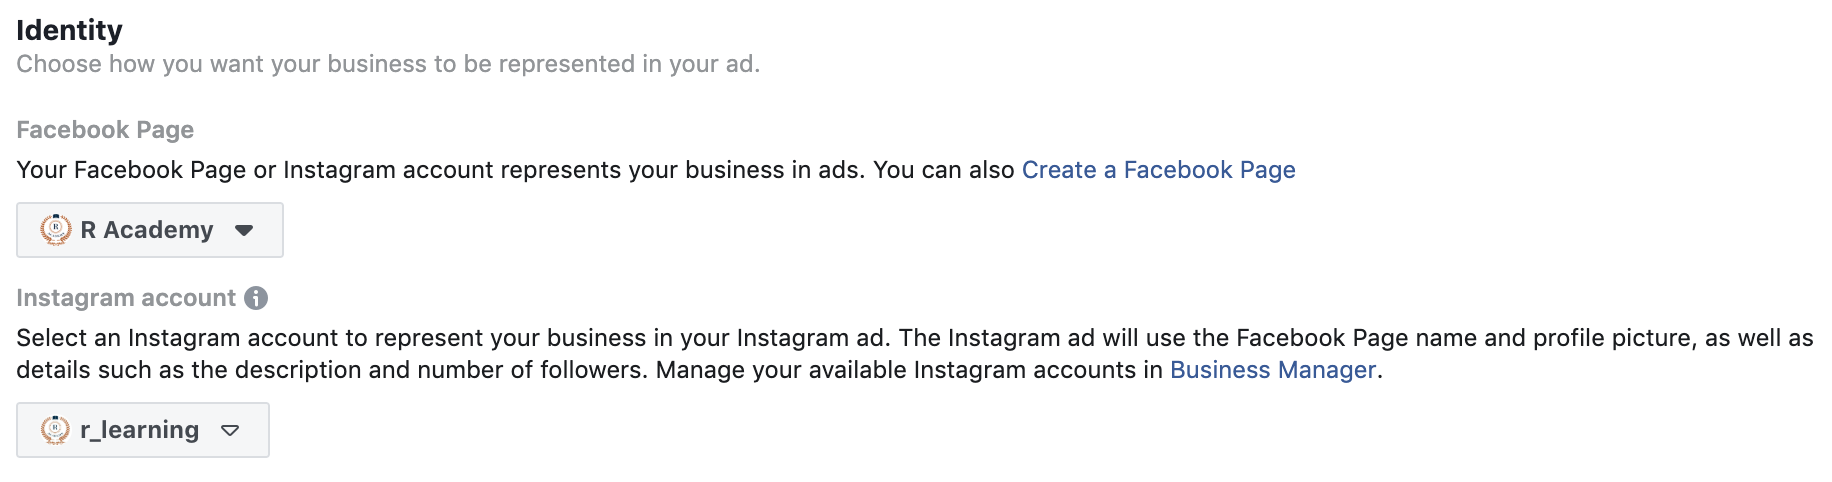
Step 15
Next step is to define the Facebook page and Instagram profile. I have defined as below, you can similarly define your page and profile.
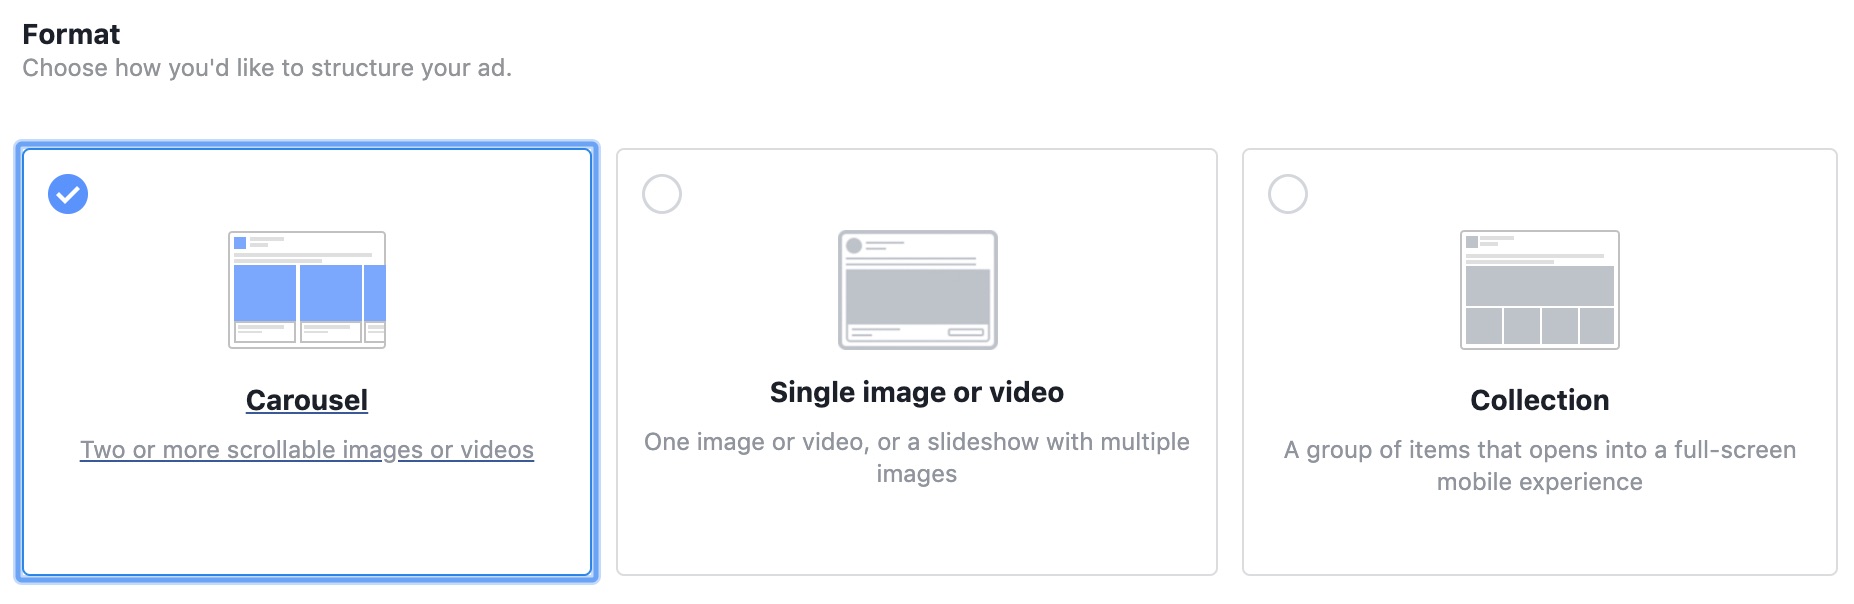
Step 16
The next step is to define ad format for your remarketing campaign. I am selecting Facebook carousel ads for my campaign, so that I can show multiple creatives in a single ad copy.
Once you have selected the format, you need to define the ad copy. I have defined the ad copy as below with text, headline, destination url and call to action.
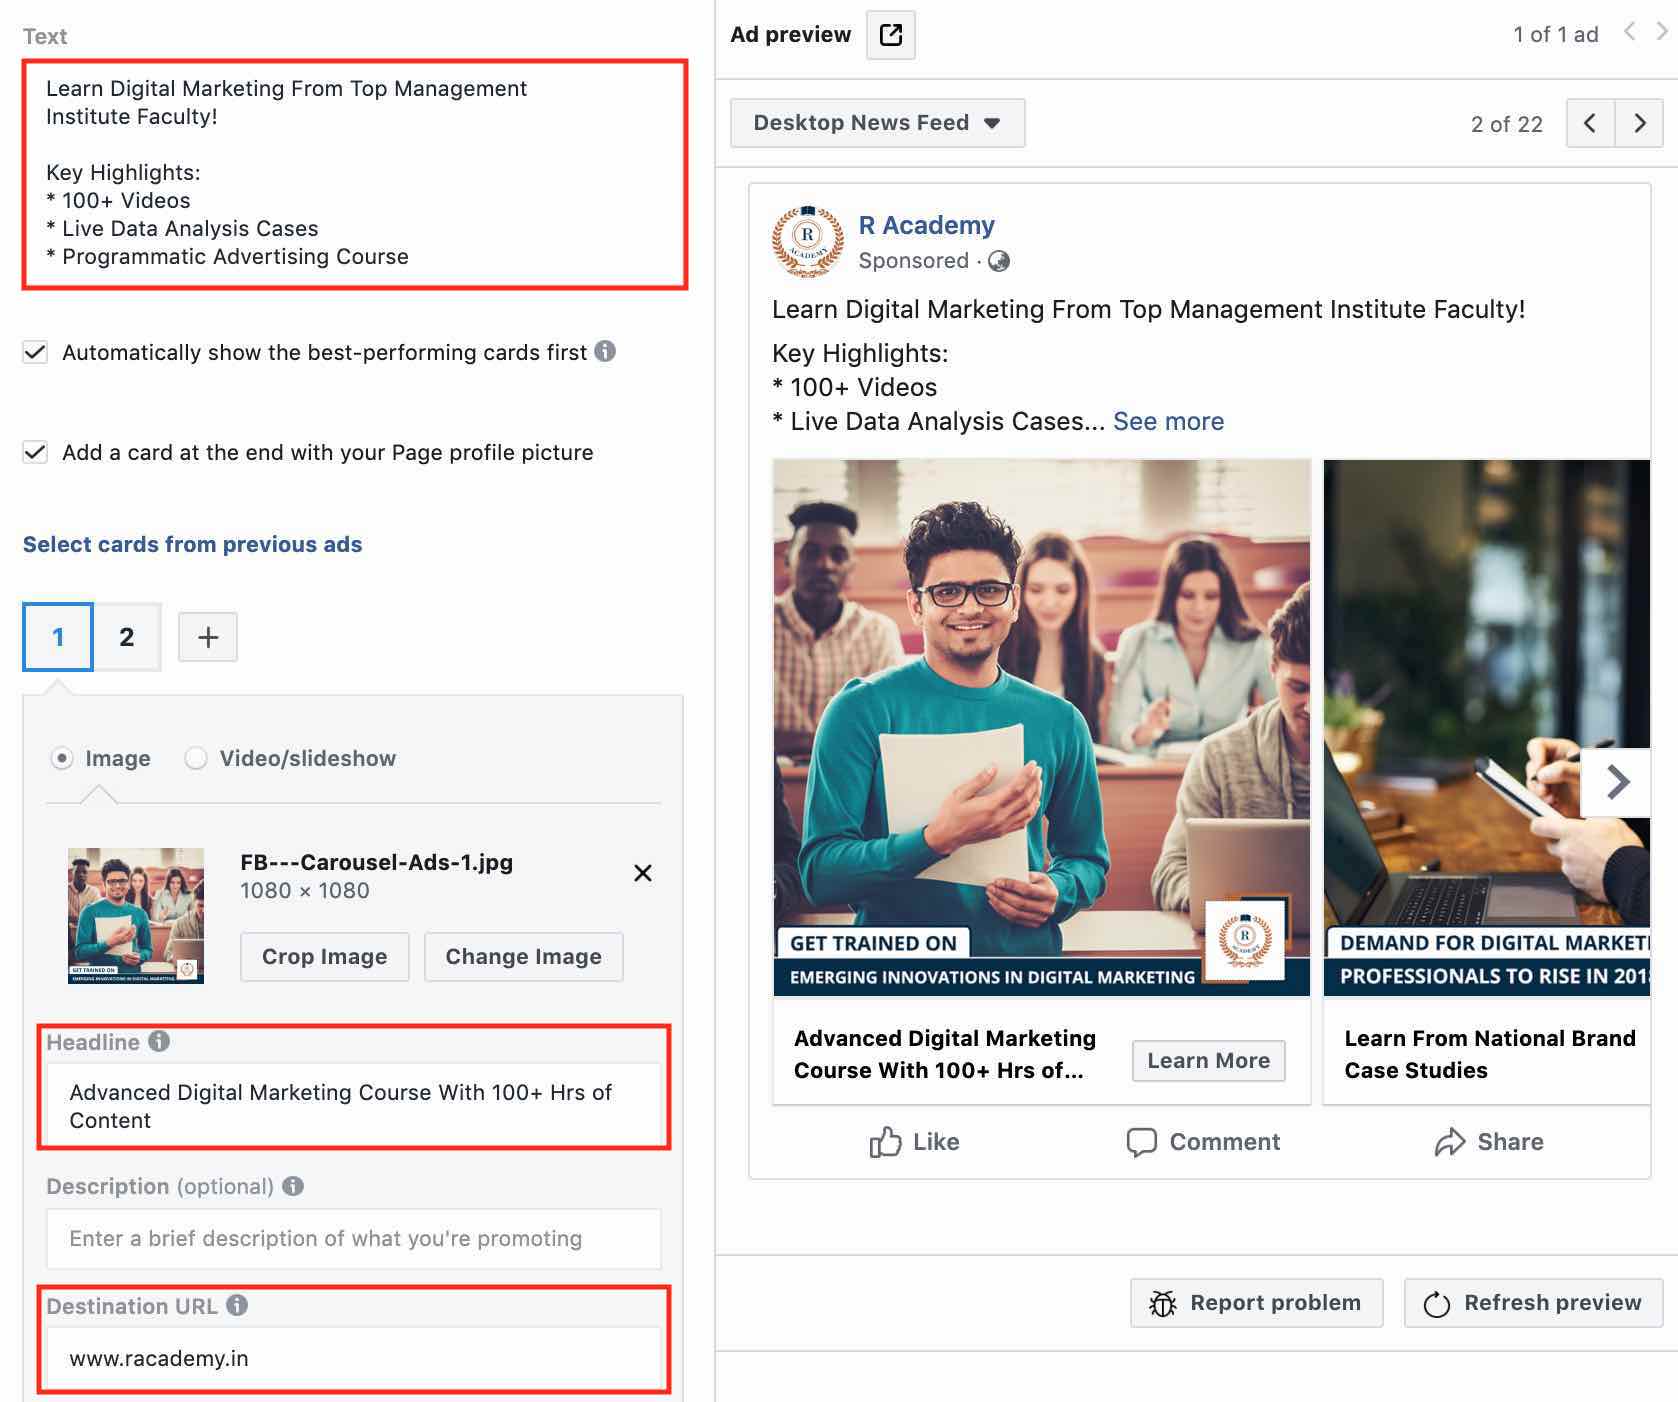
Step 17
Next step is to check the pixel option. If the pixel option is in green color, it means the pixel has been set up properly, if it’s in red color, then you need to re-check the pixel set up.
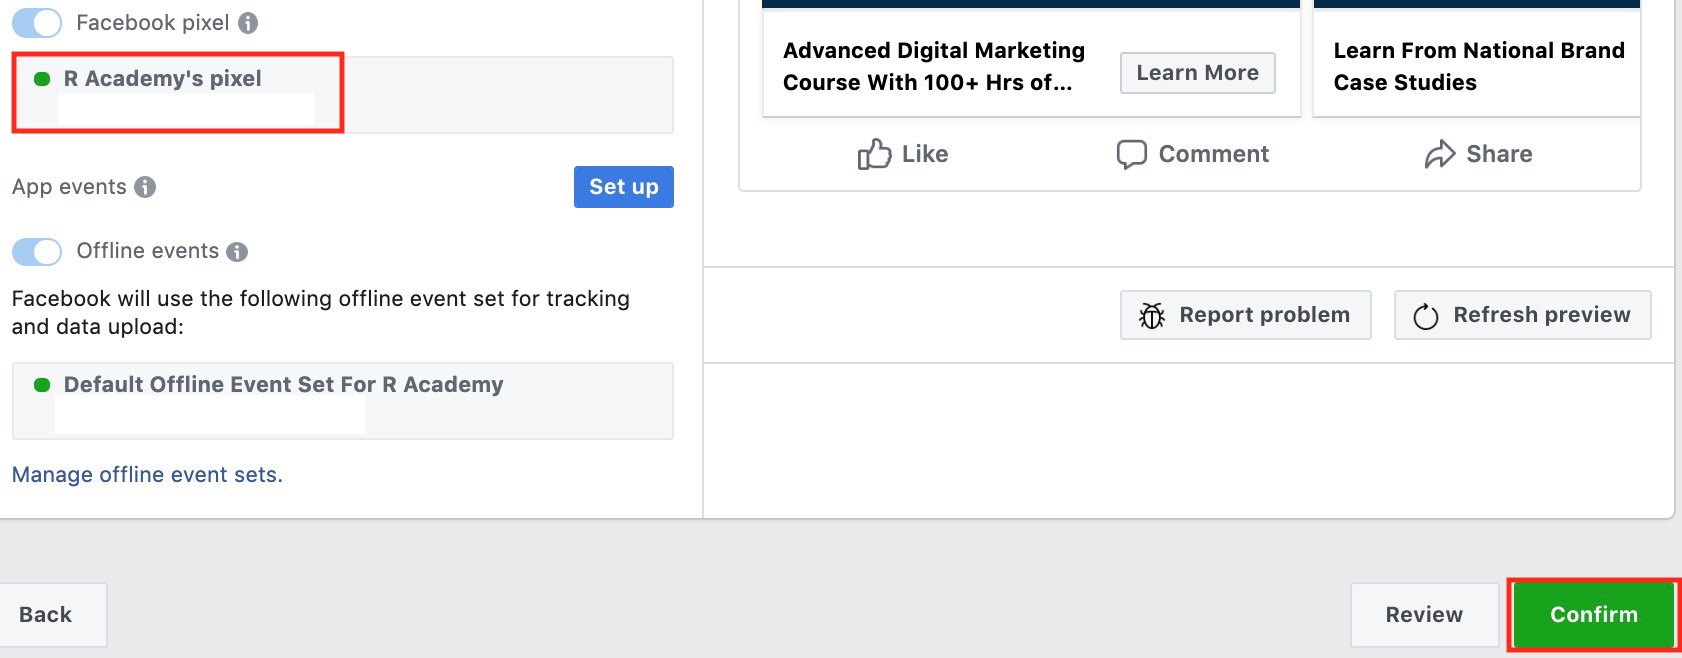
Lastly, click the green button and say confirm. You Facebook remarketing campaign is ready and will go live once the campaign is approved by Facebook.
Conclusion
If you are advertising regularly on Facebook, you should keep the remarketing ads active all the time because the users who came to your website were interested in your products or services. You can try multiple creatives and headlines to your remarketing audience to engage them and convert them effectively.
Related Articles: